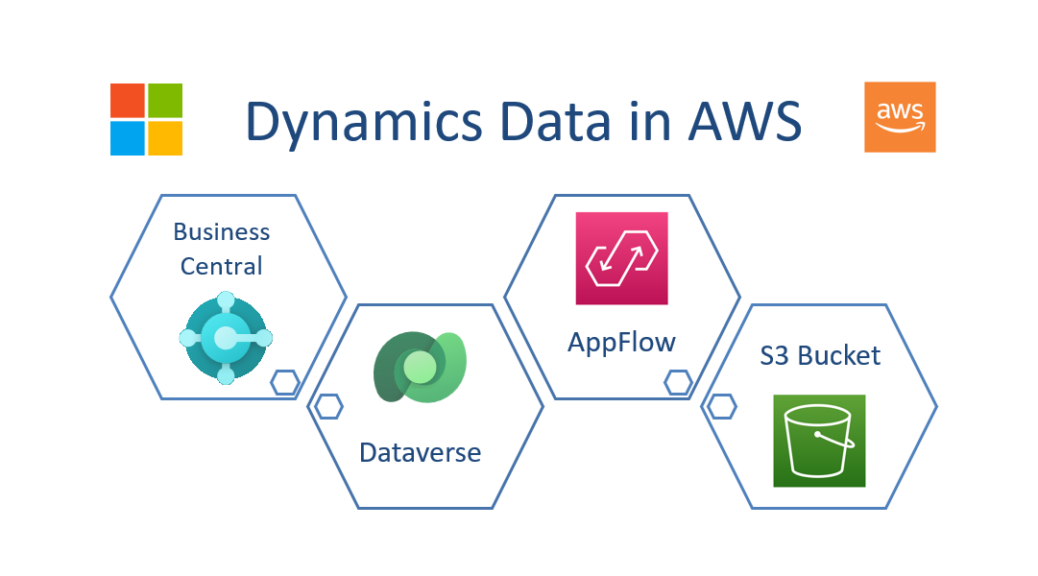
Analyse your Dynamics Data in AWS
In this post, I’ll show you how you can use AWS Cloud to analyze your Dynamics data. As you may know, Dynamics data captures important information about your customer interactions, sales, and other key business processes. Furthermore, analyzing this data can provide valuable insights into operational efficiency, customer behavior, and business performance.
Before diving into how to bring Dynamics data into AWS, it’s important to understand why you might want to do so. After all, Microsoft already offers tools like Azure Synapse and Power BI for analyzing Dynamics data, so why bother with AWS?
One reason to bring Dynamics data into AWS is if your company mainly uses AWS for data analytics. This way, you can integrate your Dynamics data into your existing infrastructure, which can save time and benefit from the scalability and security of AWS. By doing this, you can gain insights into your business processes and make data-driven decisions without having to change your entire cloud setup.
But there are still some challenges. Firstly, my Dynamics data can be large and complex. Secondly, I must access my Dynamics data from AWS. Finally, I want to automate this in AWS.
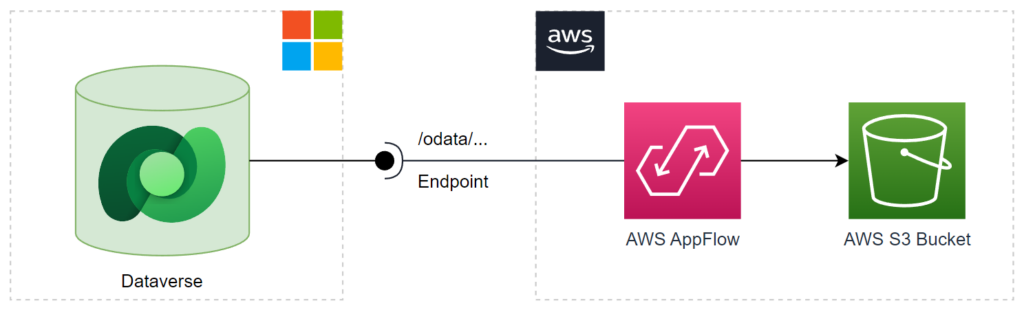
Amazon AppFlow
Amazon AppFlow can be an answers to my problems. This is because, Amazon AppFlow are automated bi-directional data flows between SaaS applications and AWS services. In other words, I can use an Amazon AppFlow to transfer data between my Dataverse tables and an AWS S3 bucket, for example.
Amazon AppFlow Connectors for Microsoft
An AWS AppFlow provide out-of-the-box 3 connectors, which works with Microsoft. In detail, I can setup a connection to Microsoft Dynamics 365 (Dataverse), Microsoft SharePoint Online, and Microsoft Teams:
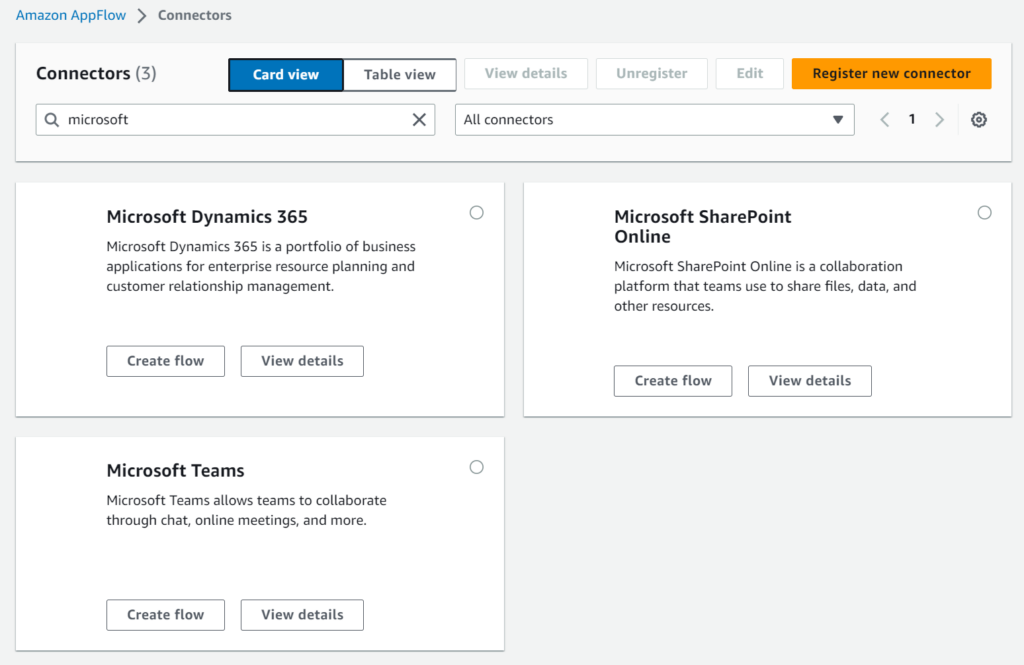
I know the Microsoft Dynamics 365 connector is the right one for my example.
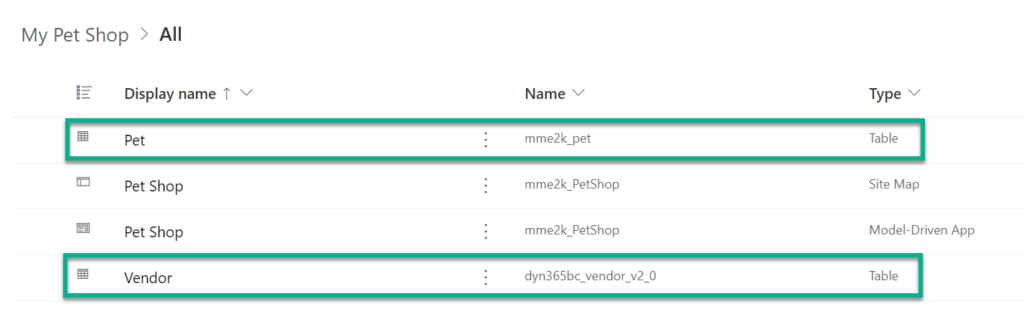
My Example Solution in Dataverse
Let’s imagine, I have a Dataverse solution “Pet-Shop”. This solution contains a table Pet. Furthermore, I have added a synthetic relation to my virtual table Vendor from Microsoft Dynamics 365 Business Central:
In detail, my tabe Pet contains these columns:
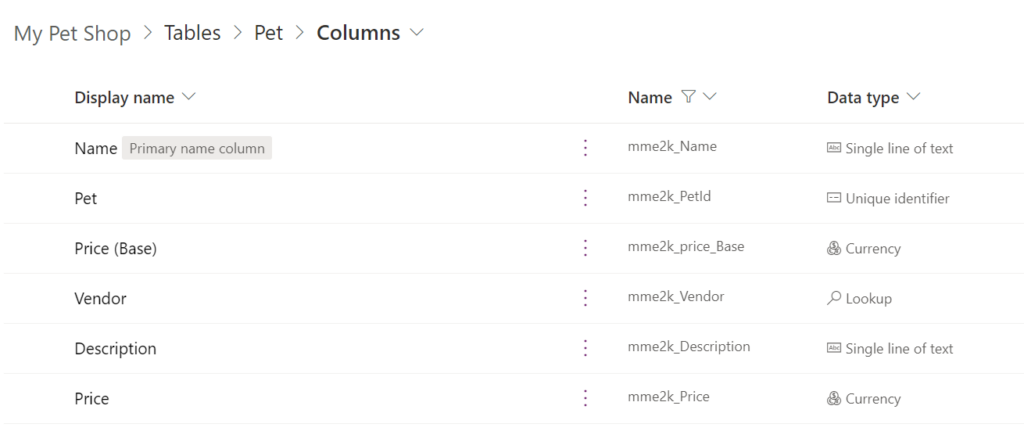
As you can see, I have included into my Dynamics solution a reference to my virtual table from Business Central. In other words, table Pet uses a Lookup field (a synthetic reference) to virtual table Vendor. My demo database schema is this:

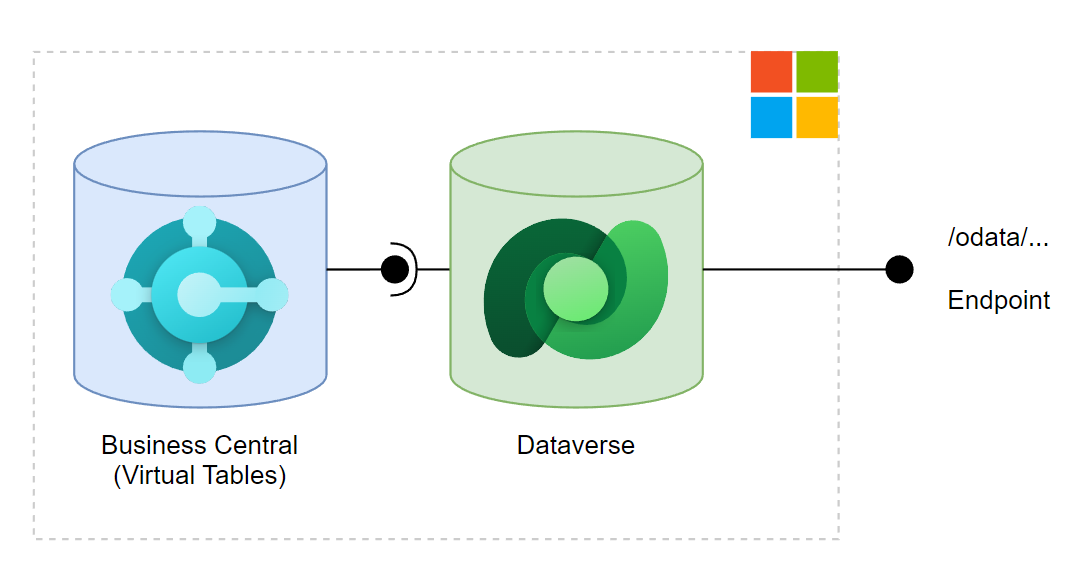
Both tables are available as entities at my Dataverse instance. This means, I can access the data of both entities from the Dynamics 365 REST endpoint in AWS:
Here are my example data. I have 2 records in table Pet, which contains a synthetic reference to my virtual Business Central table Vendor:

Dynamics 365 Endpoints
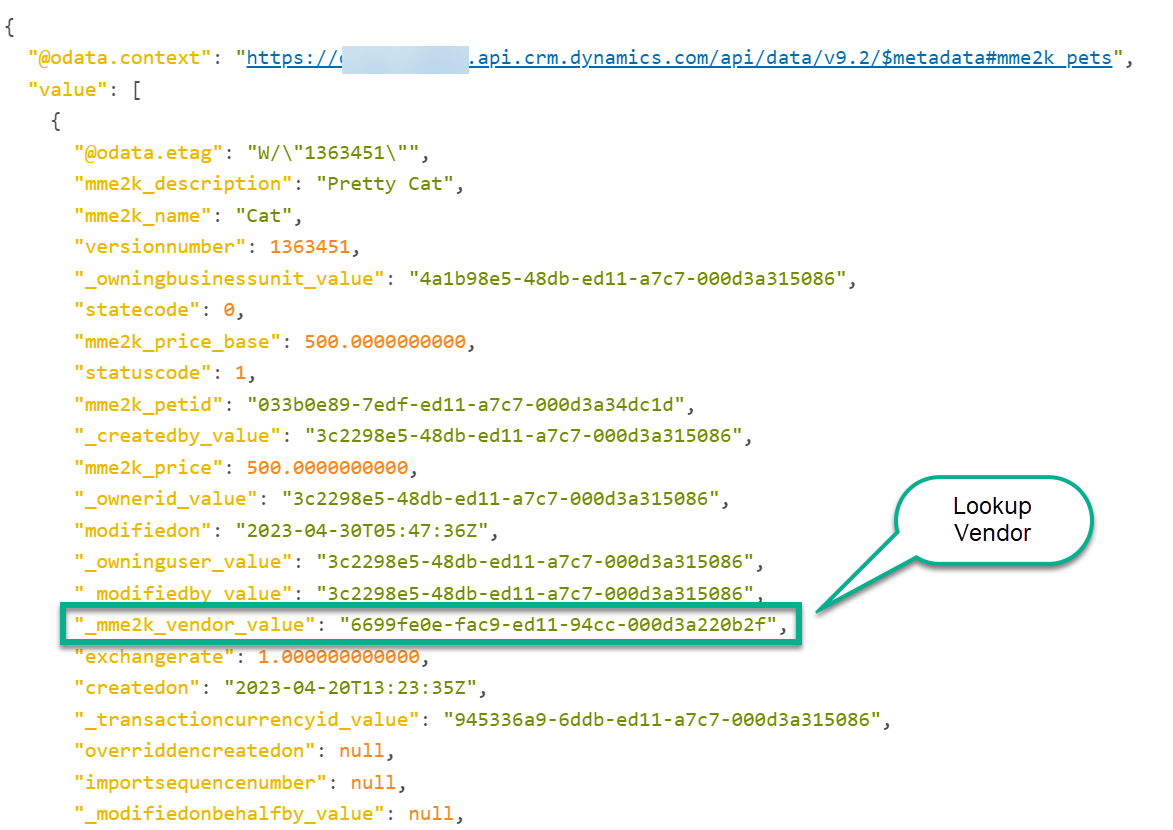
Let’s check quickly my Dynamics 365 endpoint and see, that all information are available for AWS. I’ll start with my Dataverse table Pet. The entity name is mme2k_pets and my respective HTTP call this:
GET https://{environment}.api.crm.dynamics.com/api/data/v9.2/mme2k_pets
Authorization: Bearer eyJ0eXAiOiJKV1...
My result contains all information of my table including the lookup field for my Vendor. You see also that my vendor id is stored in _mme2k_vendor_value:
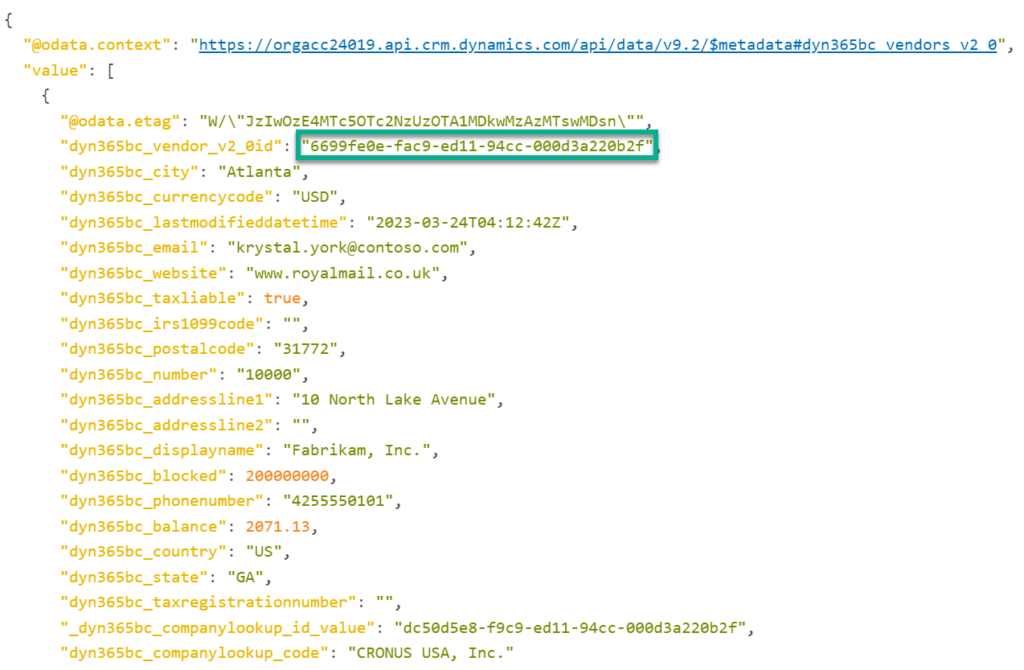
Furthermore, the HTTP call for my table Vendor (dyn365bc_vendors_v2_0) is this:
GET https://{environment}.api.crm.dynamics.com/api/data/v9.2/dyn365bc_vendors_v2_0
Authorization: Bearer eyJ0eXAiOiJKV1...
You see also, I find in this result the expected vendor, referenced from my table Pet:
Perfect, my Dynamics API provide all information for AWS. In other words, I can import my Pet and my Vendor data into AWS with an AppFlow.
Prerequisites for my AWS AppFlow
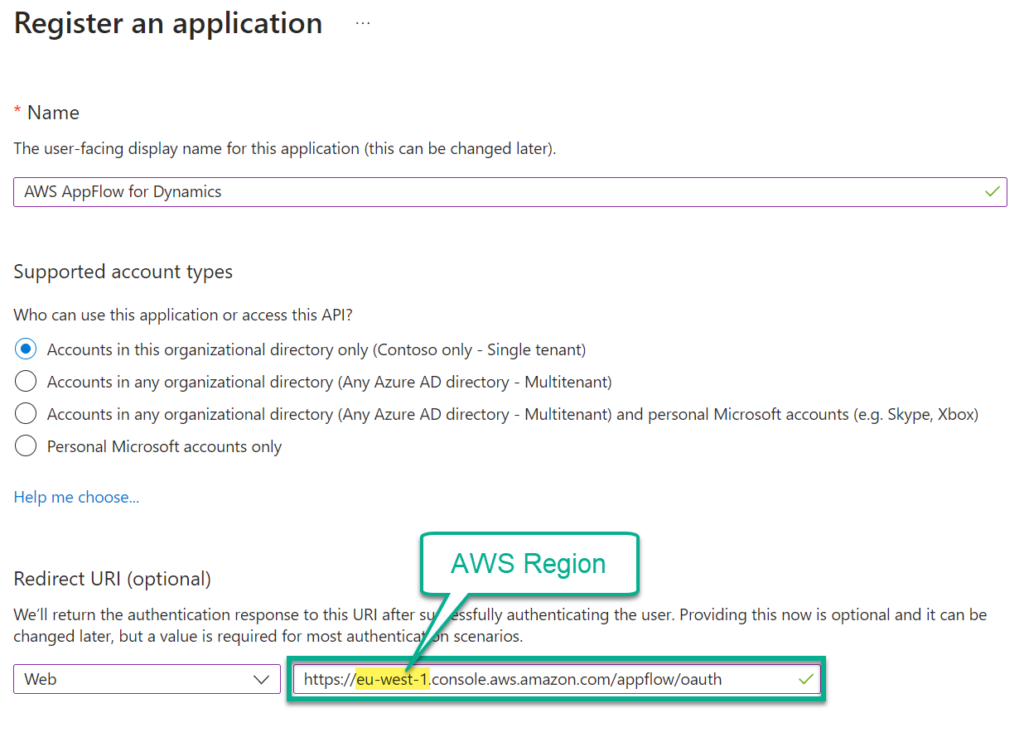
My AWS AppFlow connection needs an Application Registration in my Azure Active Directory to access my Dynamics 365 Dataverse data. This is described here in: Microsoft Dynamics 365 connector for Amazon AppFlow.
Accordingly, I create a new Application Registration and configure my Redirect URI. I use the region of my AppFlow (eu-west-1):
Afterwards, I enable Access tokens and ID tokens for the implicit authentication flow for my App-Registration:

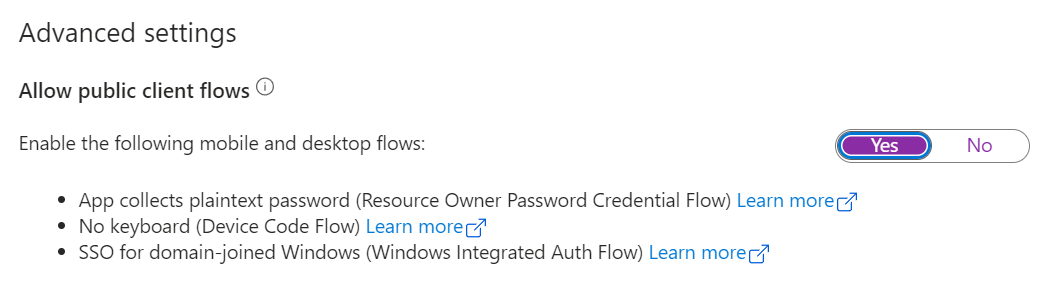
I also enable Allow public client flows underneath advanced settings:
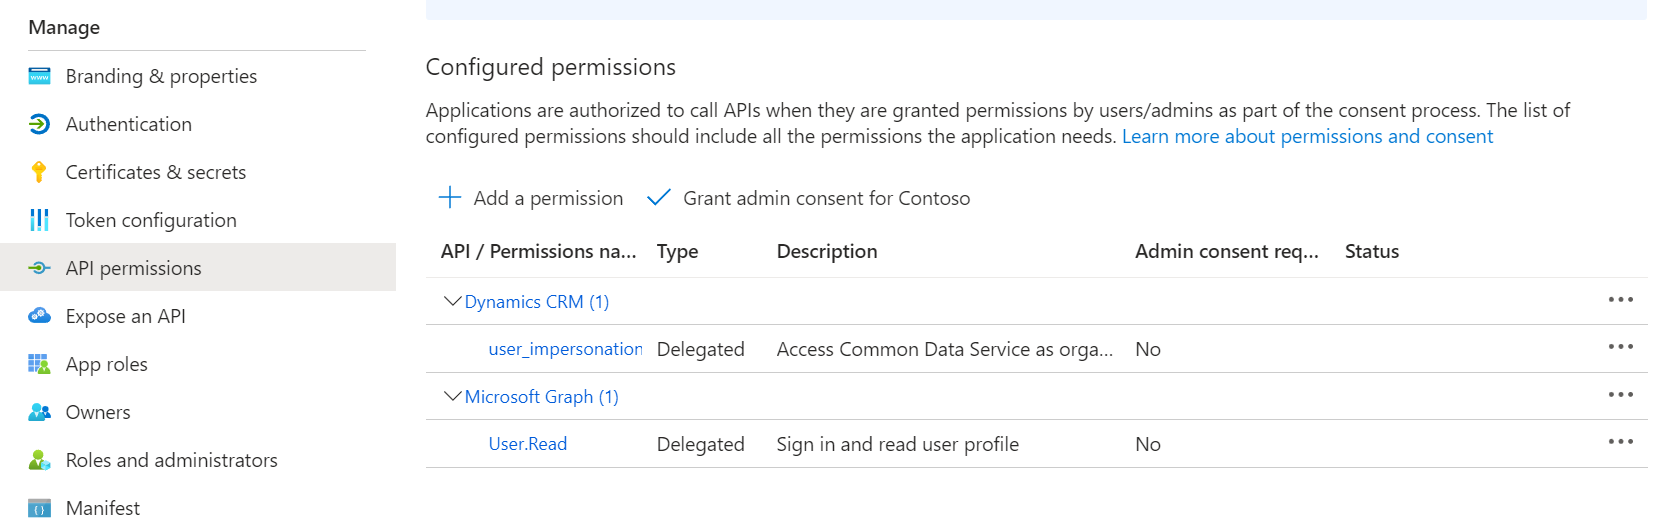
Finally, I have added 2 permissions to my App Registration. One is Dynamics 365 user_impersonation and the other Microsoft Graph User.Read:
AppFlow for Microsoft Dynamics 365
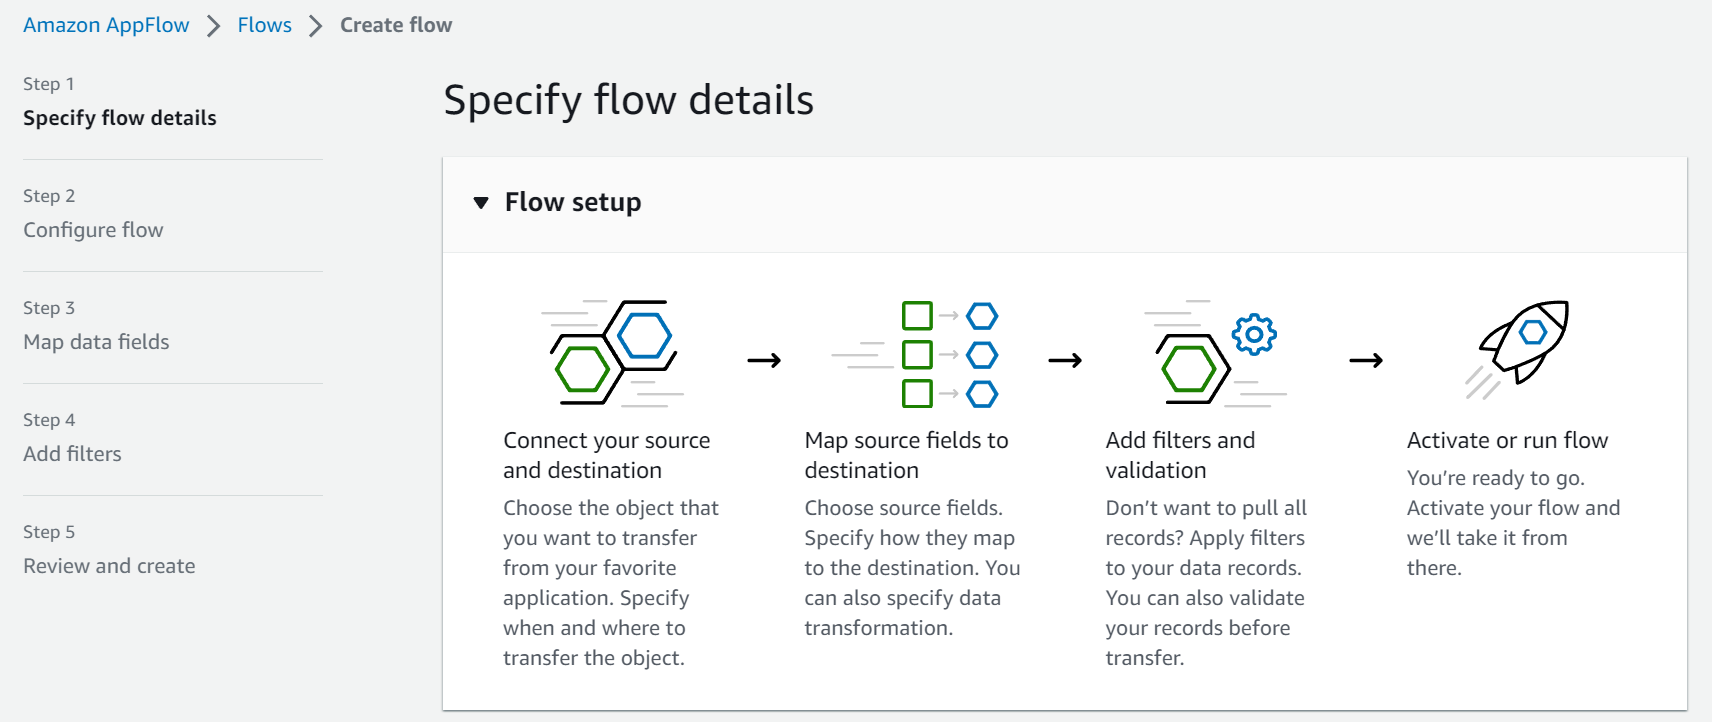
Let’s start with my AppFlow setup for Dataverse. This means, after selecting the Microsoft Dynamics 365 connector a wizard appears in my AWS console:
I’ll start entering the information for my new AppFlow. I enter a Flow name and my Flow description:

Furthermore, I can overrule the standard encryption of my connection parameters:

However, for my example I’m fine with the AWS standard encryption.
Source Details
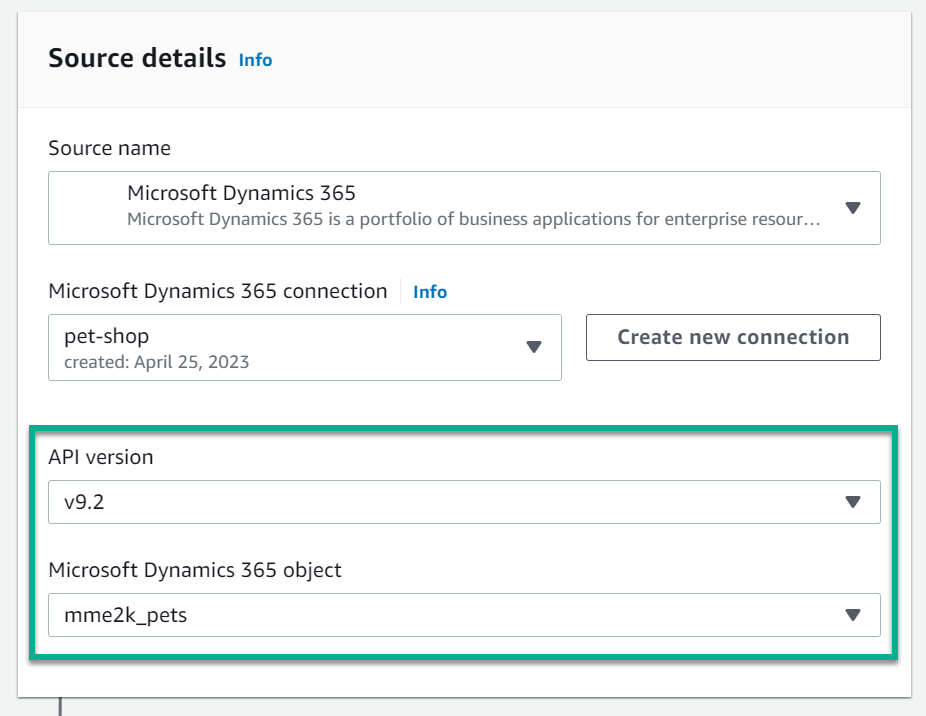
In the next step of the wizard, I’ll configure my source details. I choose Microsoft Dynamics 365 as Source name:
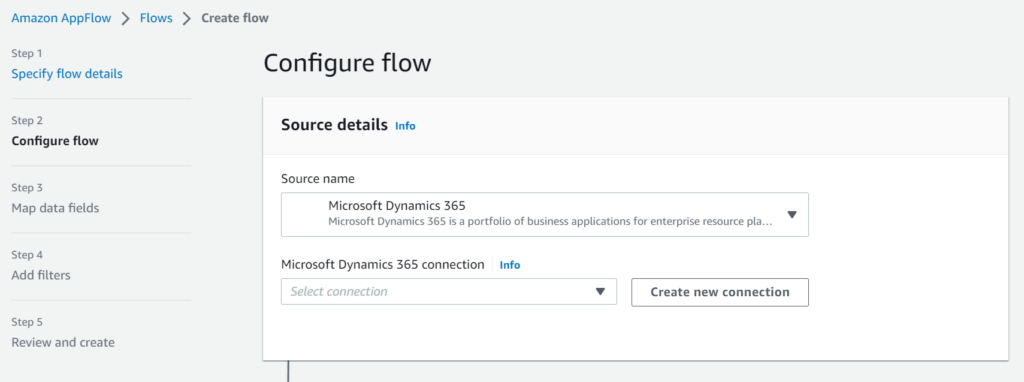
In other words, I connect my AppFlow to my Dataverse environment:
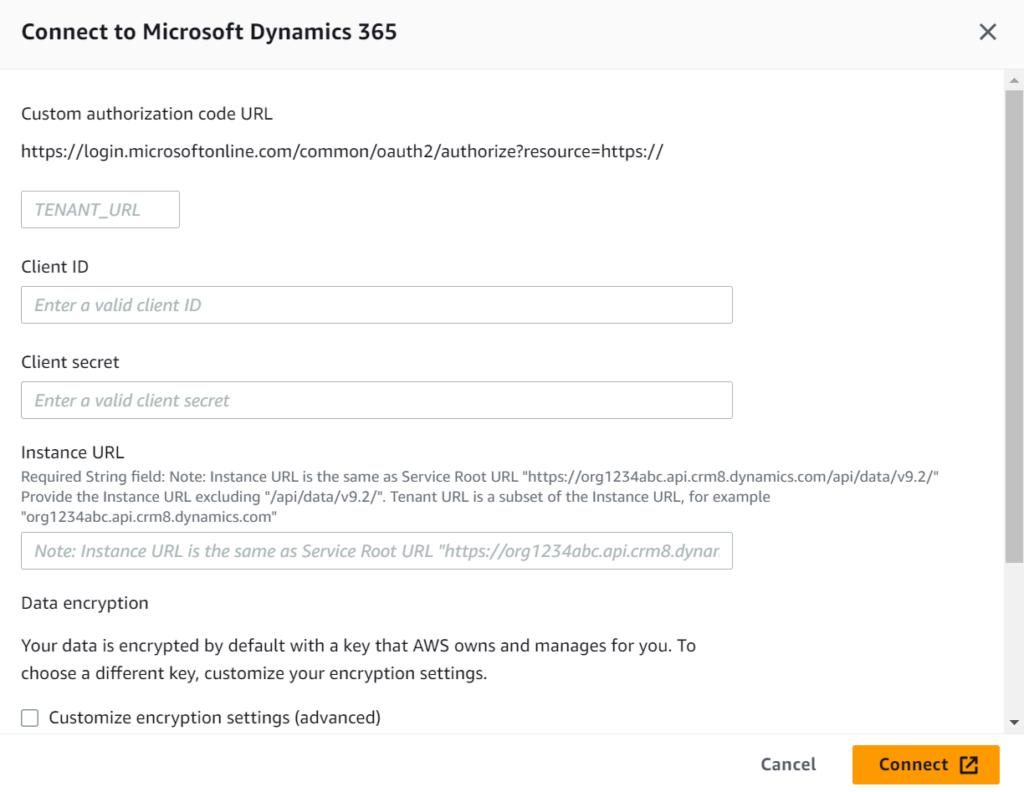
As you can see it’s all about providing the correct authentication with OAuth2. I need my TENANT_URL, a Client ID, the Client Secret, and the Instance URL of my Dataverse environment.
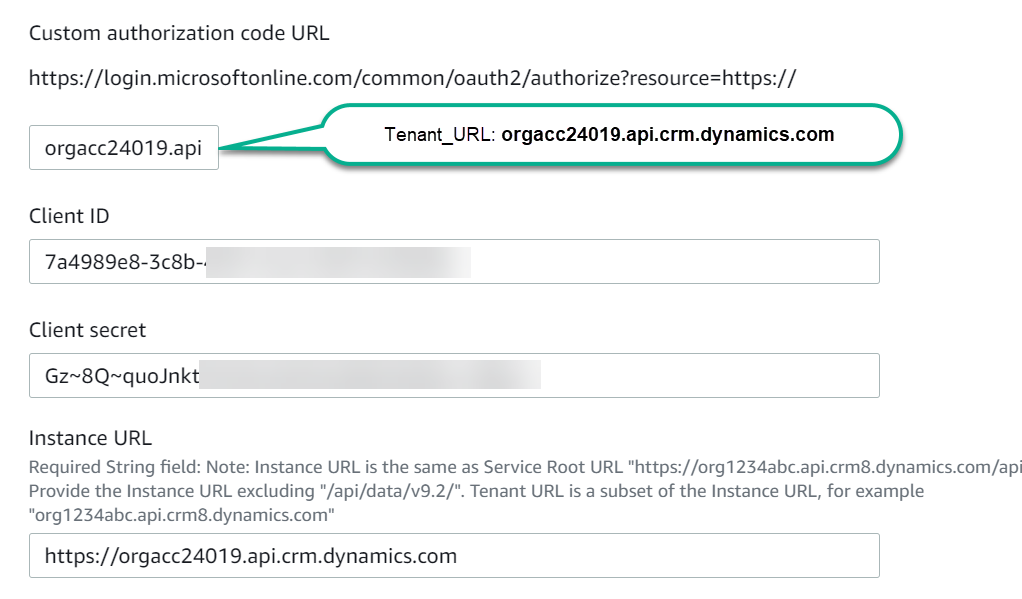
For that reason, I open my Developer resources in my Dataverse environment and grab my Web API endpoint:

I use the blue highlighted part from my Web API endpoint for my TENANT_URL. Furthermore, I enter the complete Web API endpoint URL excluding '/api/data/v9.2' as Instance URL. Finally, I add also the Client ID and Client Secret from my App Registration. Here is the result:
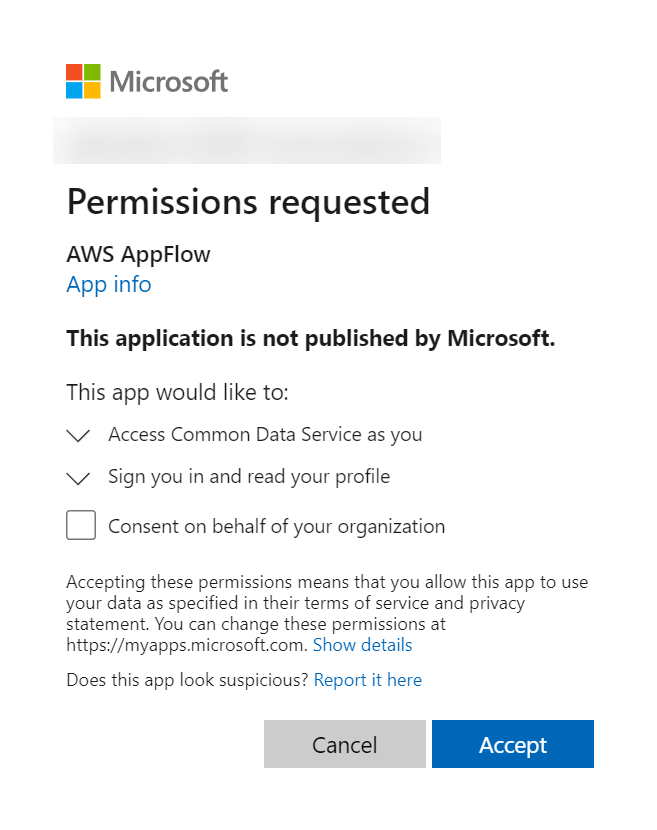
Finally, my new connection needs a name. I use “pet-shop“. Then I have to log in with my account and accept the permission request:
Now my connection is ready to use and I can select my API version and the object for my transfer. I use as API version v9.2 and my entity mme2k_pets from the provided list:
Destination Details
I keep my destination simple for my example. An Amazon S3 bucket is therefore a perfect match:
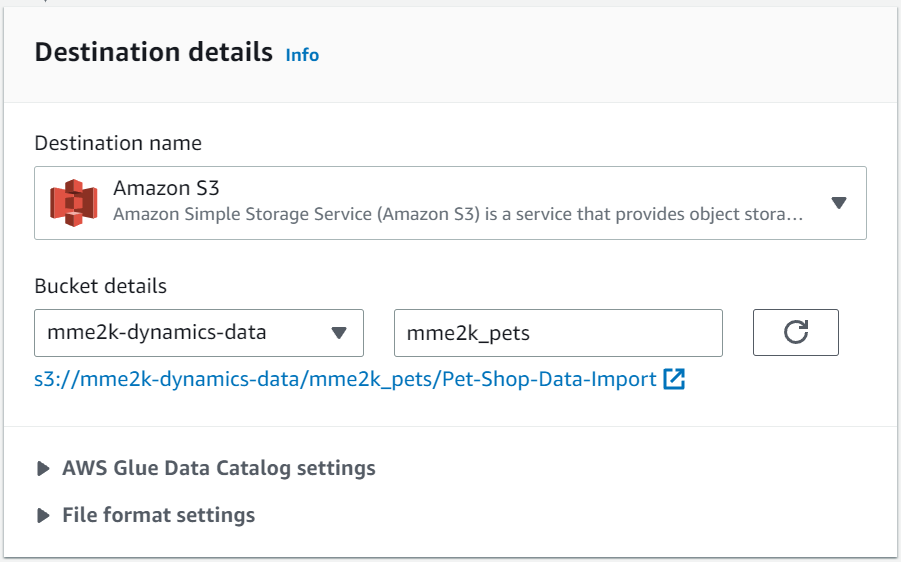
You might also see from my screenshot, I can configure AWS Glue Data Catalog settings for my destination. In other words, I can automatically create a table with metadata about the imported entity in my AWS Glue Data Catalog central metadata repository. That sounds interesting … I’ll have to take a closer look at that later!
Triggers
I can choose between these triggers to start my flow either manually or automated:
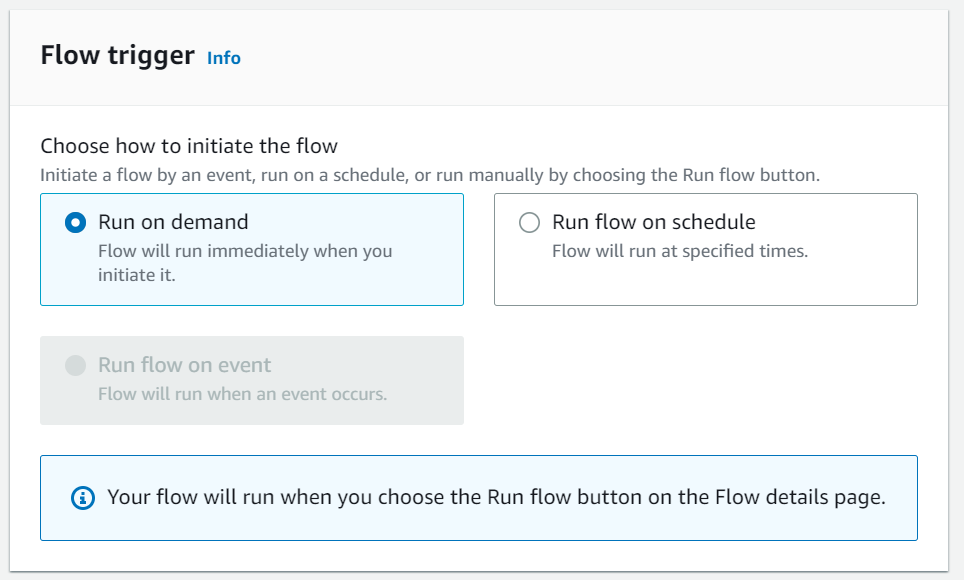
I use Run on demand and start my flow later manually.
Field mapping
The next step is to map my source fields to my target. I can do this in two ways. I choose to manually map my fields:
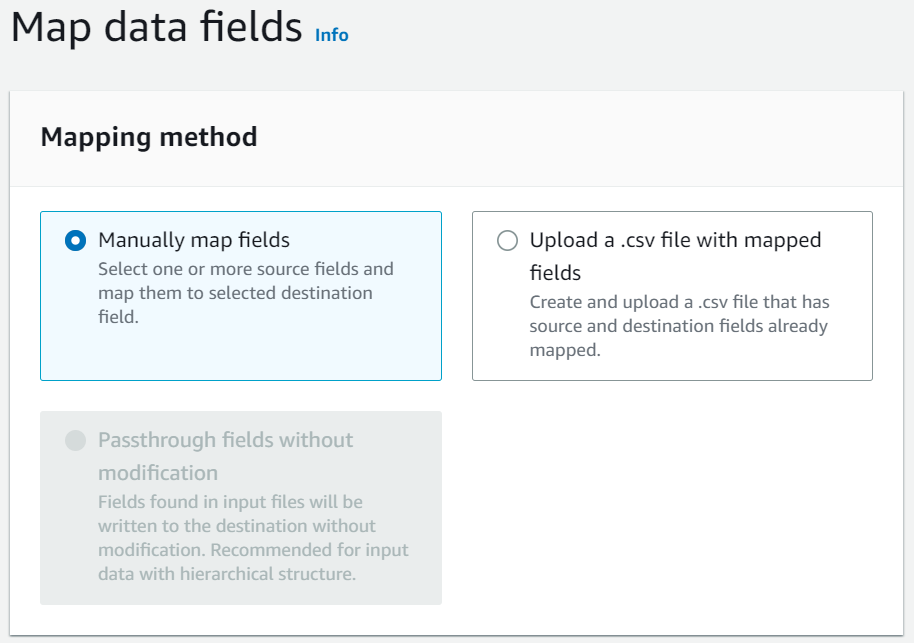
A selection list opens after entering Choose source fields and present the available fields to me:
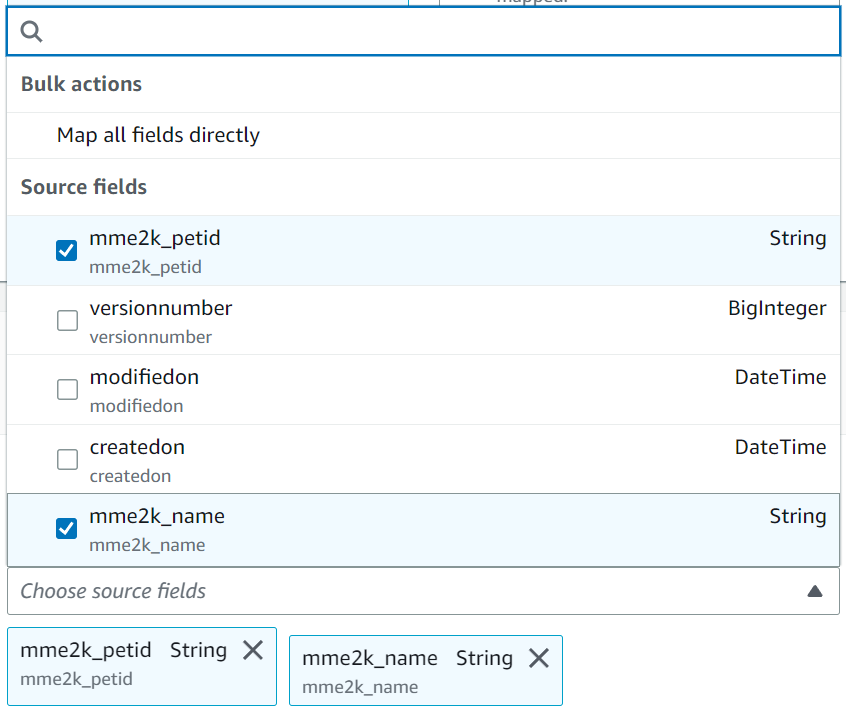
I’ll take these fields from my table Pet:
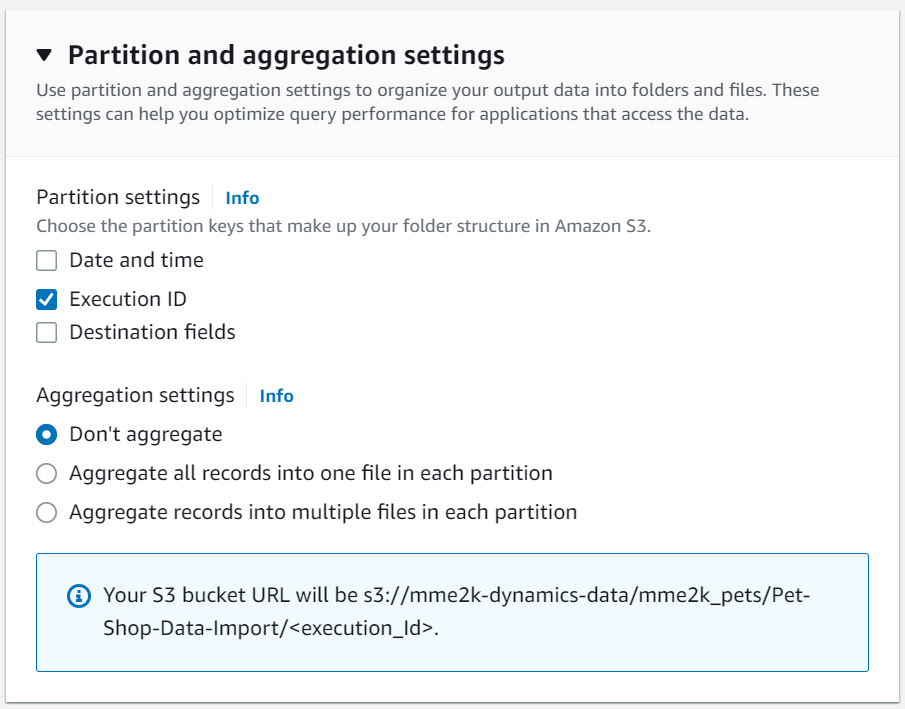
Finally, I have to specify my preferences about partition and aggregation settings. I’m fine with the defaults for my example:
Lastly, I save my AppFlow and the validation check for problems.
Importing Dynamics Data into my S3 Bucket
My AppFlow have no trigger. In other words, I start my AppFlow manually. Some seconds later this message appears:
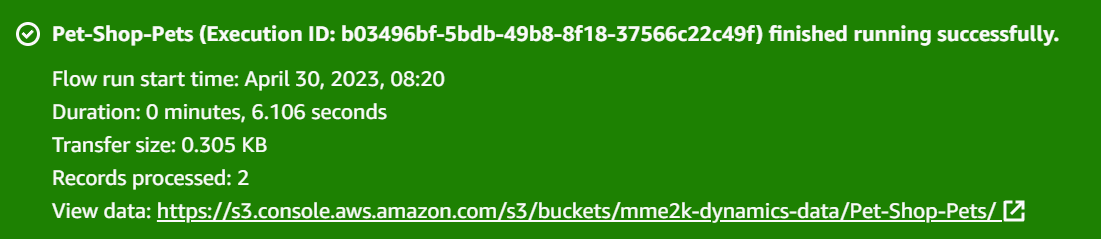
As result, a new folder was created for my latest run:
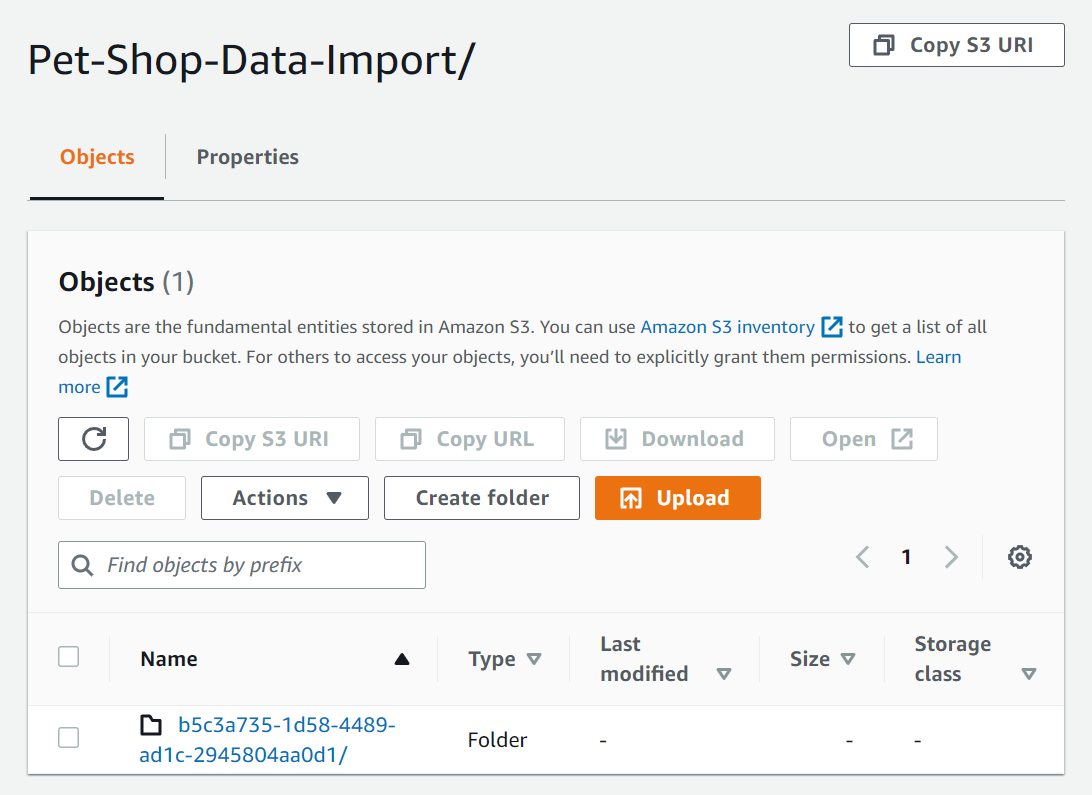
This folder contains now a file with my exported Dataverse data from Table Pet with the defined field mapping. Here is an example:
{"mme2k_petId":"033b0e89-7edf-ed11-a7c7-000d3a34dc1d","mme2k_name":"Cat", ...}
{"mme2k_petId":"ba747494-7edf-ed11-a7c7-000d3a34dc1d","mme2k_name":"Dog", ...}
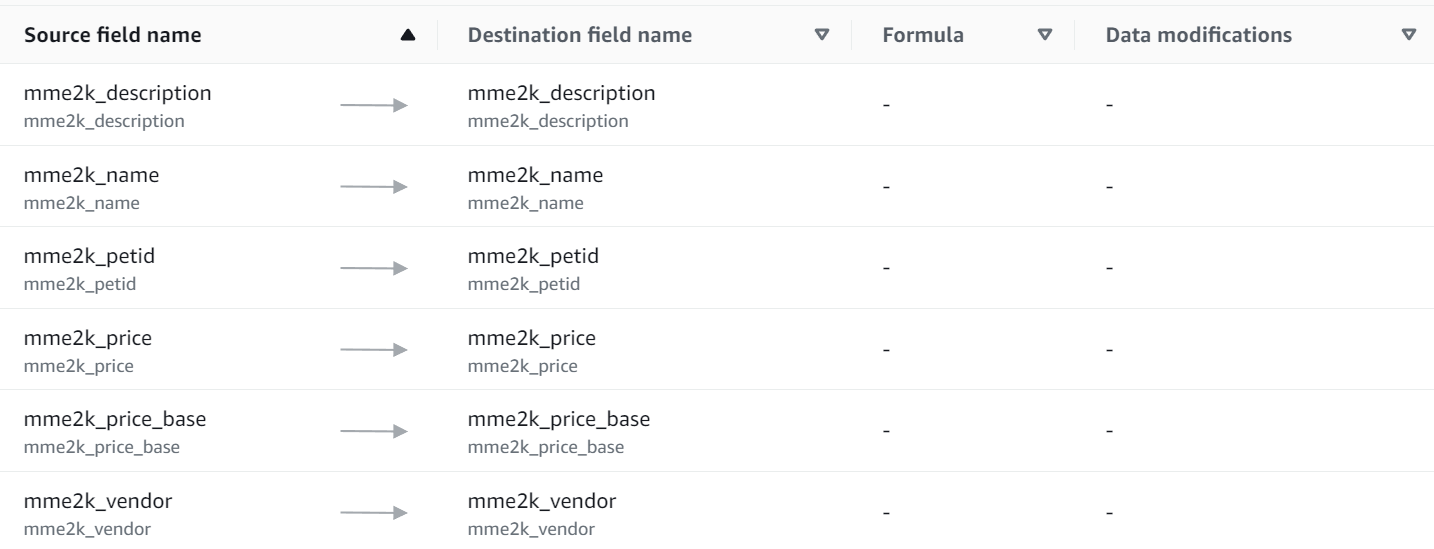
Finally, I set up a second AppFlow for my table Vendor using the same steps as described. I defined this mapping:
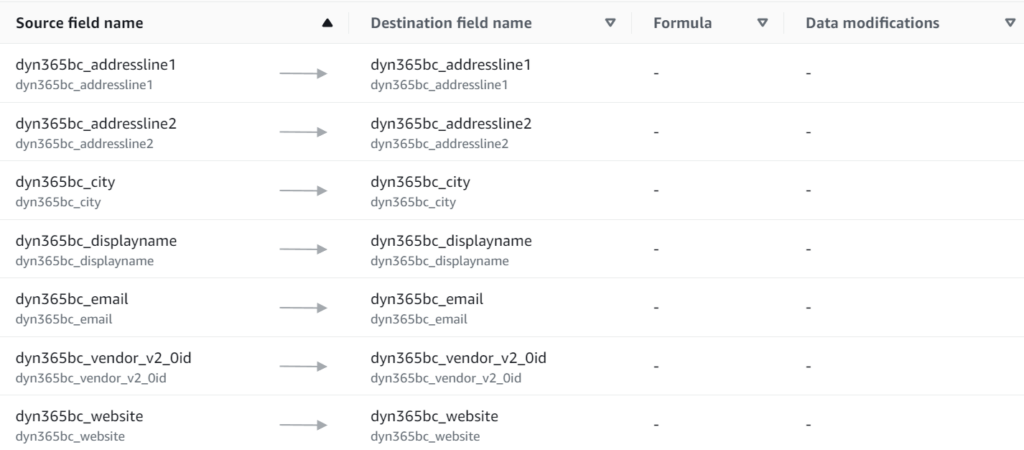
The result of my export is similar to the export of Table Pet. After running my AppFlow I see this data of my virtual Microsoft Dynamics 365 Business Central table Vendor in my AWS S3 bucket:
{"dyn365bc_vendor_v2_0id":"6699fe0e-fac9-ed11-94cc-000d3a220b2f","dyn365bc_city":"Atlanta","dyn365bc_displayname":"Fabrikam, Inc.", ...}
{"dyn365bc_vendor_v2_0id":"6799fe0e-fac9-ed11-94cc-000d3a220b2f","dyn365bc_city":"Chicago","dyn365bc_displayname":"First Up Consultants", ...}
{"dyn365bc_vendor_v2_0id":"6899fe0e-fac9-ed11-94cc-000d3a220b2f","dyn365bc_city":"Miami","dyn365bc_displayname":"Graphic Design Institute", ...}
{"dyn365bc_vendor_v2_0id":"6999fe0e-fac9-ed11-94cc-000d3a220b2f","dyn365bc_city":"Atlanta","dyn365bc_displayname":"Wide World Importers", ...}
{"dyn365bc_vendor_v2_0id":"6a99fe0e-fac9-ed11-94cc-000d3a220b2f","dyn365bc_city":"Atlanta","dyn365bc_displayname":"Nod Publishers", ...}
...
Perfect! I have transferred my data to AWS. Now I can start analyzing my data with AWS Athena, AWS SageMaker or event more together with my existing production data in AWS.
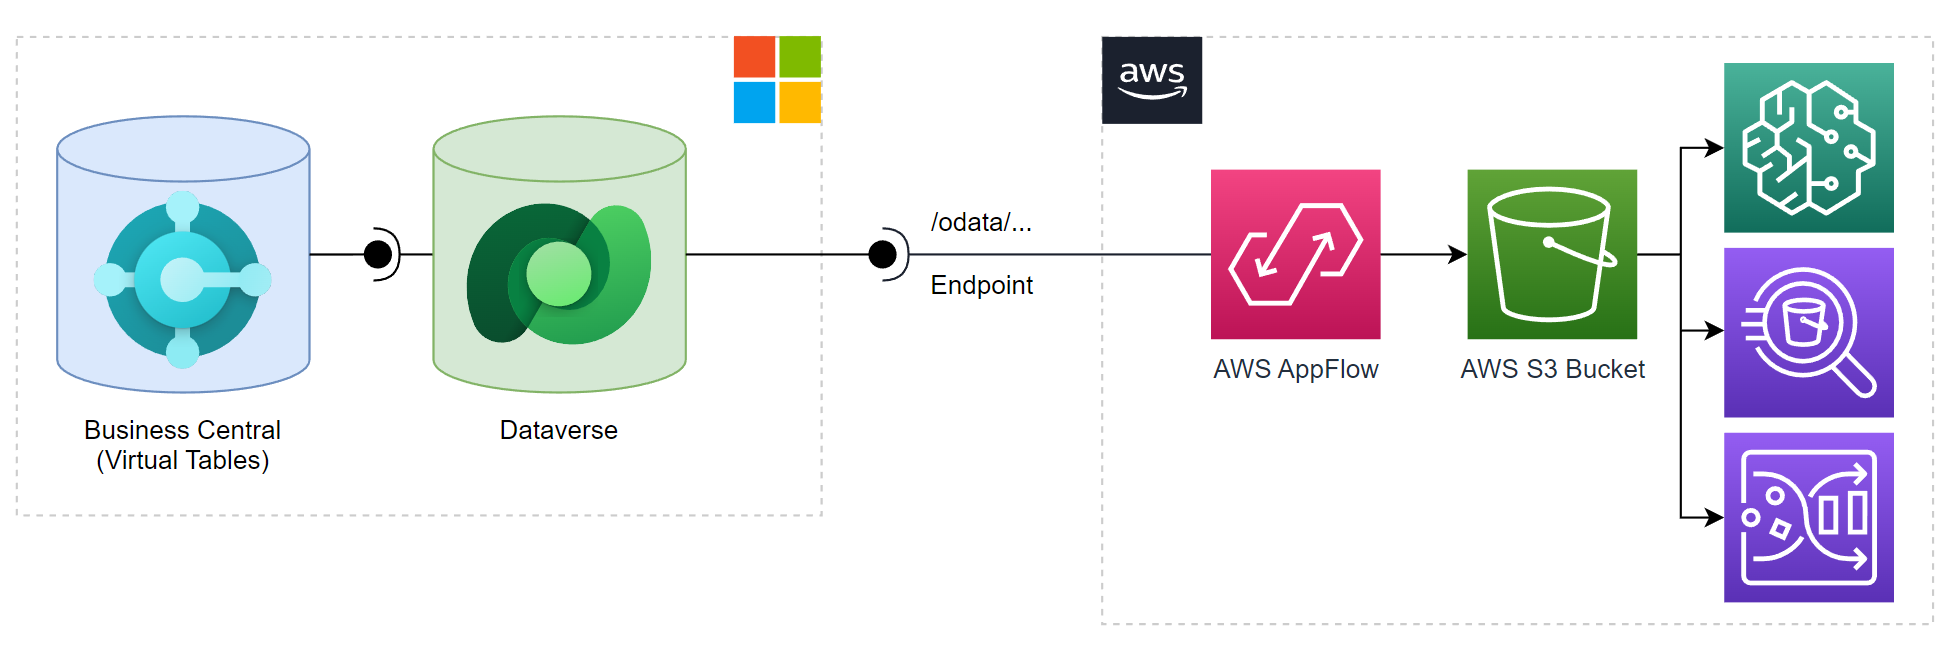
The final image once again shows the simplicity of the architecture.
Summary
In my blog post, I explain how to use AWS Cloud to analyze Dynamics data. I discuss the benefits of integrating Dynamics data into AWS infrastructure for data analytics, and how Amazon AppFlow can be used to automate the data transfer process.
For that reason, I explained my example solution in Dataverse including a virtual table to Microsoft Dynamics 365 Business Central. I demonstrate how to access the data of both entities (physical and virtual) from the Dynamics 365 REST endpoint.
Afterwards, I also explain the setup of an App Registration in Azure, which is a prerequisite for creating an AWS AppFlow connection. Furthermore, I show how to set up an AWS AppFlow connection using the Microsoft Dynamics 365 connector. Finally, I provided a step-by-step guide on how to configure the AppFlow setup for Dataverse. At the end I validated my transfered data.