
Setup GitHub Codespace for AWS Development
I recently came across a new way to write and create source code. I had been looking for an alternative because my computer didn’t have the necessary administrative privileges to install software and the resources available on it were also limited. In detail, I had no Git for source code management, no Docker Runtime, no AWS Command Line Interface (AWS CLI), and no AWS Cloud Development Kit (AWS CDK).
In other words, I was lost, but I discovered GitHub Codespaces. GitHub Codespaces is a cloud-based development environment that allows me to write and test my code without having to set up a local development environment on my computer. It provides me a web-based interface that allows developers to access my code and development tools from any device with an internet connection. This means I can work on my projects from anywhere, collaborate with my team members more easily, and save time on setup and configuration. Furthermore, Codespace allows me to install my preferred tools for AWS development tasks.
Creating GitHub Codespaces
Creating a new GitHub Codespace is simple. I can do this directly from my repository or I navigate to this URL: https://github.com/codespaces
From here I can choose one of the provided templates:
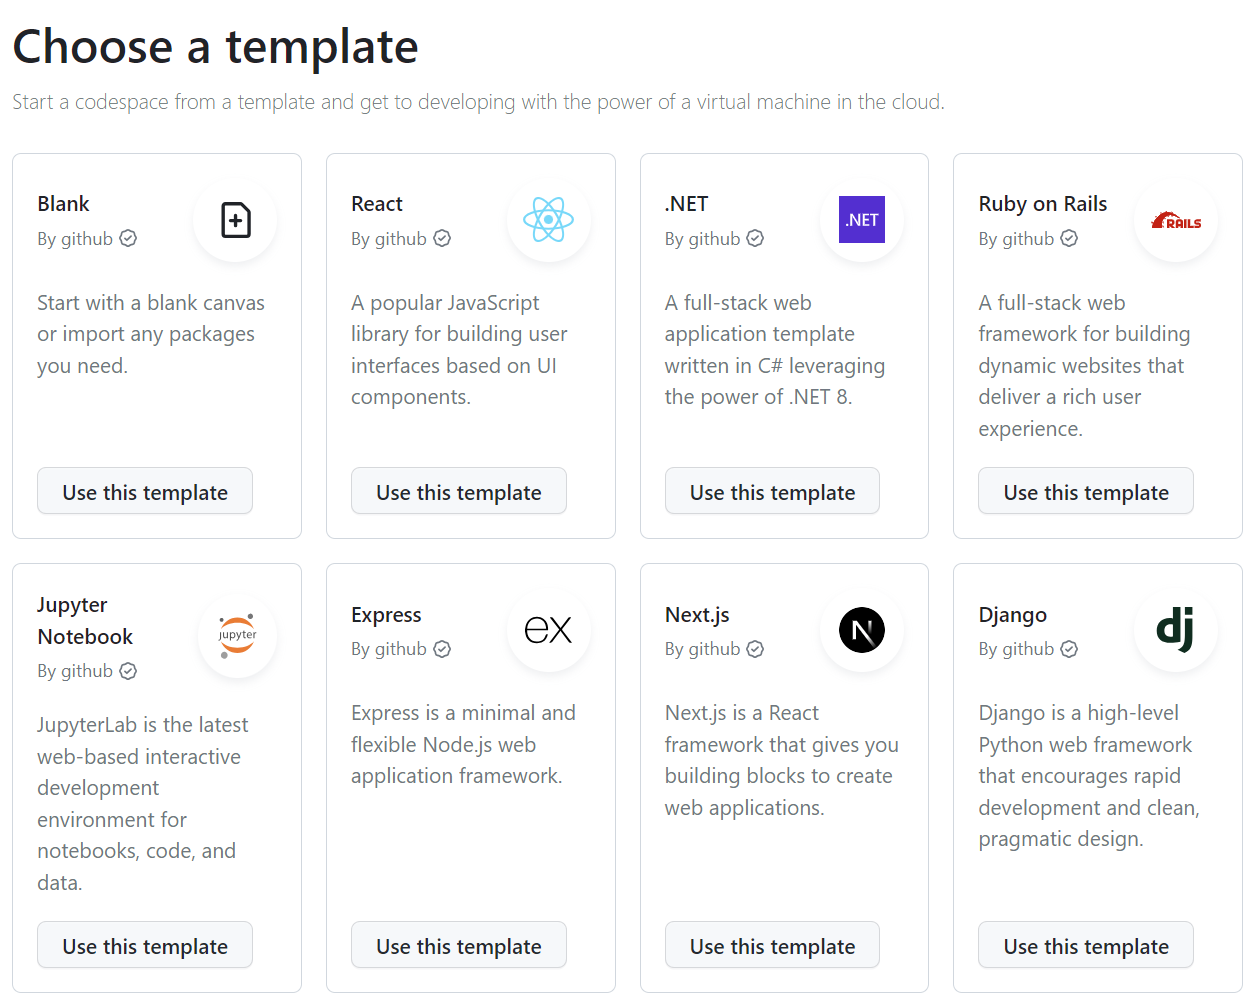
These templates provide pre-installed tools and frameworks. Furthermore, I can install my own software because I have admin rights on the created GitHub Codespace environment.
However, I use mostly the Blank template with the default setup.
Setup Tools for AWS Development in Codespace
This brings me to the next topic. Often, I’m using these tools and frameworks for my AWS development in my:
- Git SCM for source code management and collaboration
- Node.js as framework for web development
- Yarn as package manager
- Docker Runtime for build and run docker containers.
- AWS Command Line Interface (AWS CLI) to manage AWS services.
- AWS Cloud Development Kit (AWS CDK) as framework to write infrastructure as code for AWS stacks.
Unfortunately, the GitHub Codespaces Blank template doesn’t provide everything out-of-the-box to me. In other words, my preferred AWS development tools are not installed in my GitHub Codespace.
But this is not an issue, because I can install software in my Codespace!
Setup Common AWS Frameworks and Tools
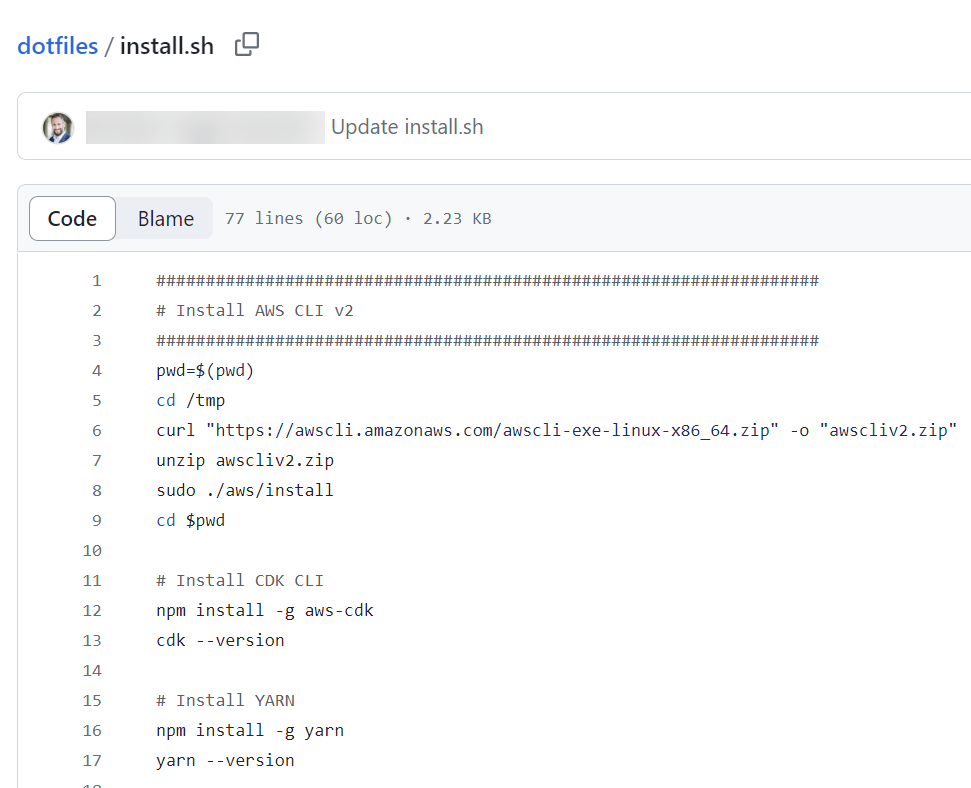
Let’s start. My GitHub Codespaces contains already the Docker Runtime, Git SCM, Node.js, and Python. This means I must install at least the AWS CLI version 2 (needed for configuring single sign on) and the AWS CDK framework. Additionally, I added Yarn and AWS Amplify to my script:
# Install AWS CLI v2
pwd=$(pwd)
cd /tmp
curl "https://awscli.amazonaws.com/awscli-exe-linux-x86_64.zip" -o "awscliv2.zip"
unzip -o awscliv2.zip
sudo ./aws/install
cd $pwd

# Install CDK CLI
npm install -g aws-cdk
cdk --version

# Install YARN
npm install -g yarn
yarn --version

# Install AWS Amplify
npm install -g @aws-amplify/cli

# Install Taskfiles
npm install -g @go-task/cli
My environment is now ready after copying, pasting, and executing all this commands. In other words, my common tools for AWS development are installed in my GitHub Codespace.
Connect with AWS
From here I can start to connect my GitHub Codespace with my AWS Account. I use mostly the single sign on for this:
aws configure ssoDuring the SSO configuration I’m asked to provide the URL. You find this information here:
| SSO session name | <name for your sso session> … default |
| URL | https://<your-idp-name>.awsapps.com/start |
| SSO region | <your idp region> … eu-central-1 (in my case) |
| SSO registration scopes | sso:account:access |
| CLI default client Region | <preferred region> … eu-central-1 (in my case) |
| CLI default output format | text |
| CLI profile name | default |
Use this command to authenticate when your SSO session is expired:
aws login ssoAlternatively, you can configure the AWS account using the following command with AWS Access Key ID and AWS Access Key Secret:
aws configureLast but not least, I recommend to review your AWS Config file (~/.aws/config). Here is per example my AWS Config file based on my Single Sign-On setup:
[sso-session default]
sso_start_url = https://d_00000000.awsapps.com/start
sso_region = eu-central-1
sso_registration_scopes = sso:account:access
[default]
sso_session = default
sso_account_id = 300000000000
sso_role_name = AdministratorAccess
region = eu-central-1
output = text
Now I’m ready to start development.
More Tools
Furthermore, I have started to expand my toolkit according to the respective requirements. This means, here are more script snippets that you can use in GitHub Codespace.
Installing PowerShell
Sometimes I add PowerShell to my GitHub Codespaces. I use this script for that reason:
pwd=$(pwd)
cd /tmp

###################################
# Prerequisites

# Update the list of packages
sudo apt-get update

# Install pre-requisite packages.
sudo apt-get install -y wget apt-transport-https software-properties-common

# Get the version of Ubuntu
source /etc/os-release

# Download the Microsoft repository keys
wget -q https://packages.microsoft.com/config/ubuntu/$VERSION_ID/packages-microsoft-prod.deb

# Register the Microsoft repository keys
sudo dpkg -i packages-microsoft-prod.deb

# Delete the the Microsoft repository keys file
rm packages-microsoft-prod.deb

# Update the list of packages after we added packages.microsoft.com
sudo apt-get update

###################################
# Install PowerShell
sudo apt-get install -y powershell

cd $pwd

# Start PowerShell
pwsh
Install Terraform CLI
In some other cases, I want to use terraform. For that reason, is here the script based on Hashicorp documentation:
sudo apt-get update && sudo apt-get install -y gnupg software-properties-common

wget -O- https://apt.releases.hashicorp.com/gpg | \
gpg --dearmor | \
sudo tee /usr/share/keyrings/hashicorp-archive-keyring.gpg

gpg --no-default-keyring \
--keyring /usr/share/keyrings/hashicorp-archive-keyring.gpg \
--fingerprint

echo "deb [signed-by=/usr/share/keyrings/hashicorp-archive-keyring.gpg] \
https://apt.releases.hashicorp.com $(lsb_release -cs) main" | \
sudo tee /etc/apt/sources.list.d/hashicorp.list

sudo apt update

sudo apt-get install terraform
Visual Studio Code Extensions
Here are also install commands of some of my preferred VS Code extensions:
# Copilot
code --install-extension GitHub.copilot

# API-Debugging
code --install-extension rangav.vscode-thunder-client
code --install-extension humao.rest-client

# Utils
code --install-extension heaths.vscode-guid

# Python
code --install-extension ms-python.python
code --install-extension ms-python.vscode-pylance
code --install-extension ms-toolsai.jupyter
code --install-extension ms-python.black-formatter
code --install-extension ms-python.isort
Dotfiles Repository
Finally, I started to setup and configure my own Dotfiles repository. In other words, I have copied all my scripts in a single install.sh file in my Dotfiles repository:
Furthermore, I configured my GitHub Codespace settings to use this dotfiles repository:
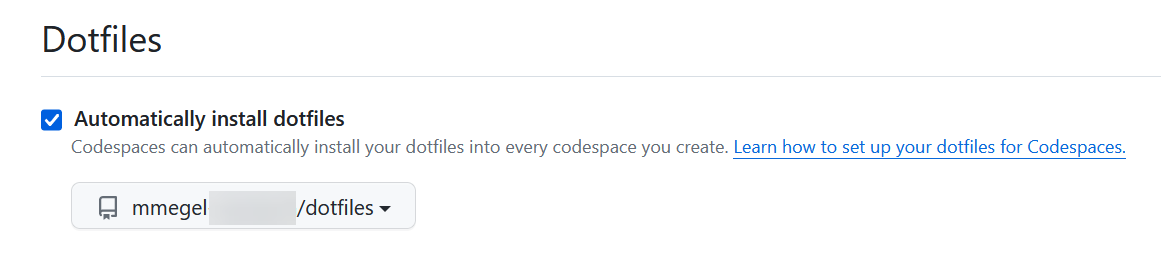
As a result, whenever I create a new GitHub Codespace, my install.sh script runs and prepares my Codespace. To be honest, this is my favorite feature!
Summary
The use of GitHub Codespace has made my life as a developer much simpler. With the creation of a new Codespace, I can quickly install all the necessary tools for AWS based on my script snippets. These snippets enable me to start my development tasks efficiently.
Additionally, I have enhanced my setup by creating and configuring a Dotfiles repository in my GitHub account settings for Codespace. In detail, I have consolidated all my scripts in an install.sh file within this repository, which runs automatically during the creation of my new Codespace. This has significantly reduced the time it takes to set up my development environment.
Now, all I need to do is waiting until my GitHub Codespace is created, sign into my AWS account and I am ready to start developing or debugging…