Application Lifecycle Management for PowerApps: Citizen Developers
It took me a while to realize, my Citizen Developers need a simple approach of an Application Lifecycle Management process. In detail, I can’t talk about Git repositories & branches, Azure DevOps, build and release pipelines. This is to technical and out of scope for my Citizen Developers.
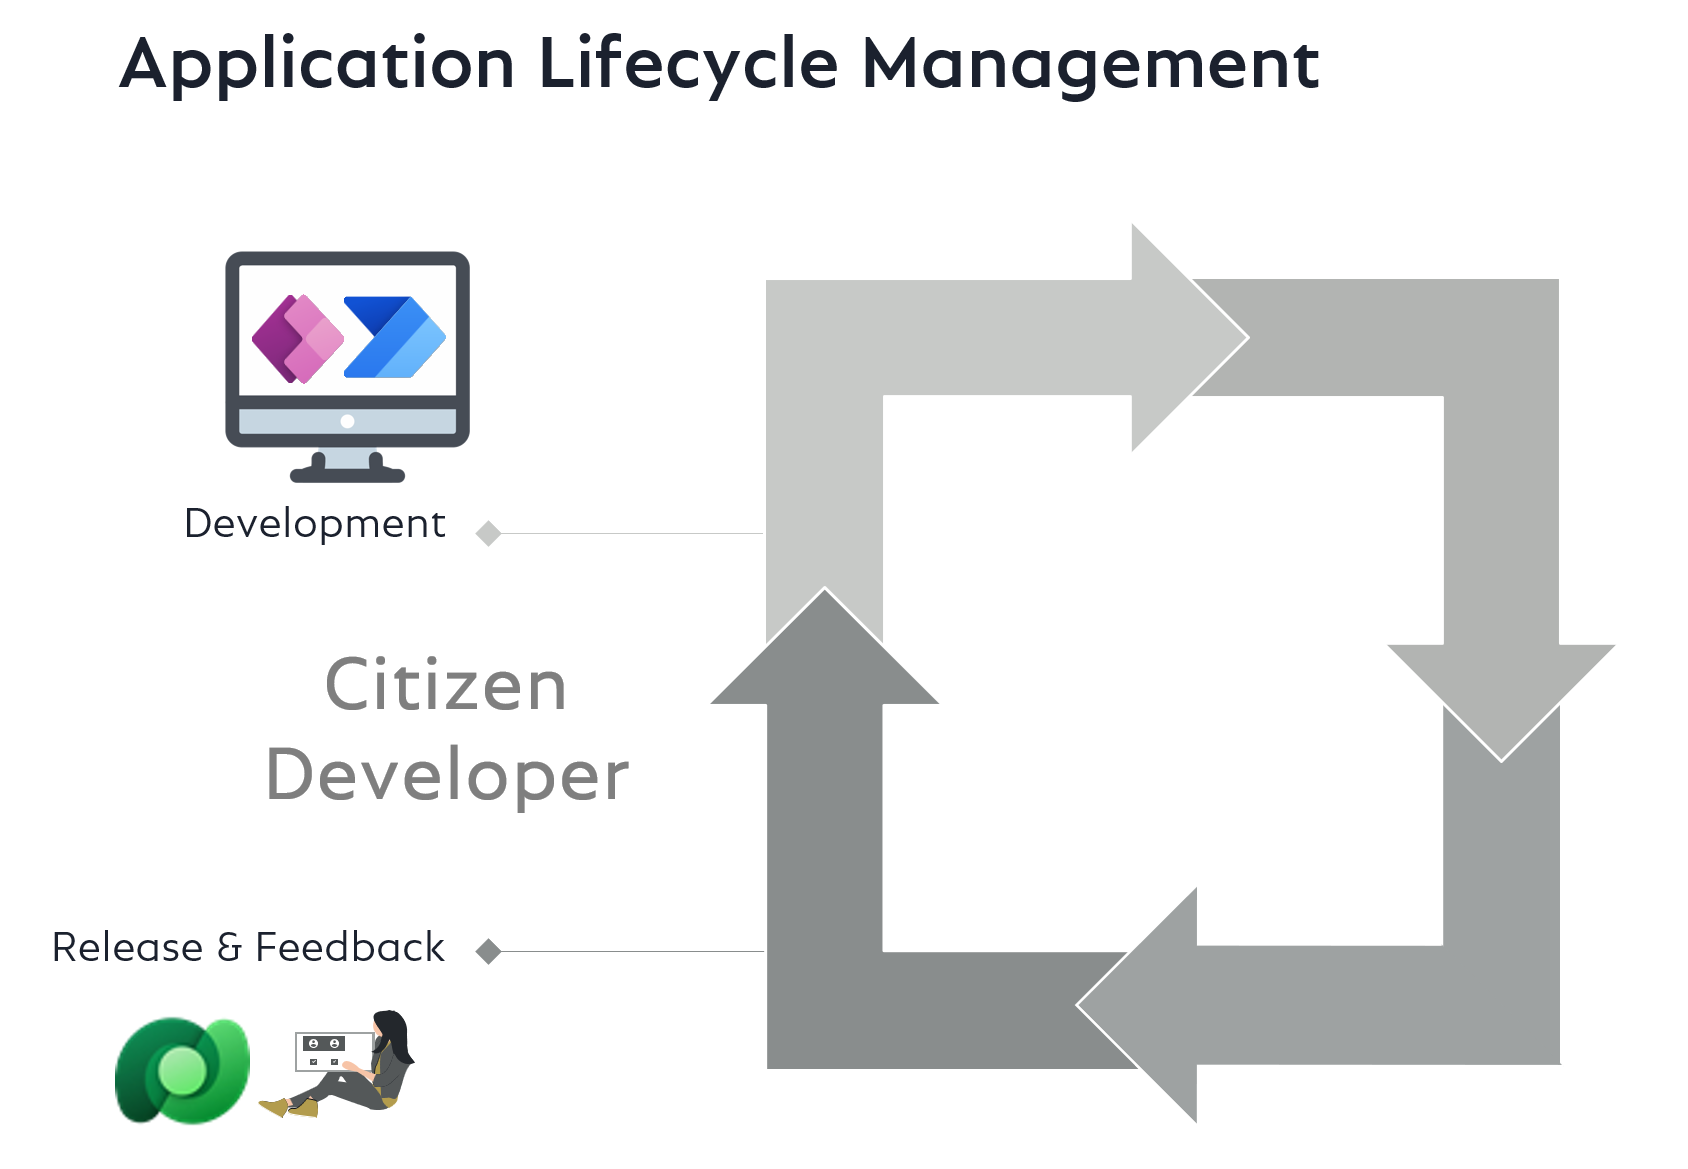
In conclusion, a classic Citizen Developer ALM process must be simple. For instance, as a Citizen Developer, I develop my Power Apps and Power Automate Flows. Afterwards, I create my release by publishing and sharing my canvas app and flows within my colleagues. Finally I collect feedback from my users to start my next development cycle. Here is an example of this highly simplified process:
On the other hand, I am a Pro Developer and I see the benefit of an automated ALM process. Furthermore, I know what is necessary, to establish this process. In detail, I use solutions as a package to transport my PowerApps and Power Automate Flows between my Dataverse Environments.
You find more detailed information of my solution export and import procedure in my previous blog posts:
Let’s start with ALM for Citizen Developer
The million dollar question is: “What can I do to enable my Citizen Developers to join my ALM process?” Well, the answer sounds simple: “Provide something to start an automated solutions transport.”
For that reason, I can create a canvas app for my Citizen Developers. My goal is to start the solution export from my DEV environment and transport the exported solution to other environments like TEST and PROD. Here is an example, what my Citizen Developer could do with a selected solution:

No technical details, no Azure DevOps, no GitHub, no pipelines and repositories are visible. This is because, my Citizen Developers don’t want the complexity of this technologies … right now.
The bottom line is, that I first need to convince my Citizen Developers of the benefits of an automated ALM process. After I have build trust in this process, I can extend the workflow with the cool things, technical stuff – what can I say, my Pro Developer magic…
So, let’s do this without DevOps, but with the full power of Dataverse: Tables, PowerApps, Power Automate Flows, and …!
Defining the Data Model
My App needs master data and transactional data to organize my solution transport. I have decided to use Dataverse, therefore I define a data model.
Firstly, I have two entities. These are my solutions and my environments. For that reason, I setup the dataverse tables Solutions and Environments. Secondly, I have a classic n:m relation between my solutions and my environments. I could use a relation between solutions and environments, but I want to store additional information like “managed/unmanaged”. Therefore, I setup this as a separate table Solution Environments:

I need also entities to store transactional data of my automated ALM process. In detail, I start my solution export by creating a record in table Solution Export. The result of a solution export is a solution-zip file. I store this zip-file in my table Solution Artifact. Finally, I create a record in Solution Import to start my import procedure. Sounds simple. In conclusion, I set up this data model for my transactional data:

In summary, I have 3 tables to store my master data for my solutions, my environments, and the relation between. And I have 3 tables to store transactional data for my solution transports.
Master Data Setup
Before I can create a Power App for my Citizen Developers, I have to setup my master data. Surprise, I choose a Model Driven App. This is because I use Dataverse tables want to add and modify records in tables. I don’t need a pixel perfect design for this usecase.
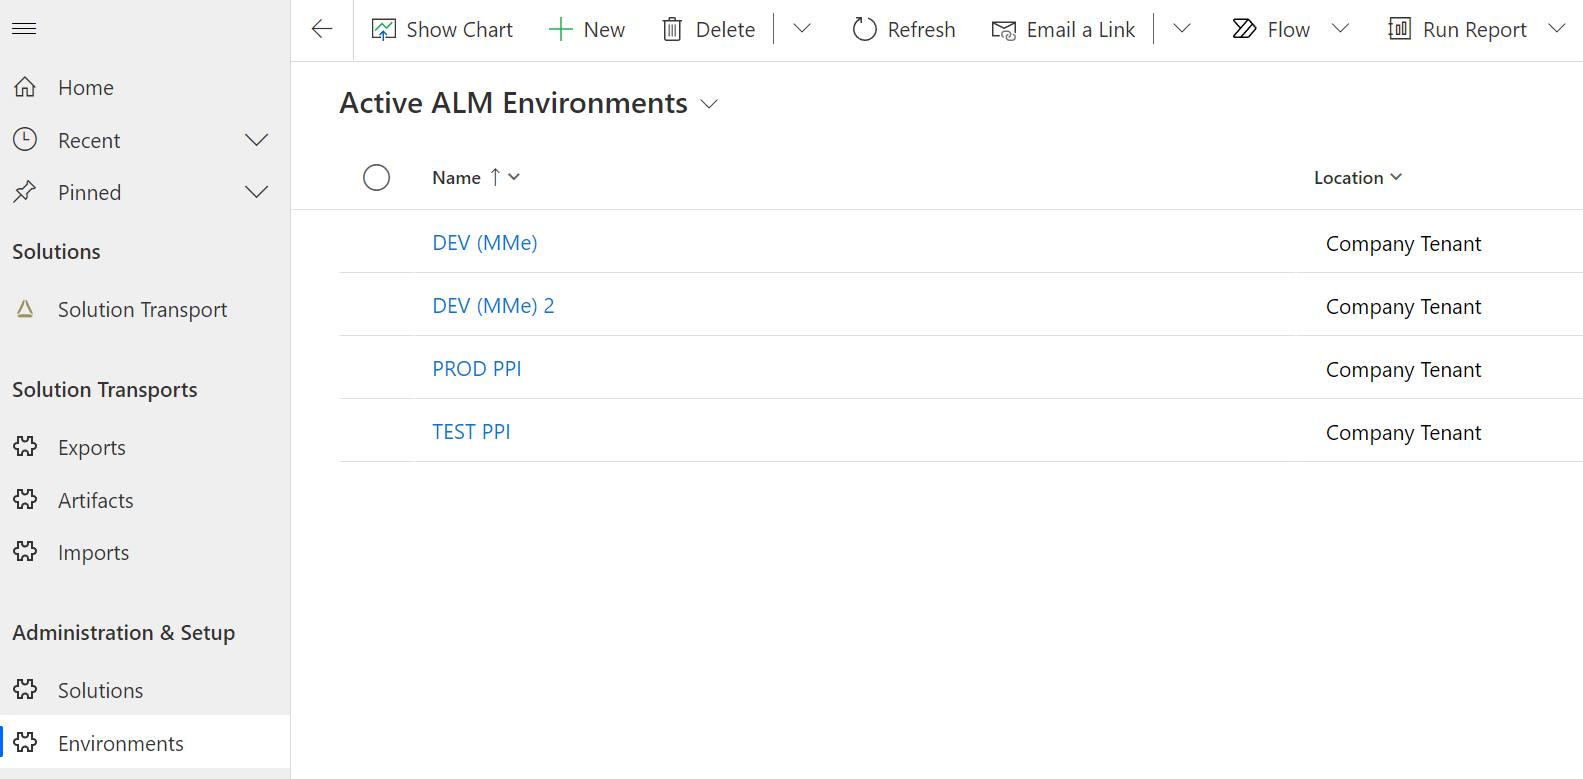
Firstly, I define forms and views for all my created tables in Dataverse. Afterwards, I add my tables Solutions and Environments to my created Model Driven App. I use a section “Administration & Setup” for my master data and a section “Solution Transports” to visualize my transactional data. This take a couple of minutes in within a Model Driven App.
Environments
Another benefit of a Model Driven App is, as a user, I can easily switch between the list presentation form my table and a detailed form for a single record.
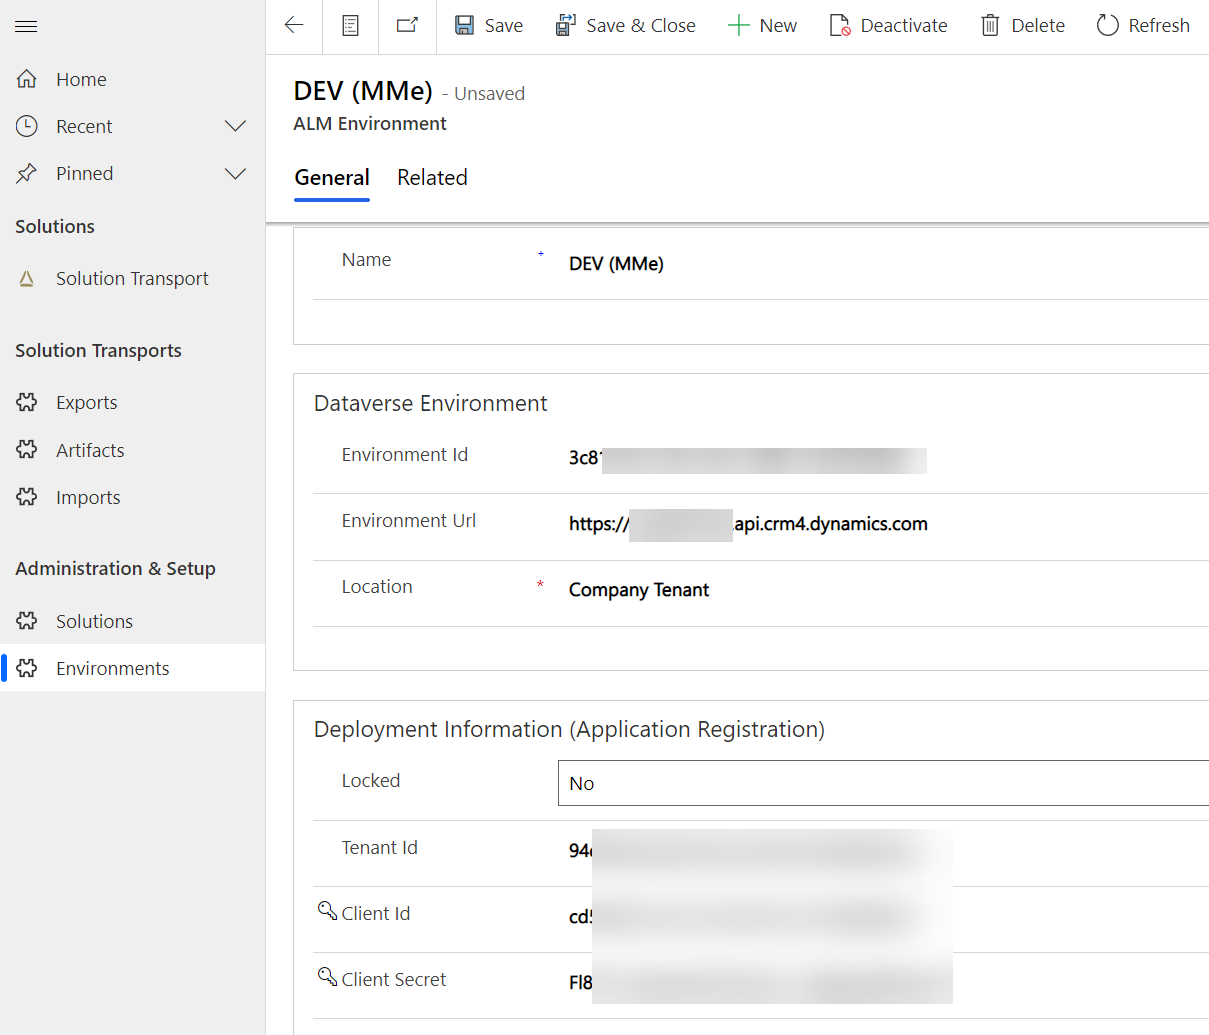
As you can see above in the picture, I use more information to setup my environments. These are for instance my environment id, environment URL, as well as information of an Azure Application Registration. I use these information to authenticate my API calls and to access my environments.
Solutions
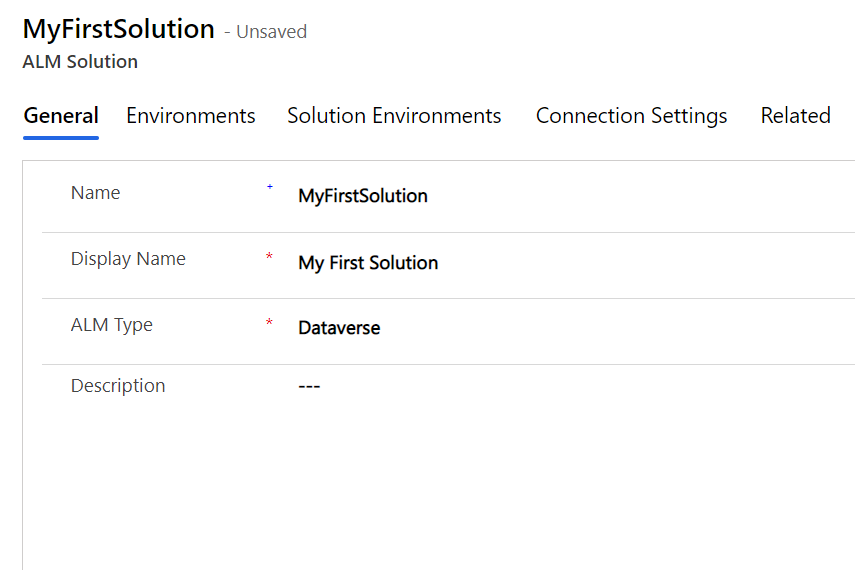
My solution information are less complex. Here I specify my Unique Solution Name as Name, the Display Name, and the ALM Type. I add the ALM Type, because I will extend my process later with e.g. Azure DevOps. But currently, I support only Dataverse as Application Management Lifecycle process.
I use a separate Tab-Control to show and modify my relation between a solution and its environments.
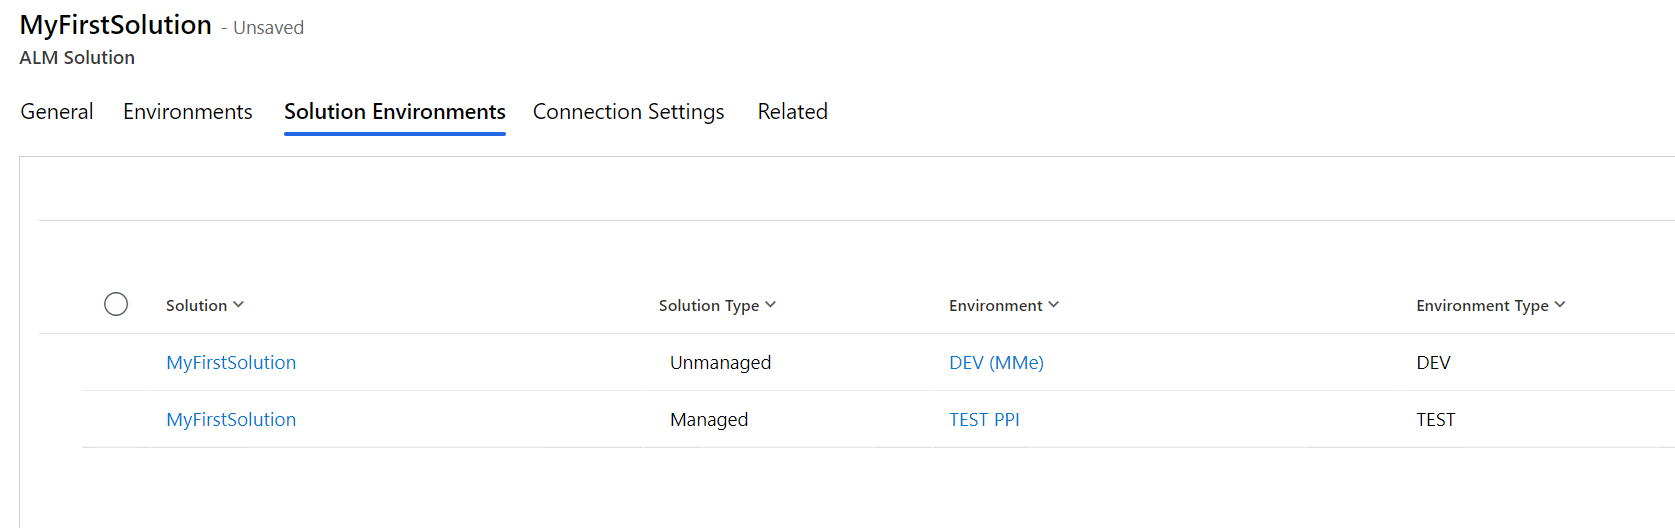
This Tab-Control allows me to add a related list where I can add and remove environments. Furthermore, I use a simple rule to identify my development environment. And, my rule is: When my environment contains my unmanaged solution, then this environment is my development environment. This is because I can only export an unmanaged solution.
ALM Process – The Citizen Developers part!
Now it is time to build a “nice looking” Canvas App. My primary goal is: I want to empower my Citizen Developers to invoke my automated ALM process easily. Additionally, I want to give my Citizen Developers an overview of their solutions.
For this I present my previously added solutions in a collection. Each solution visualize also it’s related environments to give my Citizen Developer a brief overview what will happen during the ALM process. Finally, my actions are only visible to the selected record (solution) to sharpen the focus:
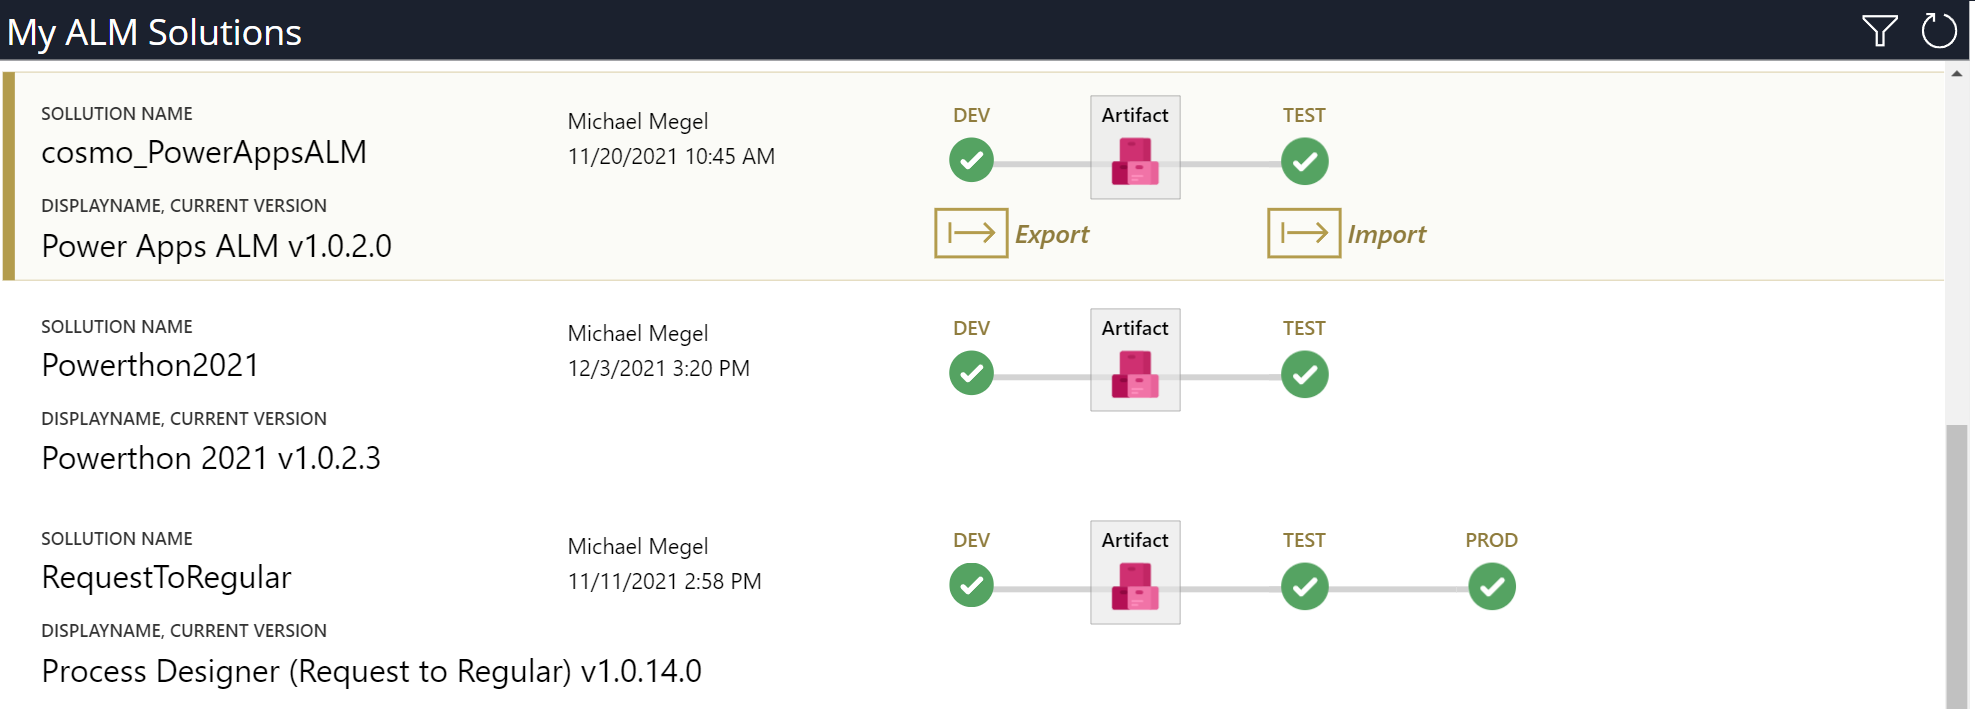
My Citizen Developer can now start the ALM process by clicking either the Export or the Import button. Each button will start it’s own process. Export starts Export Solution process and create my artifacts (solution-zip). Finally, Import starts the Solution Import of the latest exported artifact into the first environment, shown right to the Artifact symbol:
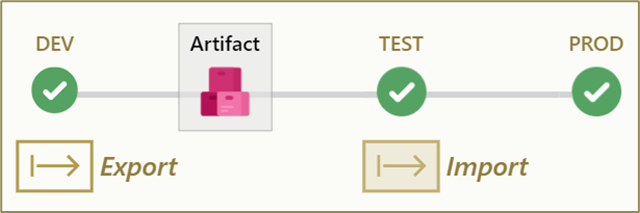
Later in my automated process, the import will continue automatically with the next environment.
I will explain this fact in more detail later in my blog post. For now,I want to focus on the user actions Export Solution and Import Solution.
Export Solution
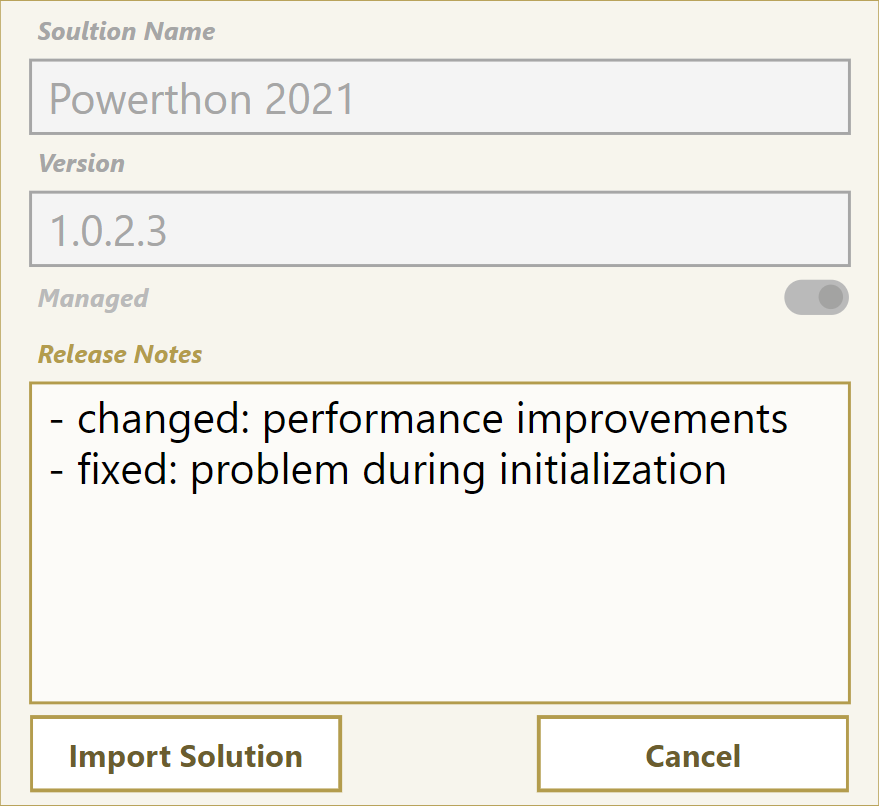
During the export, I like to encourage my Citizen Developer to enter release notes. This is because I want to build a history for each solution. I believe, it is also a good practice to share these information with the users of the app.
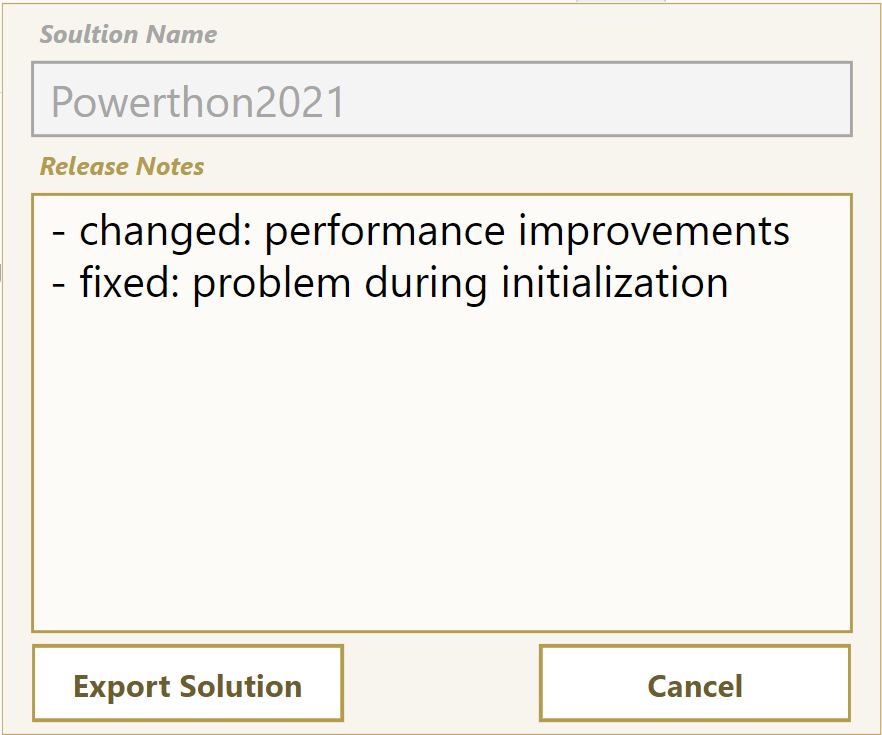
The secret behind is, by clicking the Export Solution button, my Citizen Developer create a new record in my table Solution Export. Finally, this new record will trigger on of my Power Automate Flows. As result, my solution export starts.
Import Solution
During import, I present solution information like version of the latest available artifact to my Citizen Developers. Furthermore, I include the release notes from my exported solution. So I see what has changed:
And again the same story behind the scenes. By clicking the button Import Solution, my Citizen Developer will create a new record in my table Solution Import with the related Solution Artifact. A Power Automate Flow will start and run the solution import.
But wait – where do I import my solution? This is a good question. I avoid to select a target environment in my import dialog. This is not necessary because I have already defined my target environments in my Model Driven App.
What I do instead is this. My Power Automate Flow continue automatically the import into the next environment.
Import Approvals
In order to stop this automated import sequence, I include an approval workflow. This gives me and my Citizen Developers the freedom to suspend or abort the automatic solution import.
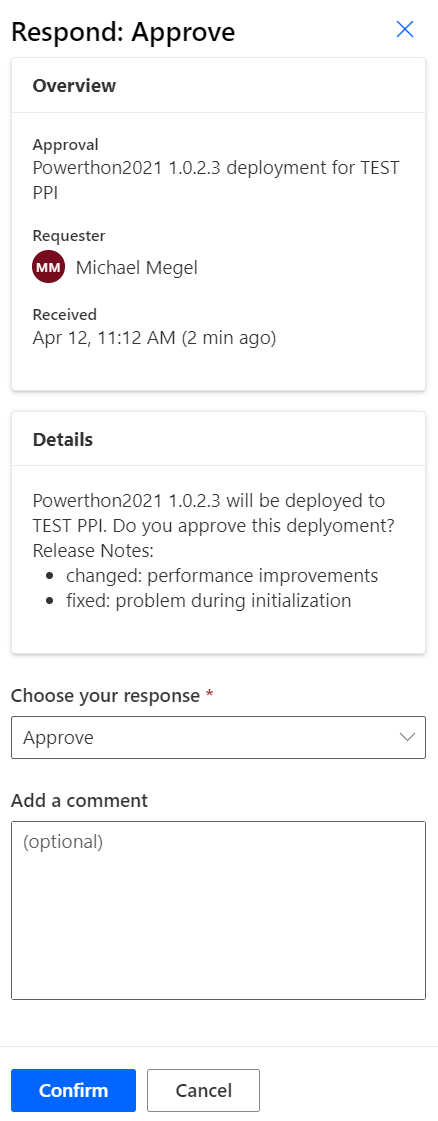
My rule is: before my solution is imported into an environment, I generate an approval request in my flow as follows:

In consequenz my Citizen Developer is able to specify the import time. The solution import starts only, after my Citizen Developer approve the import. On the other hand a related Test User can abort the import into production, when the manual test(s) in the respective TEST environment(s) have failed.
I include also the release notes of my Solution Artifact into my approval request:
Finally, I can collect comments and approval response into timeline of my Solution table in Dataverse. In other words, I document changes and generate a history for my solutions.
Backstage – my Power Automate Flows
All the magic of my ALM Process in Dataverse is based on Power Automate Flows. In fact, I add a couple of flows to achieve this goal. Moreover, I decouple my solution export and solution import for error handling and extensibility reasons. Here is my architecture overview:
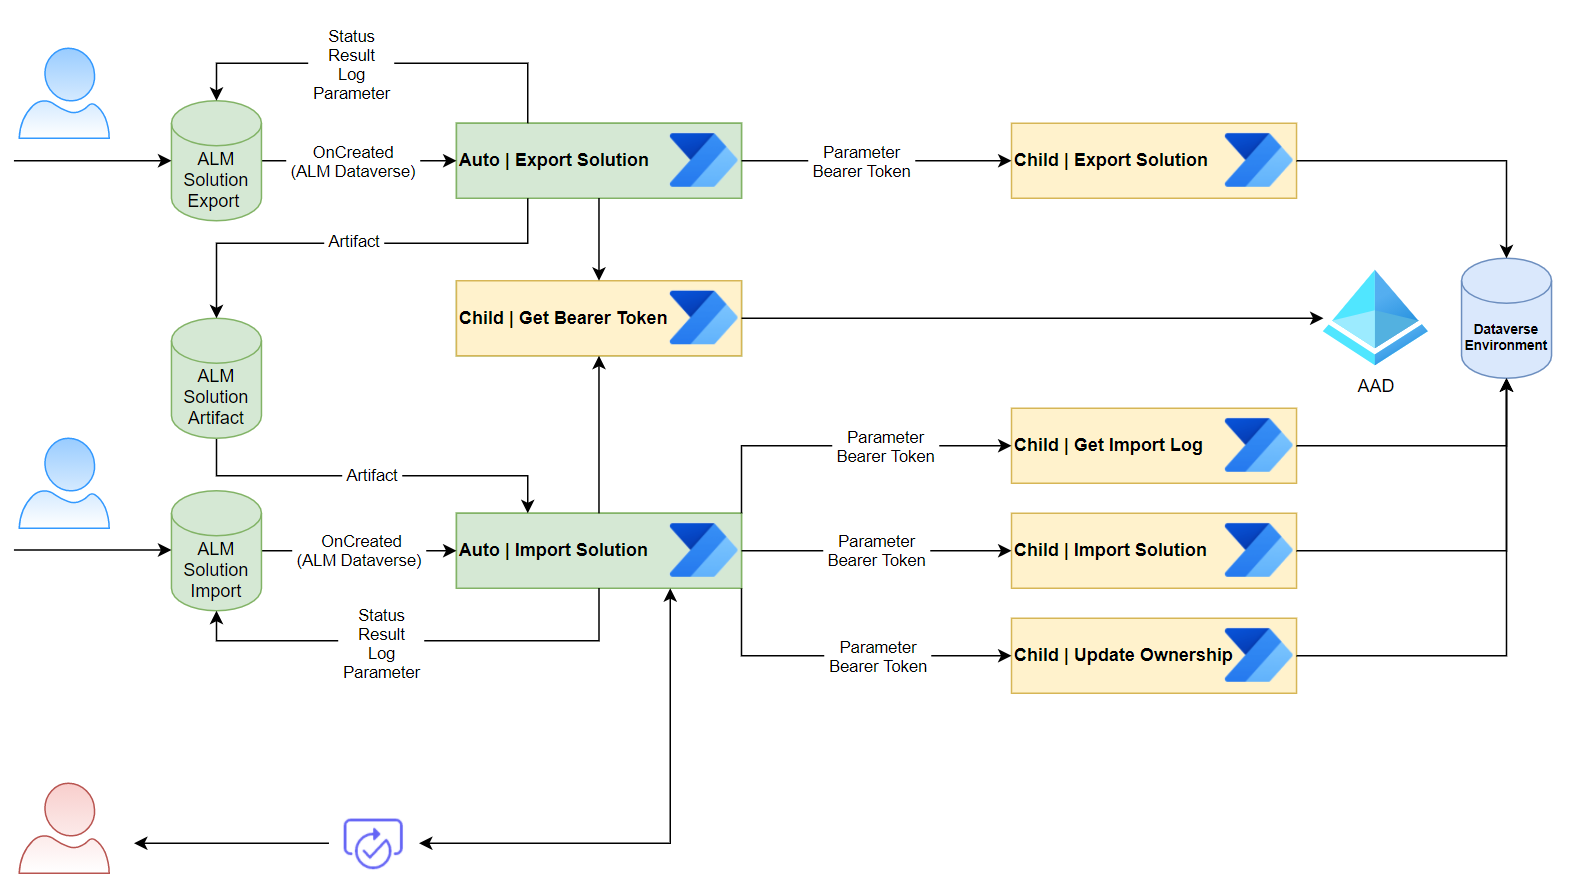
I use Power Automate Flows to start my workflow. In this case, the name of my flows starts with “Auto | …”. For instance, I use the dataverse trigger “When a row is added” in my cloud flow “Auto | Import Solution”:

In conclusion, my flow starts when my Citizen Developer create a new record either in my table Solution Export or my table Solution Import. These two flows manage the status of current export / import and handle errors. My “Child | …” flows instead do all the work.
In detail, I rebuild my manual export solution workflow in a cloud flow. Let me show this per example on the export solution tasks.
Export Solution
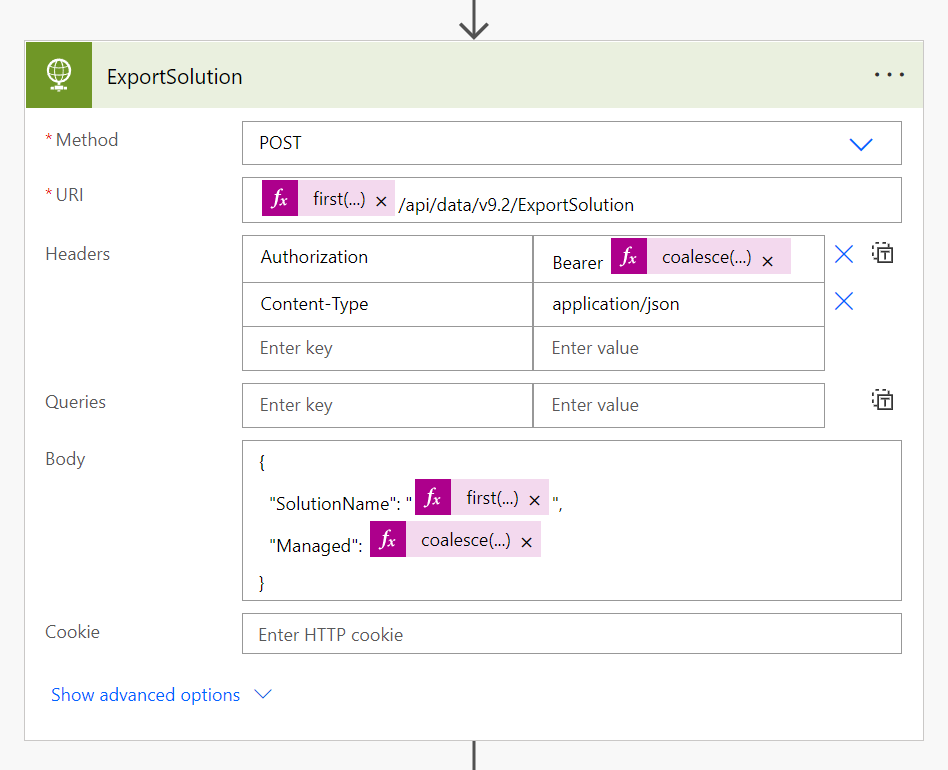
First, I specify the URL based on the master data of my environment. For authentication, I use a previously collected Bearer token in the header information of my request. And finally, I specify the solution information for the export. In total, it’s a sequence of composing data and calling APIs:
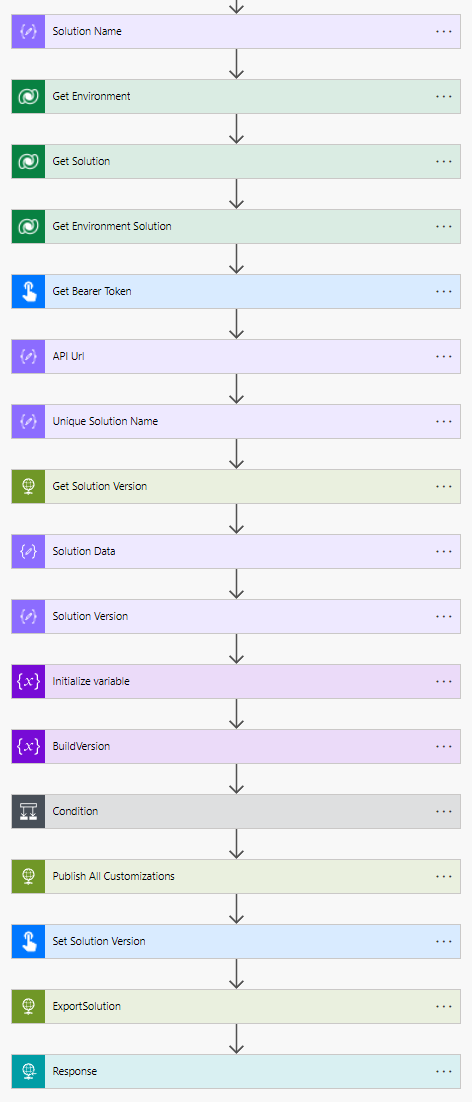
My solution export itself is a single API call with the prepared parameters. Well, nothing special – I only use calls an existing APIs in my Dataverse environment. Here is an example of my export task:
Summary
Our Citizen Developers are an important part of the Application Lifecycle Management process. For this reason, we need to keep the entry level low and we need to teach them about the ALM process.
My advise: First, as a Pro Developer, I should explain my environment concept and its benefits to my Citizen Developers. Secondly, I have to show how I use solutions and transport my Power Platform components as a package between my environments. Finally, it is in my opinion a great option, to provide a Power App to my Citizen Developers to start and automate the ALM process.
In conclusion, I created my own Power App, which serve the needs of my Citizen Developers. Now I allow my Citizen Developer to manage and transport solutions between defined environments. Furthermore, my included approval process ensure the quality of released solutions for my production environment.
Finally I must say, a fully automated ALM process for Citizen Developers based on Dataverse is possible. I can using Dataverse components and APIs to run the whole ALM process and without DevOps. But the complexity of my Power Automate Flows is huge.
It is a great starting point for the next level – so stay tuned 😉