Building an Intelligent Assistant with OpenAI as Canvas App
ChatGPT and OpenAI are a real step forward in applied AI. But there is still security issue that requires attention. As an AI enthusiast, I recognize the importance of addressing potential vulnerabilities and ensuring data privacy. For that reason, I create my own Intelligent Assistant and use the capabilities of ChatGPT and OpenAI in a secure way in a canvas app.
In this blog post, I’ll walk you through the process of creating an Azure OpenAI resource. Moreover, I show you how deploy a powerful AI model like gpt-35-turbo. I will also explain, how you can test the model using Azure OpenAI studio or by calling the REST API manually. I’ll even cover creating a custom connector and integrating it into my canvas app for a user-friendly chat interface. So, let’s dive in and discover the possibilities of Azure OpenAI in a simple and secure manner!
Azure OpenAI
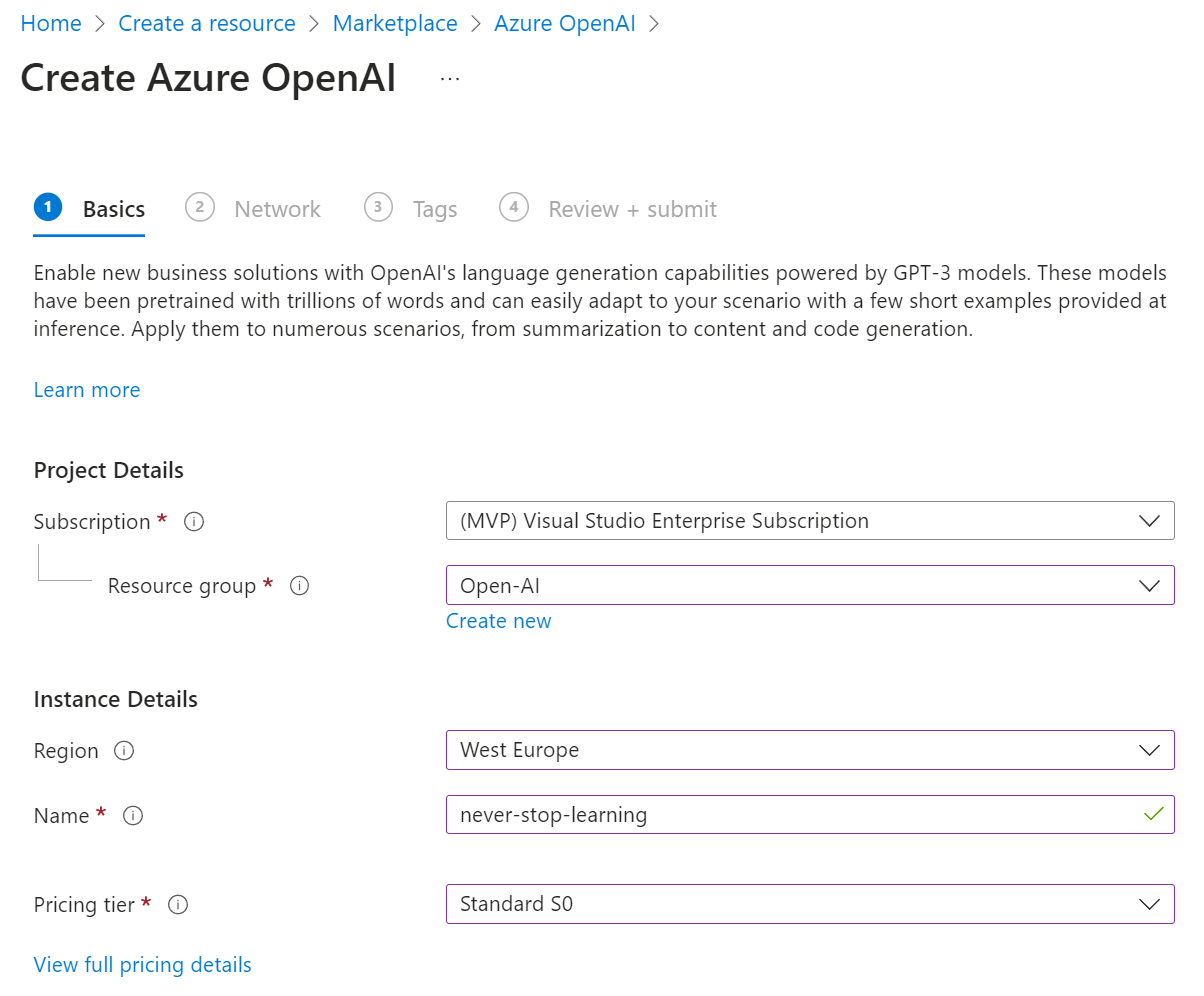
I use Microsoft Azure in order to use the capabilities of OpenAI in a secure way. For that reason, I create a new Azure resource:
Firstly, I define some basics like my Region, where I want to use the OpenAI and my component Name. I also select my preferred Pricing tier:
Additionally, I can limit the access of my OpenAI resources by configuring the Network Type:
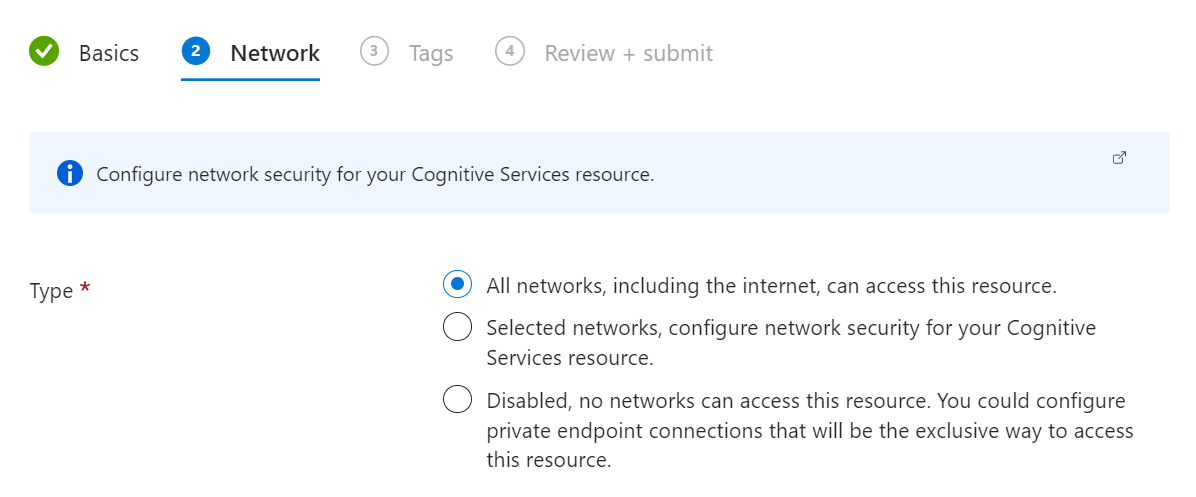
This make sense, when I train my model with confidential information.
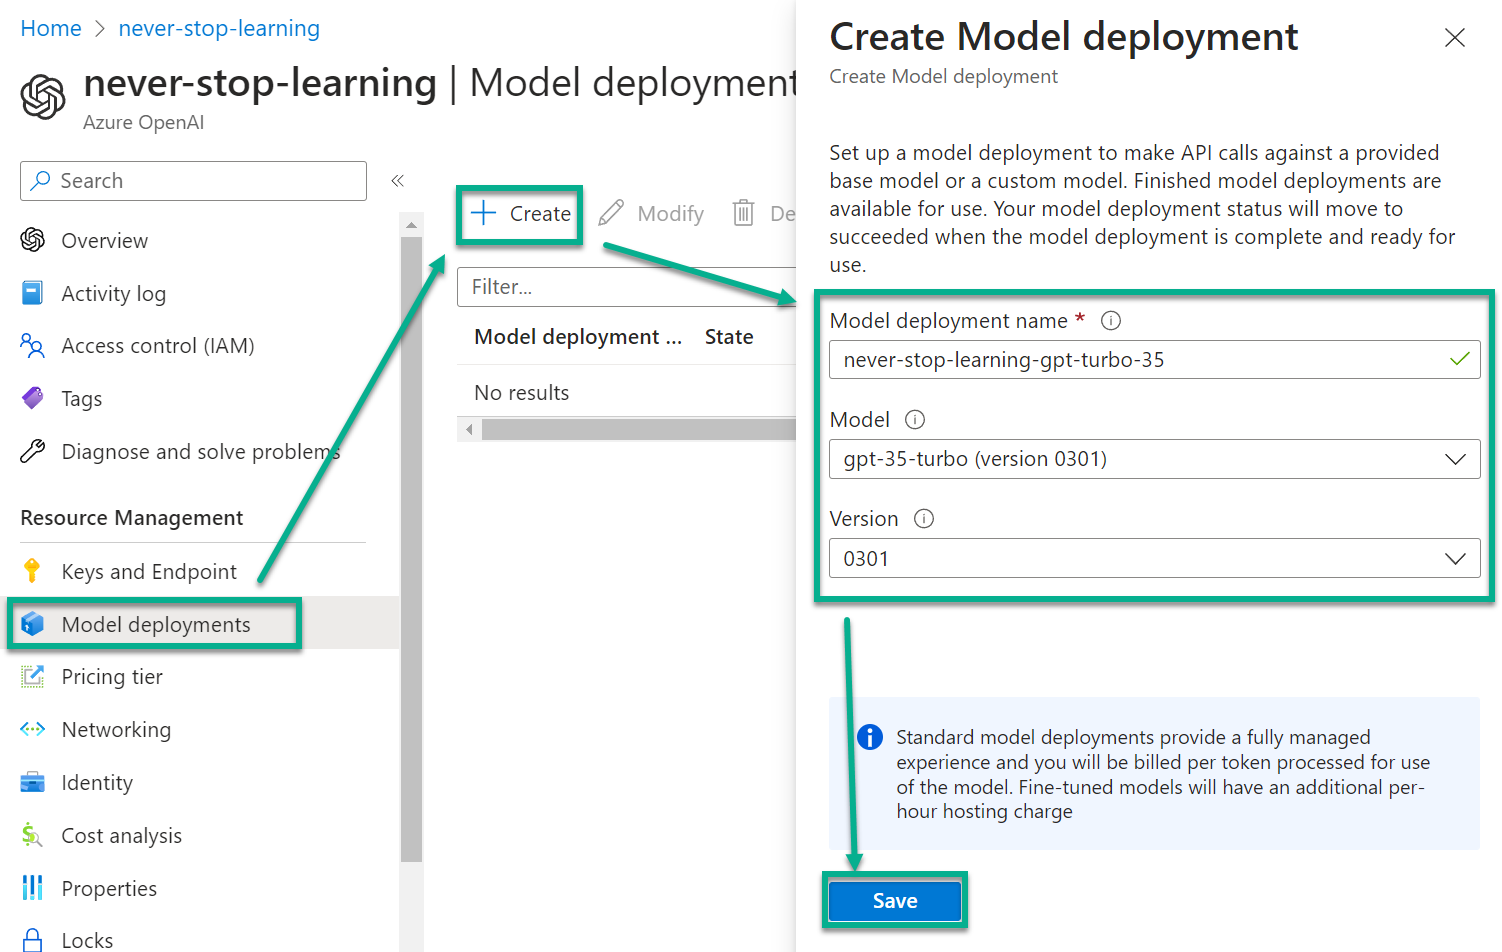
After my OpenAI component is ready in Azure, I start to deploy a new model. I use for my example gpt-35-turbo in the latest version:
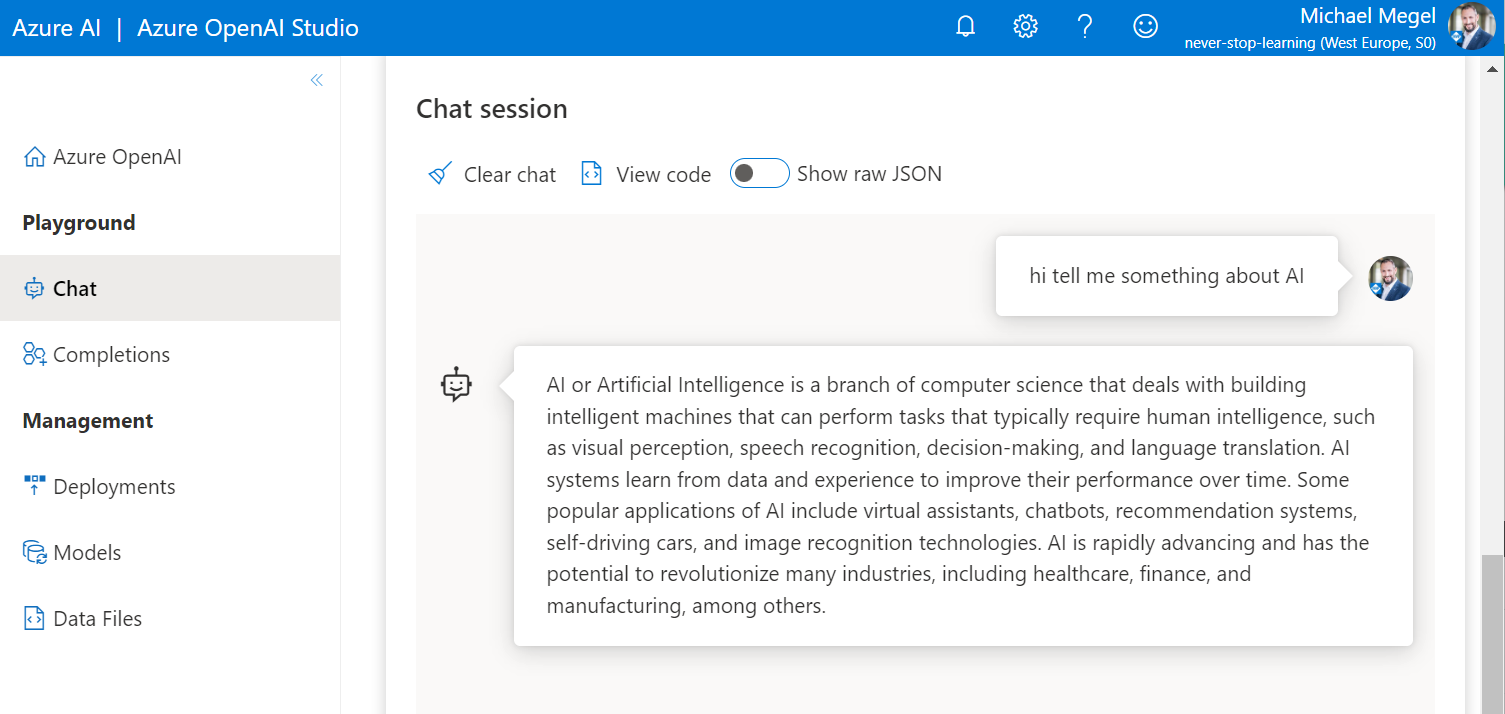
In addition, I can switch to Azure OpenAI studio. I can test my model there:
Wow, awesome! But how can I bring these OpenAI capabilities to my canvas app? Yes, OpenAI provide an API endpoint and I will use this endpoint in my canvas app.
OpenAI REST API
Based on the chat completions in Microsoft Docs, I can setup a HTTP call and test my endpoint manually from VSCode. Firstly, I specify the basic information like endpoint, model name and my API-Key in variables.
Additionally, I provide the chat content based on the role as messages in my request body for my example request. Furthermore I have added additional parameters to tweak the response:
@endpoint  = my-component-name.openai.azure.com
@model     = my-model-name
@myAPIKey  = ...
###
POST https://{{endpoint}}/openai/deployments/{{model}}/chat/completions?api-version=2023-03-15-preview
Content-Type: application/json
api-key: {{myAPIKey}}

{
  "messages": [
    {
      "role": "system",
      "content": "You are an AI assistant that helps people find information."
    },
    {
      "role": "user",
      "content": "hi tell me something about AI"
    }
  ],
  "max_tokens": 800,
  "temperature": 0.7,
  "frequency_penalty": 0,
  "presence_penalty": 0,
  "top_p": 0.95,
  "stop": null
}
After a while, my endpoint provides an answer for my request in VSCode:
{
  "id": "chatcmpl-7G7zvp00CTFHPj9vv70LJVOLHb0Xs",
  "object": "chat.completion",
  "created": 1684074503,
  "model": "gpt-35-turbo",
  "choices": [
    {
      "index": 0,
      "finish_reason": "stop",
      "message": {
        "role": "assistant",
        "content": "Sure, AI stands for Artificial Intelligence. It is a branch of computer science that deals with creating machines that can perform tasks that typically require human intelligence. AI systems can learn from data and experiences, recognize patterns, make decisions, and even communicate with humans. They are used in various industries, such as healthcare, finance, transportation, and entertainment. AI has the potential to transform many aspects of our lives, from how we work to how we interact with the world around us."
      }
    }
  ],
  "usage": {
    "completion_tokens": 95,
    "prompt_tokens": 30,
    "total_tokens": 125
  }
}
You see, using the endpoint is extremely simple. Let’s create a custom connector and use this endpoint in my canvas app.
Setup my OpenAI Custom Connector
I start by navigating to my custom connectors. I create a new custom connector by selecting Import from GitHub:
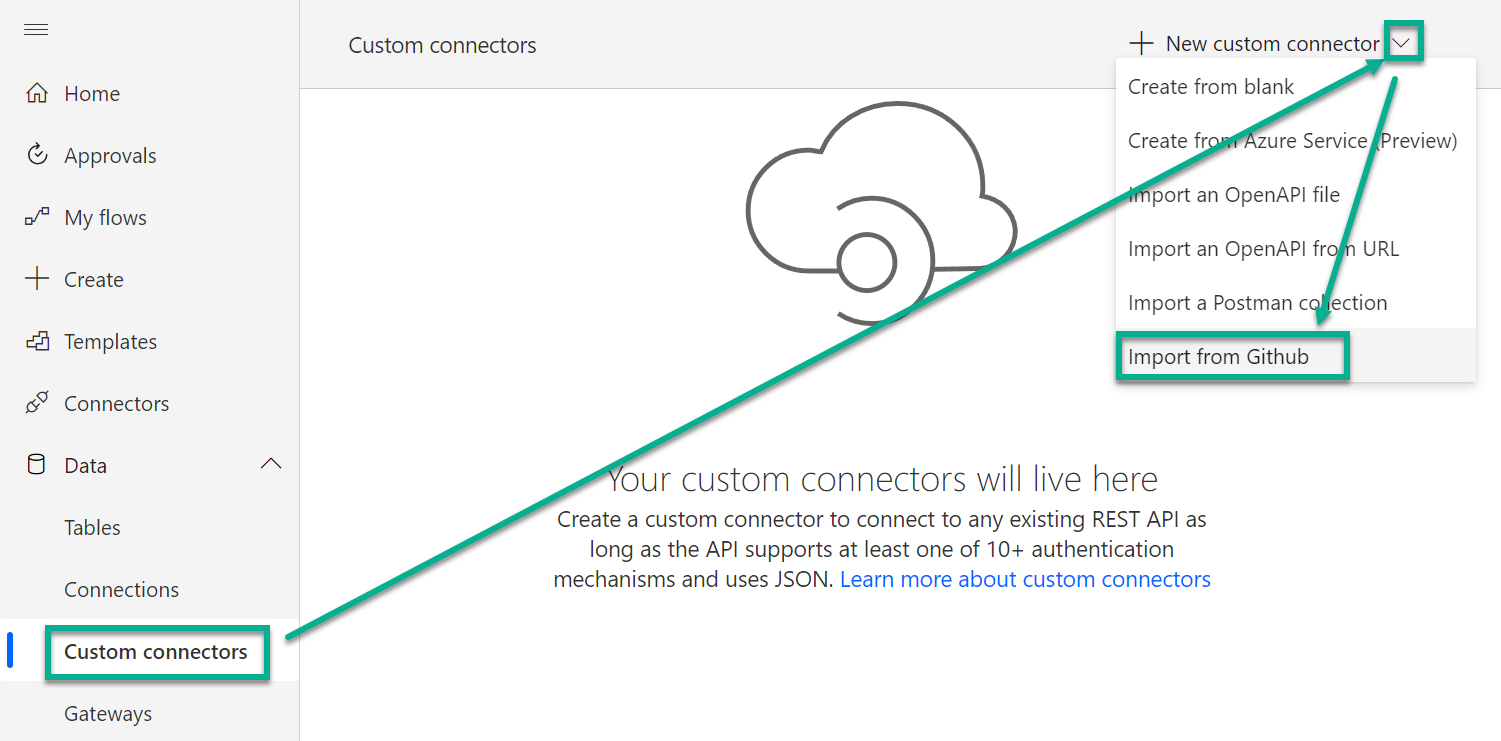
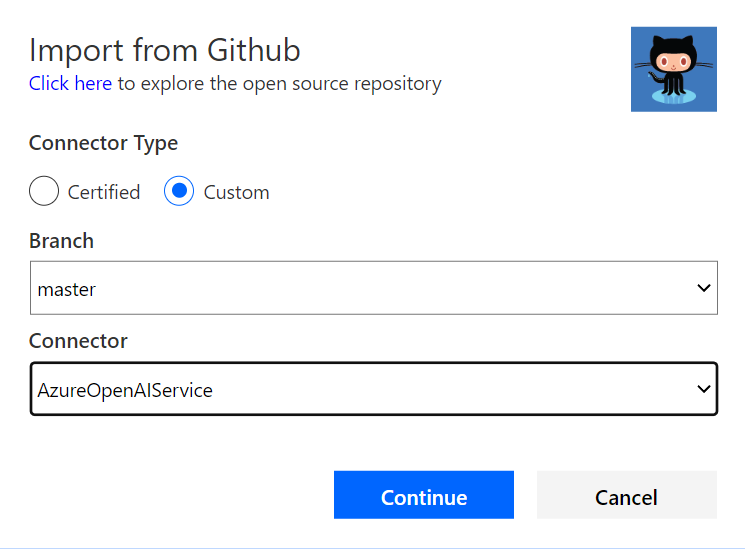
This is cool, because in the dialog I can select a prepared definition of an Azure OpenAI service:
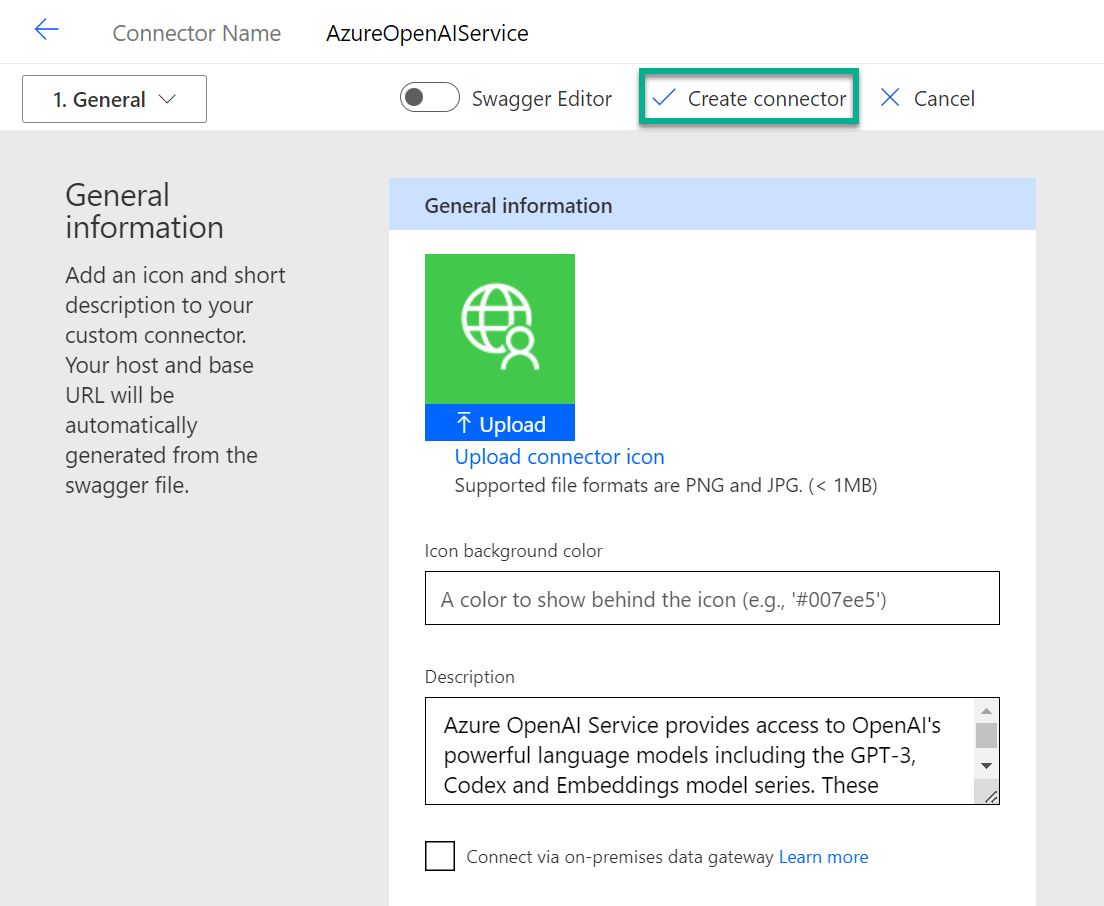
What happens in the background, the Custom Connector Designer import the Swagger definition from GitHub. The result is shown afterwards to me and I click on Create connector:
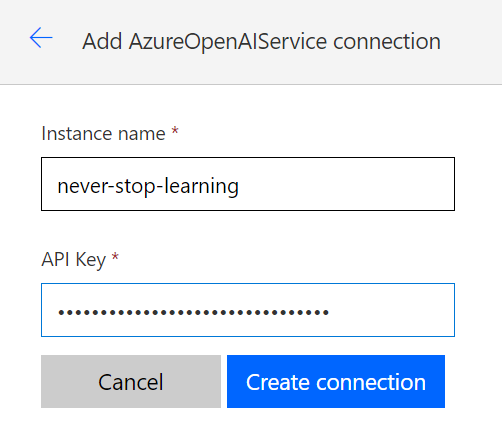
Finally, I can create a new connection based on my Instance name (Azure component name) and API Key:
As result, my connector is ready to use in less than 5 minutes. This is amazing!!!
Creating my Intelligent Assistant Canvas App
OK, let’s start by adding my created connector as a data source to my canvas app:

Now, let me show you how I create a very simple user interface for my OpenAI API chat in my canvas app. In other words, I build a visualization of a chat conversation.
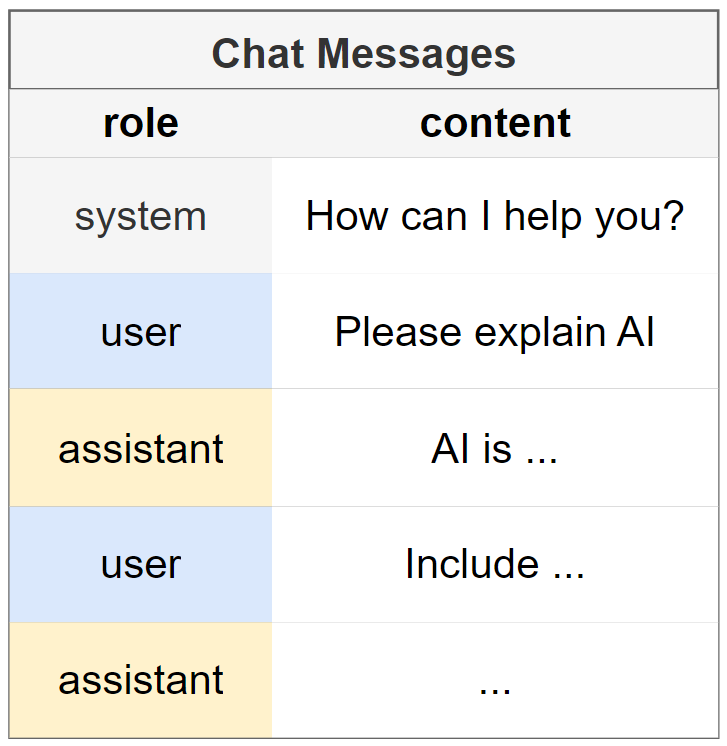
Here is an example, which shows a chat with OpenAI. You see this is nothing else than a list of Chat Messages. Each message have a role and content like this:
For that reason, I added a gallery control galChat with 2 labels (lblMessage, lblRole) to present the list of chat massages to my screen. Additionally, I want to enter questions. Therefore, I use a text input edInput. Moreover, I use horizontal and vertical containers to provide a reactive UI for my app:

The result with some data is this:

You see the Gallery present the whole conversation. Furthermore, I can use the text input to prepare my next question for my Intelligent Assistant. My icon button Clear invoke a reset of the conversation. In addition, my icon button Send send the user input to OpenAI.
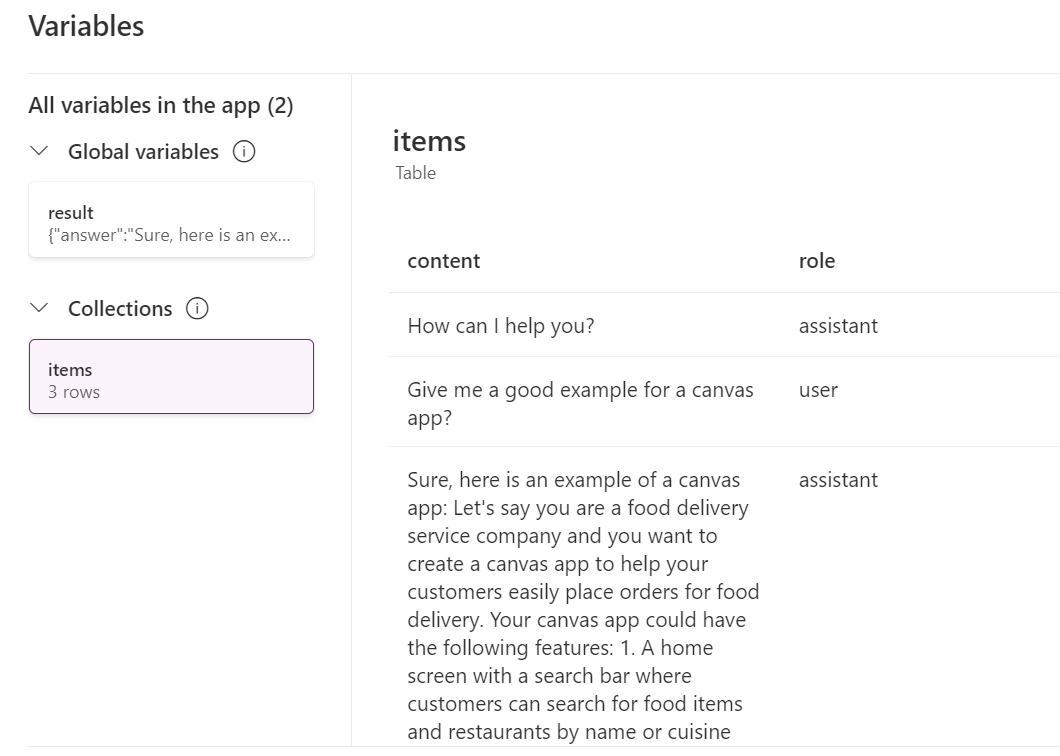
Let’s have a loser look to used variables. I use a variable result to store the result of my OpenAI connector call. In addition, my conversation is stored in my collection items:
The interesting part is now my OnSelect trigger of my Send button. You see, I use the With statement to create a local variable user_message with the user input. Afterwards, I reset my text input and call the custom connector. The result is stored in my global variable result. Finally, I update my collection items with the returned conversation (result.messages):
OnSelect := |
If(
Trim(edInput.Text) <> "",
With({ user_message: edInput.Text },
Reset(edInput);
// call my AzureOpenAIService with my model 'never-stop-learning-gpt-turbo-35'
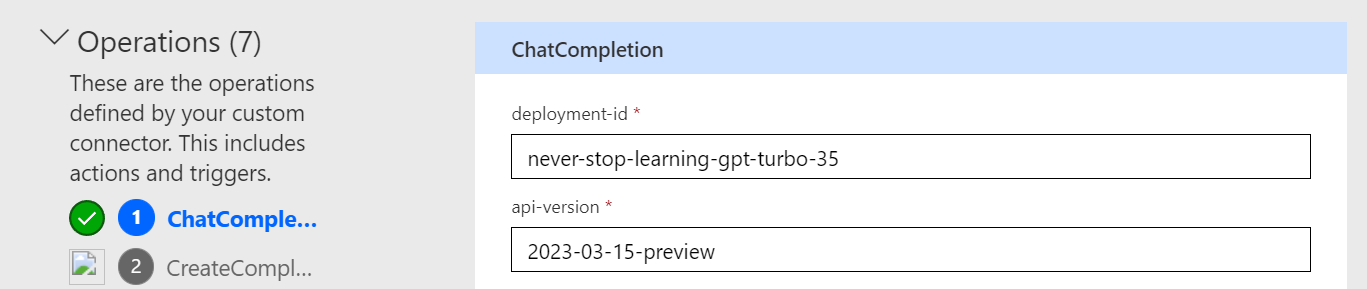
Set(
result, AzureOpenAIService.ChatCompletion("never-stop-learning-gpt-turbo-35", "2023-03-15-preview", {messages: items, user_message: user_message, user: User().FullName})
);
// update my conversation
ClearCollect(
items,
result.messages
);
);
);
Last but not least, my button Clear reinitialize my conversation in collection items and reset the input control edInput:
OnSelect := |
  ClearCollect(items, {role: "assistant", content: "How can I help you?"});
  Reset(edInput);
You see, I used basic PowerFX code. Nothing special.
Summary
Using OpenAI models in Azure is a straightforward process. Developing my Intelligent Assistant on Power Platform powered by OpenAI’s chat completion is incredibly effortless. It actually feels like completing a task with a simple snap of the fingers. I managed to create a simple demonstration in less than 30 minutes. This was definitely a mind blowing experience for me.
Firstly, I started by setting up the OpenAI in Microsoft Azure. Afterwards I deployed the gpt-35-turbo model in my OpenAI component. The result of this first step was an HTTP endpoint in Azure. Secondly, I created a respective custom connector based on the GitHub custom connector specification. Furthermore, I created in Dataverse a connection for this connector and used my OpenAI instance name and key.
Finally, I created a canvas app and used my connector as data source. Furthermore, I stored my conversation in a collection and used a gallery to visualize my chat content. This was definitely not complicated.