
Authorize from Swagger UI
Authorization is a must for APIs, there is no question about that! On the other hand, development and testing becomes more difficult. So I’d like to introduce you to the feature “Authorize” in Swagger UI that I recently discovered.
I have to say, I’m impressed! As a developer, I often use Swagger UI to test my APIs, but I’ve always struggle when it comes to authentication. In the past, I couldn’t test my API in Swagger UI because authentication was required, and I didn’t have a authentication token for OAuth2. This meant I had to switch to other tools just to authenticate and then come back to Swagger UI to test my API. It was a tedious process that took up a lot of my time.
But with “Authorize from Swagger UI,” everything changed. Now, I can easily authenticate my requests within the Swagger UI itself, without having to leave the tool. This feature has made my life so much easier, and I’m excited to share my experience with you. Furthermore, I’ll explain my own challenges in enabling authorization for Azure DevOps Rest API.
Azure DevOps Rest API
Let me give you an example of how I’ve used the Azure DevOps Rest API a lot in the past. We created several microservices that use the API to access information about organizations, projects, repositories, build pipelines, work items (backlog), test cases, and more. These microservices help me and my colleagues to set up new Azure DevOps projects, repositories, and backlogs, and to analyze the information in those projects in order to optimize costs and resources. Furthermore, we’ve found that using these services as self-service tools has been incredibly useful for our organization.
To make these services even more accessible, I decided to integrate them as custom connectors in the Power Platform. This allows my citizen developers to use Power Apps and Power Automate to create even more powerful self-service tools that can be used by anyone in the organization.
However, one of the biggest challenges of using the Power Platform (or any other application that consumes APIs) is authentication. The Azure DevOps Rest API can be used either by using OAuth2 Bearer tokens or by using basic authentication with a Personal Access Token (PAT).
An example for such a web requests is the access of Azure DevOps organizations. Firstly, I have to Get the user Profile from Azure DevOps REST API. Afterwards, I must call List Accounts in order to get all Azure DevOps organizations of the user. In other words, I execute these HTTP commands:
### Get the user profile
# @name profile
GET https://vssps.dev.azure.com/_apis/profile/profiles/me?api-version=7.0
Authorization: Basic username AAAAABBBBBBBB...

### Assign variable from Get user profile response
@memberId = {{profile.response.body.id}}

### List all Azure DevOps organizations
GET https://app.vssps.visualstudio.com/_apis/accounts?memberId={{memberId}}&api-version=7.0
Authorization: Basic username AAAAABBBBBBBB...
As you may have noticed, I’m using Basic Authentication together with the Personal Access Token from Azure DevOps. However, I’m aware that this is not the most secure way of authenticating requests. A better way to authenticate requests is to use OAuth2 and a Bearer token.
A Microservice for Retrieving Azure DevOps Organizations
Let me give you an example of one of my microservices – the “AzDevOps Organizations” microservice. In order to get a list of Azure DevOps organizations, I needed to call two different endpoints from the Azure DevOps Rest API. Rather than making these calls directly from my application, I decided to create a small microservice that could handle this functionality.
// Controller Response
public record Organization(string id, string name, string description) { }

// Azure DevOps
record Profile(string id) { }
record ListRecord<T>(T[] value) { }
record Account(string accountId, string accountName, string emailAddress) { }

// ...

[ApiController]
[ODataAttributeRouting]
[ODataRouteComponent("organizations")]
public class OrganizationsController: ODataController
{
    // ...

    // GET Organizations
    [SwaggerOperation(Summary = "Get Organizations", Description = "Get Organizations", OperationId = "get-operations")]
    [HttpGet("organizations", Name = "Get Organizations")]
    [Produces("application/json")]
    [ProducesResponseType(StatusCodes.Status200OK, Type = typeof(Organization[]))]
    public async Task<IQueryable<Organization>> Get()
    {
        return (await GetOrganizations()).AsQueryable();
    }

    // Get the organizations
    internal async Task<IEnumerable<Organization>> GetOrganizations()
    {
        using var httpClient = ...

        // Get User Profile
        var request = new HttpRequestMessage(..., "https://vssps.dev.azure.com/_apis/profile/profiles/me?api-version=7.0");
        request.Headers.Add("Authorization", $"{Request.Headers.Authorization}");

        var response = await httpClient.SendAsync(request);
        response.EnsureSuccessStatusCode();
        var content = await response.Content.ReadAsStringAsync();
        var profile = JsonBase.FromJson<Profile>(content);

        // List Accounts
        request = new HttpRequestMessage(..., $"https://vssps.dev.azure.com/_apis/accounts?memberId={profile.id}&api-version=7.0");

        request.Headers.Add("Authorization", $"{Request.Headers.Authorization}");

        content = await response.Content.ReadAsStringAsync();
        var organizationList = JsonBase.FromJson<ListRecord<Account>>(content);

        // Transform organizationList into Organization-Records
        return organizationList.value.Select(a => new Organization(id: a.accountId, name: a.accountName, url: $"https://dev.azure.com/{Uri.EscapeDataString(a.accountName)}"));
    }

}
As you see, the result is an ASP.NET Core API that can be called by any application or service that needs to get a list of Azure DevOps organizations. Furthermore, my microservice forward the necessary authorization header directly to the Azure DevOps Rest API ready to use.
That’s where Open API and Swagger comes in. When I start my ASP.NET Core API, I can access Swagger UI in my browser. As result my operations is shown:
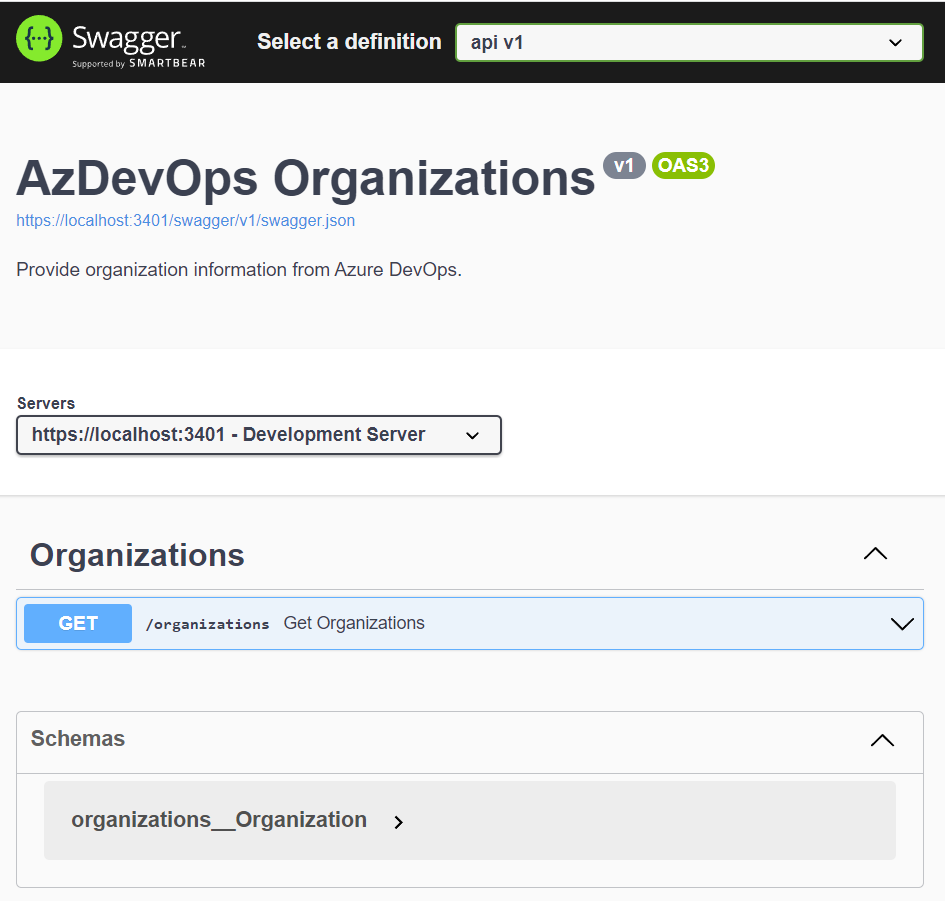
But I can’t add here the needed Authorization information. Yes, something is missing. I must add some information to my OpenAPI definition.
Adding Authorization methods to OpenAPI and Swagger
To enable authorization in OpenAPI and Swagger, there are several steps that need to be taken. The first step is, I add a security definition for Bearer authentication to the Swashbuckle SwaggerGenOptions. This tells Swagger to include the necessary information for authenticating requests using a Bearer token.
In my case, I use my method CreateAzDevOpsSecurityScheme() that defines a security scheme for Bearer authentication in OpenAPI/Swagger, specifying that OAuth2 will be used with an access token passed in a header. The code also sets the authorization and token URLs, along with the required scope for Azure DevOps API access.
internal static OpenApiSecurityScheme CreateAzDevOpsSecurityScheme()
{
    return new OpenApiSecurityScheme
    {
        // specify the name of the scheme
        Name = "Authorization",
        // specify that the access token will be passed in a header
        In = ParameterLocation.Header,
        // specify that OAuth2 will be used
        Type = SecuritySchemeType.OAuth2,
        // explain how the access token will be formatted
        Description = "Bearer {access_token}",
        // specify the authentication scheme
        Scheme = "Bearer",
        // specify the format of the bearer token
        BearerFormat = "JWT",
        // specify the OAuth2 flows
        Flows = new OpenApiOAuthFlows
        {
            // specify the implicit flow
            Implicit = new OpenApiOAuthFlow
            {
                // set the authorization & token URL, the current tenant is "common"
                AuthorizationUrl = new Uri($"https://login.microsoftonline.com/common/oauth2/v2.0/authorize"),
                TokenUrl = new Uri($"https://login.microsoftonline.com/common/oauth2/v2.0/token"),
                // set the required scopes
                Scopes = new Dictionary<string, string>
                {
                    // specify the Azure DevOps API scope (UUID is needed for Azure DevOps)
                    { "499b84ac-1321-427f-aa17-267ca6975798/user_impersonation", "Azure DevOps" },
                }
            }
        }
    };
}
Next, a security requirement for Bearer authentication needs to be added to the SwaggerGenOptions. This ensures that all API endpoints require authentication using a Bearer token. I have created my method CreateAzDevOpsSecurityRequirement() for this:
internal static OpenApiSecurityRequirement CreateAzDevOpsSecurityRequirement(string id = "BearerAuth")
{
    return new OpenApiSecurityRequirement
    {
        {
            new OpenApiSecurityScheme
            {
                // set the reference type to SecurityScheme and the id to BearerAuth
                Reference = new OpenApiReference
                {
                    Type = ReferenceType.SecurityScheme,
                    Id = id
                }
            },
            // specify the list of required scopes
            new List<string>{
                "499b84ac-1321-427f-aa17-267ca6975798/user_impersonation" // "Azure DevOps"
            }
        }
    };
}
Furthermore, in order to apply this security requirement to individual operations, an IOperationFilter can be used to add the security requirement to each operation. This ensures that each operation requires authentication using a Bearer token before it can be called. Here is my very tiny implementation:
public class SecurityRequirementsOperationFilter : IOperationFilter
{
    public void Apply(OpenApiOperation operation, OperationFilterContext context)
    {
        if (operation.Security == null)
            operation.Security = new List<OpenApiSecurityRequirement>();

        operation.Security.Add(SwaggerExtensions.CreateAzDevOpsSecurityRequirement());
    }
}
Finally, I add Swagger support to my ASP.NET Core application. To enable authorization for my APIs in Swagger, I used the AddSwaggerGen method with options configuration. Within this configuration, I defined a Bearer authentication security definition and requirement using CreateAzDevOpsSecurityScheme() and CreateAzDevOpsSecurityRequirement() methods respectively. Lastly, I use an operation filter to apply these security requirements to all operations.
builder.Services.AddSwaggerGen(options =>
    {
        // ...
        options.AddSecurityDefinition("BearerAuth", CreateAzDevOpsSecurityScheme());
        options.AddSecurityRequirement(CreateAzDevOpsSecurityRequirement("BearerAuth"));
        options.OperationFilter<SecurityRequirementsOperationFilter>();
        // ...
    }
But before I can use authentication of requests within the Swagger UI itself, it is necessary to first register an application for Azure DevOps with user_impersonation.
An Application Registration for Azure DevOps
I create a new application registration for my needed authorization in Azure DevOps with user_impersonation in my Azure Active Directory (AAD):
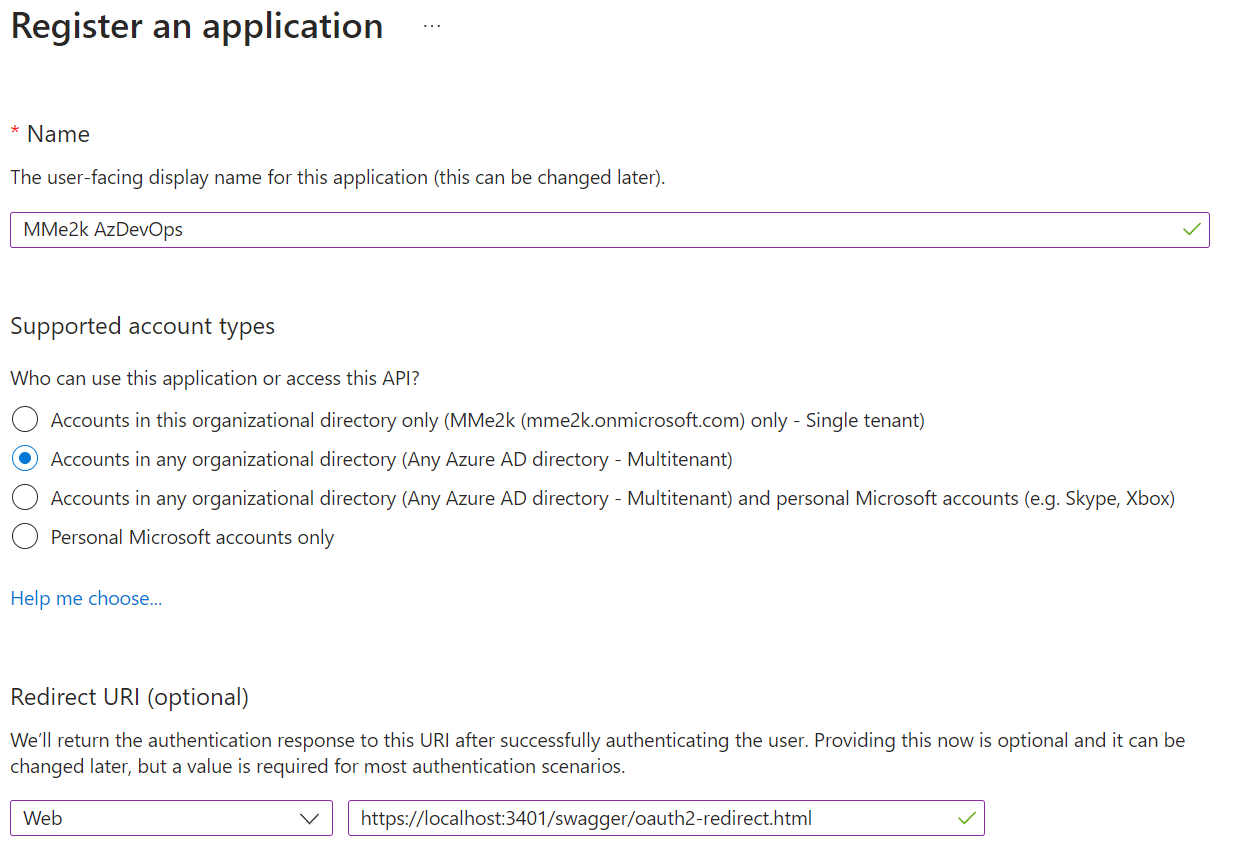
For this example, I am using “Accounts in any organizational directory (Any Azure AD directory – Multitenant)” because I used the tenant common for my AuthorizationUrl and tokenurl. Otherwise, I would have to use my tenant ID or name in both URLs. Furthermore, I add as Redirect URI my local development server. I change this later to the redirect URI of my custom connector:
https://global.consent.azure-apim.net/redirect
In addition, I enable also ID tokens in order to allow my implicit flow:

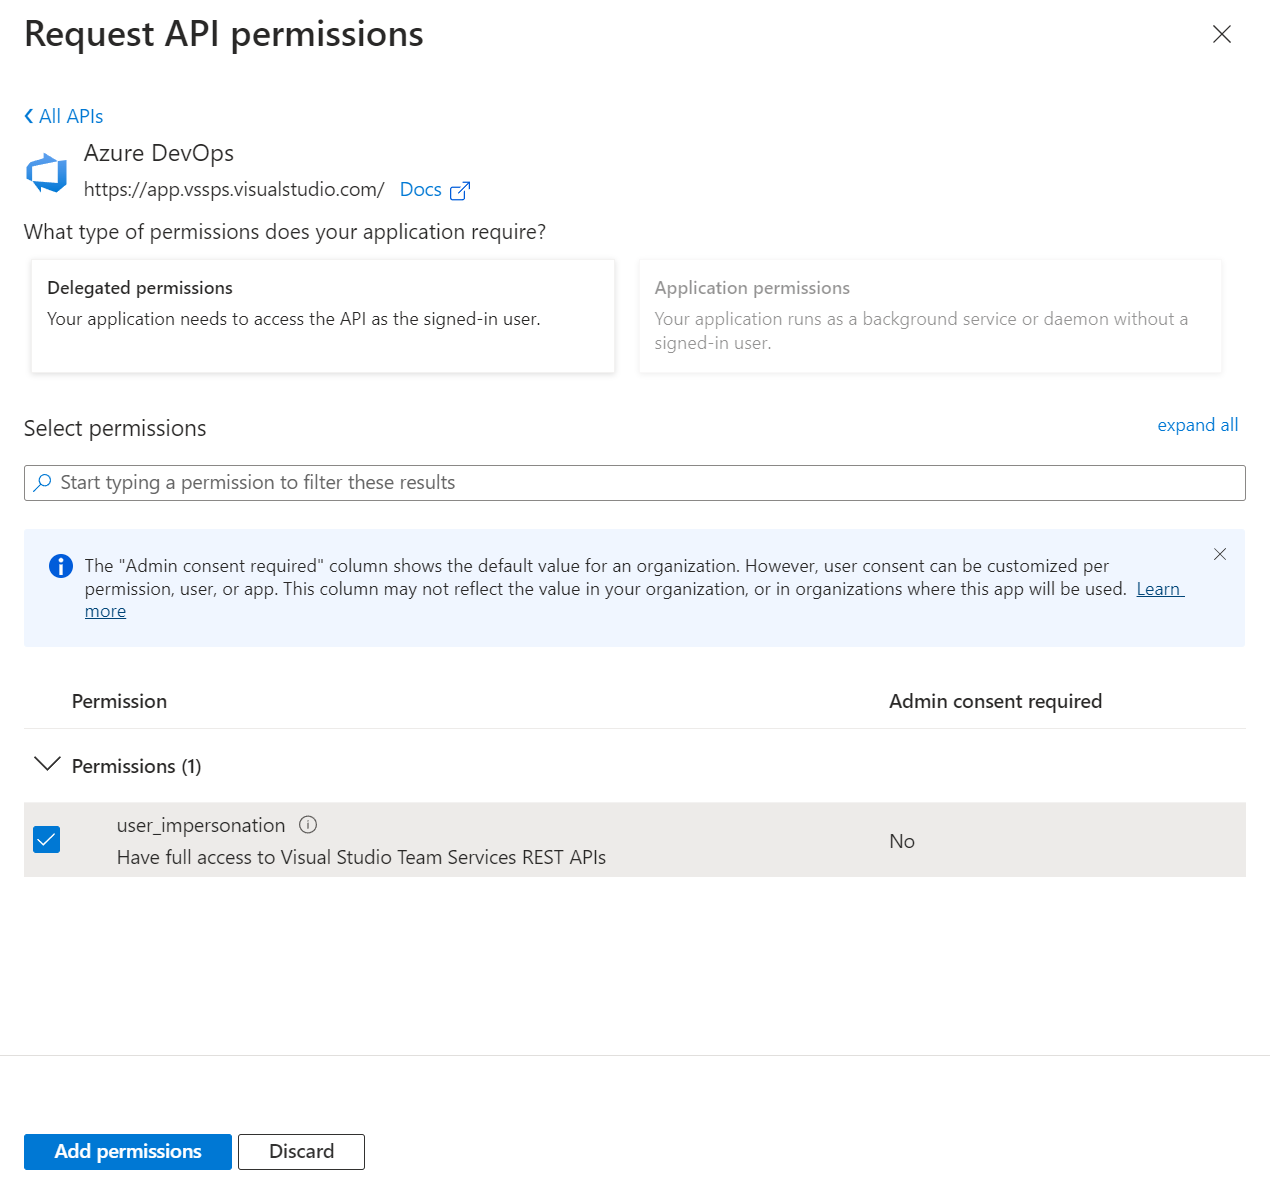
Last but not least, I select as API permission Azure DevOps. You see also, the previously used UUID is here visible:
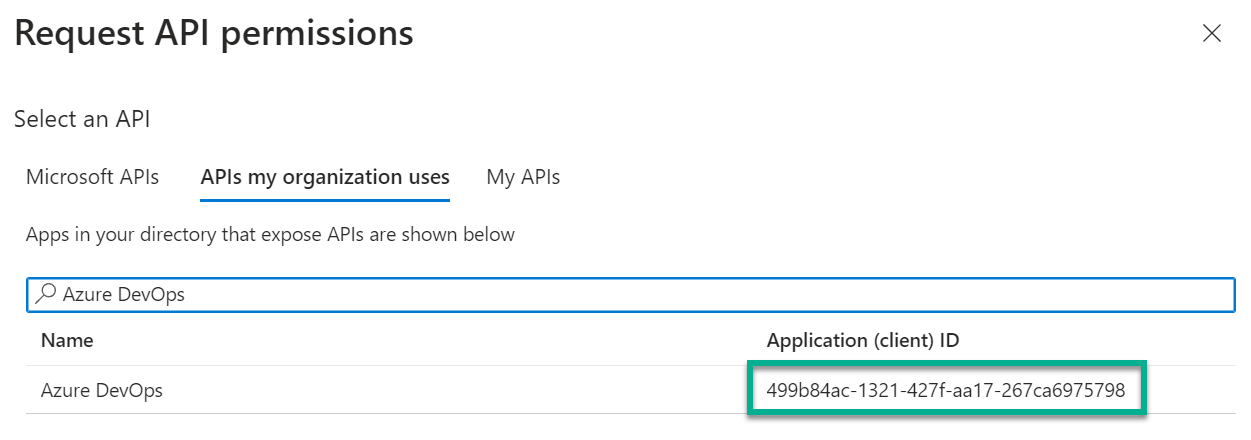
Afterwards I add user_impersonation from delegated permissions:
Finally, I copy my Application Client ID for my final test…
Let’s use “Authorize in Swagger UI”!
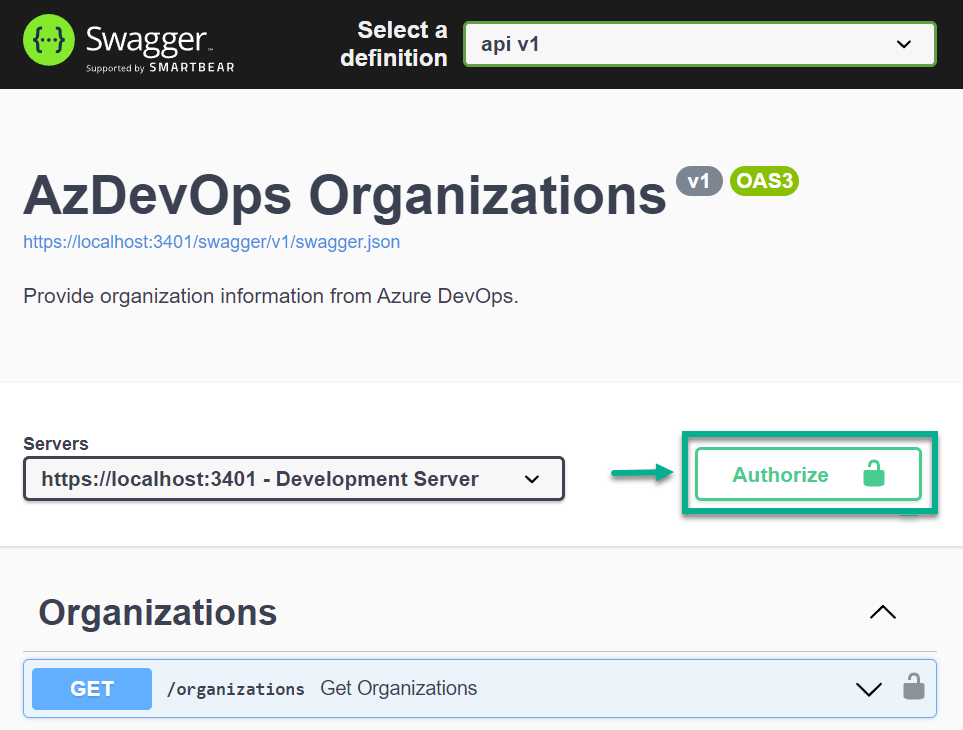
Yes, it’s finally happening – I can now authorize requests directly in Swagger UI without the need to leave my browser:
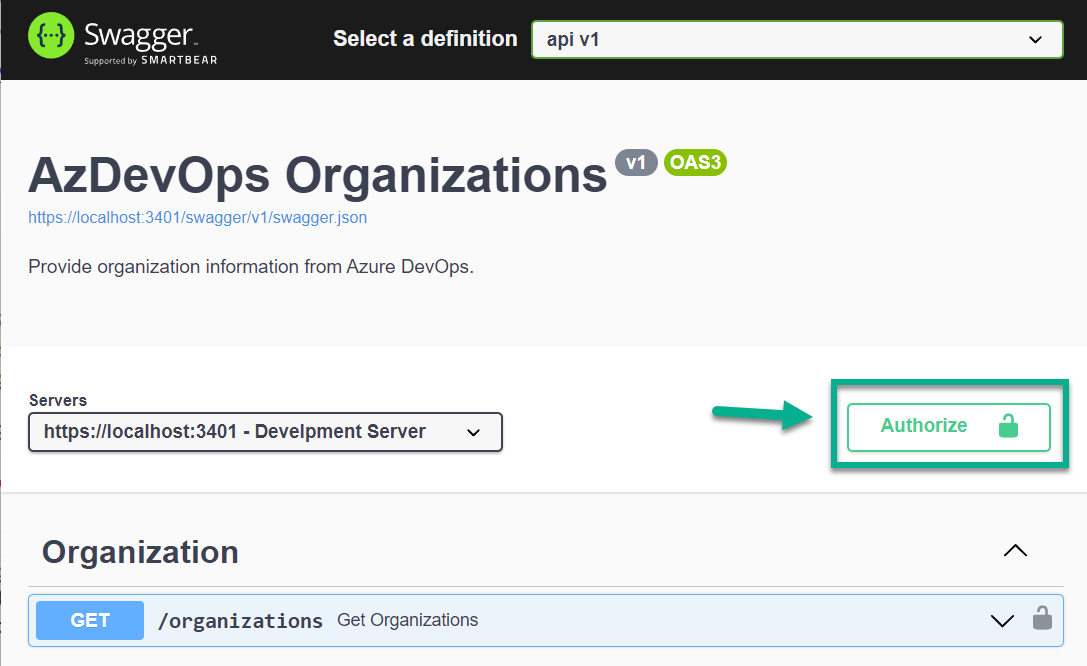
To authorize my requests within Swagger UI, I begin by clicking on “Authorize”. This opens a small window where I select my authorization method. For OAuth2 authentication, I must include the client_id from my App Registration and the required scope for Azure DevOps:
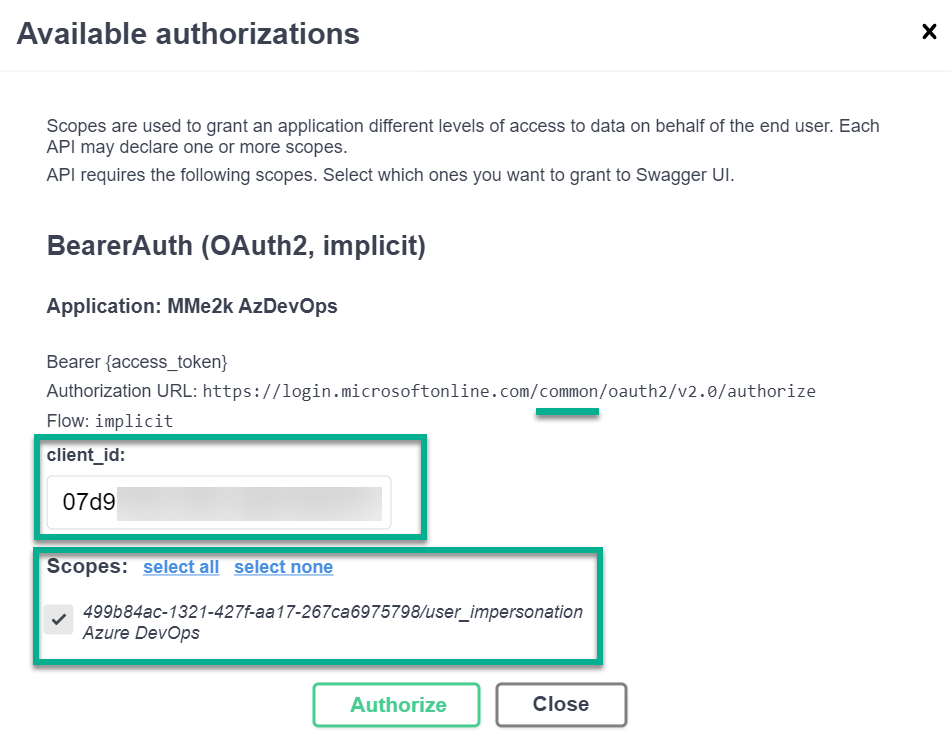
Next, when I select “Authorize” again, Swagger UI redirects me to my AuthorizationURL including my tenant common, my client_id, redirect_uri, scope, and other information like state:https://login.microsoftonline.com/common/oauth2/v2.0/authorize?response_type=token&client_id=07d9...redirect_uri=https%3A%2F%2Flocalhost%3A3401%2Fswagger%2Foauth2-redirect.html&scope=499b84ac-1321-427f-aa17-267ca6975798%2Fuser_impersonation&state=U2F0...
In other words, my sign in dialog opens:
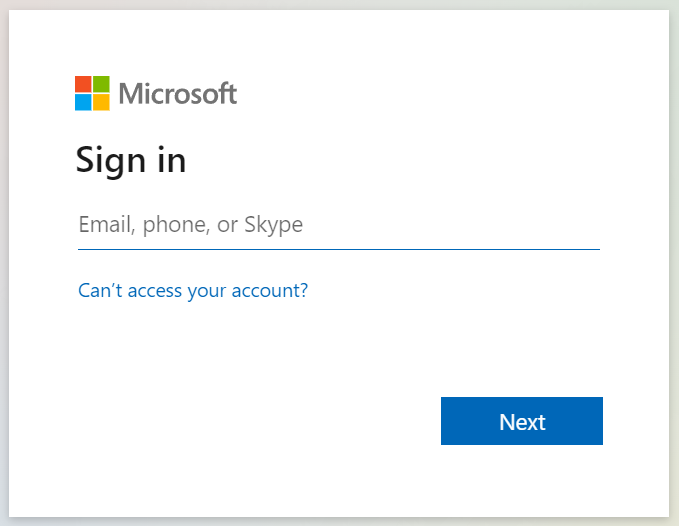
Once I enter my login credentials, the sign-in process is authenticated, and the bearer token is acquired. Swagger UI caches the token for me, which means that I don’t need to re-authenticate until I log out:

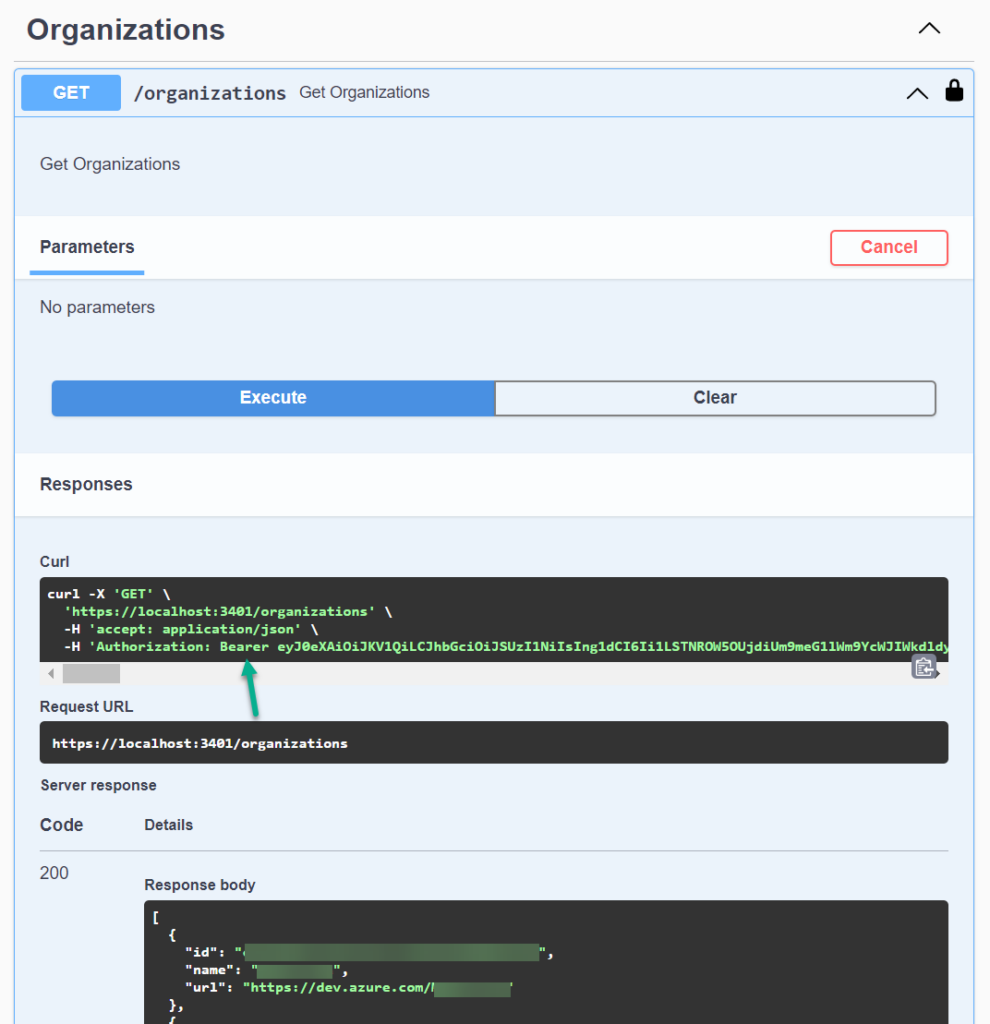
Finally, I can now test my API directly from Swagger UI. Furthermore, the acquired Bearer token is included correctly as Authorization Header and my service provide the correct response to me:
Summary
Certainly, the “Authorize” feature in Swagger UI is a time-saving highlight once properly configured. However, it requires knowledge of the necessary steps, as discovering all the details can be a challenging experience.
In addition, I provided an explanation of the required steps in C# code for enabling authorization in Azure DevOps within the ASP.NET Core framework. I also walked you through the process of setting up the necessary App registration and demonstrated the steps in Swagger UI based on my example.
With these insights, you should be able to easily configure the “Authorize” feature in Swagger UI for your Microservice, without the need to go through the same learning curve as I did.