
Upload files into AWS S3 Bucket with Power Automate
Recently, a colleague reached out to me with a Power Automate Flow problem. I asked him, „What did you try?”. He answered to me: “I want to upload generated csv files to my AWS S3 Bucket.”
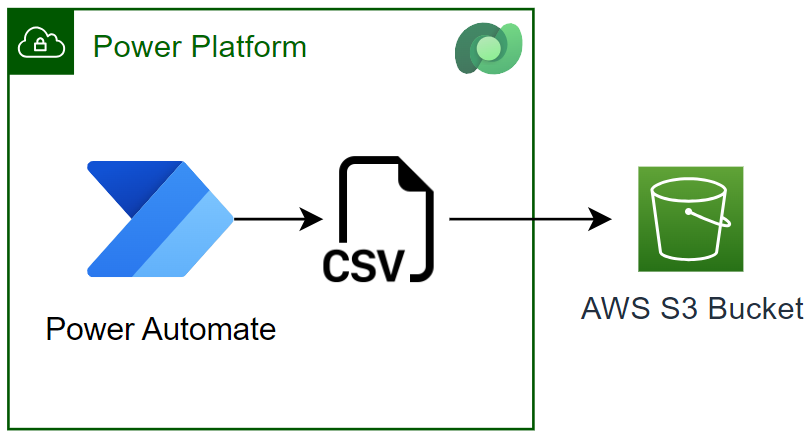
I thought this shouldn’t be a problem. I know there is a standard connector in Power Platform for Amazon S3. But my colleague was right. There is a problem with this connector. Unfortunately, the Amazon S3 connector supports only listing and reading files from an AWS S3 Bucket. In other words, I can’t upload files from my Power Automate flow into my S3 Bucket.
Note: A S3 Bucket (Amazon Simple Storage Service) is the storage solution in AWS Cloud. This is comparable to the Microsoft Azure storage solution, the Azure Blob Storage.
Standard Amazon S3 Connector
Let’s have a closer look at the Power Platform standard connector for Amazon S3. Here you see the available options:
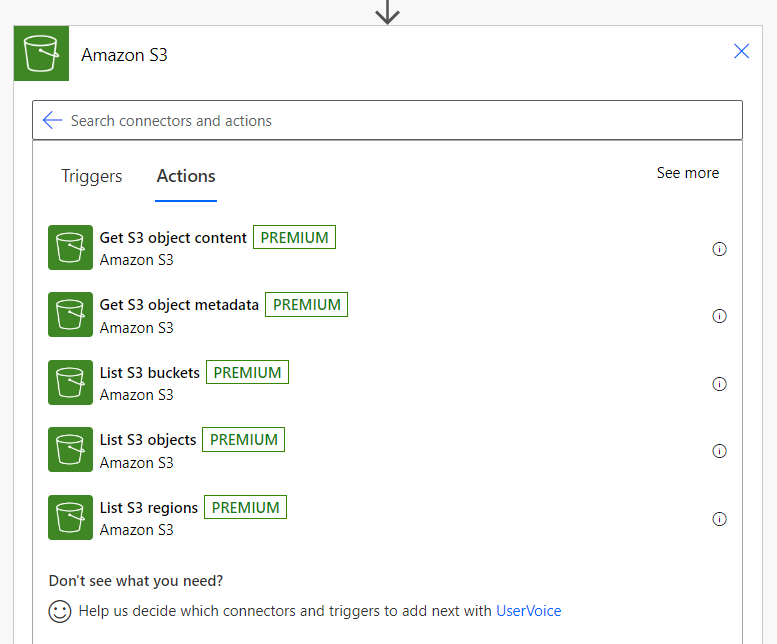
It’s true, I can list objects from the Amazon storage solution. Furthermore, I can also read the content of those objects. But I can’t create, update, or delete an object in my AWS S3 Bucket with the standard connector. In addition there are some other known limitations like the object’s size must be less than 3.5 MB.
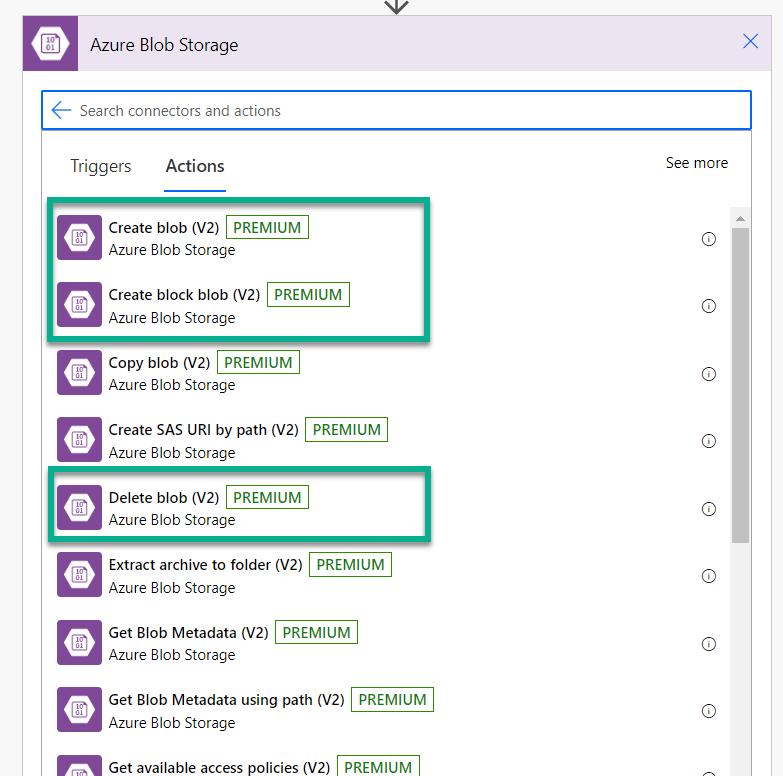
The Amazon S3 connector is comparable to the connector for an Azure Blob Storage. But in contrast the Azure Blob Storage connector has much more actions compared to the Amazon S3 connector. You see, I can create, update, or delete an Azure Blob Storage blob:
In conclusion, I must find another solution for my colleague.
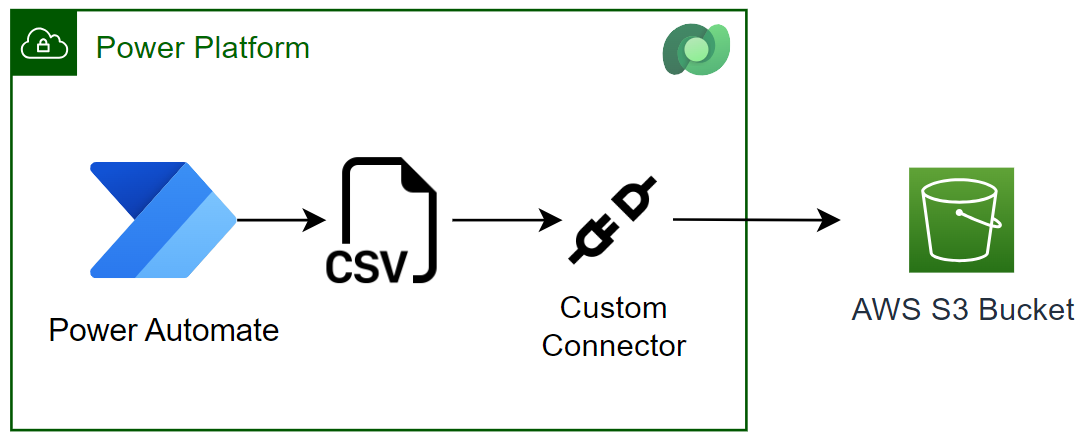
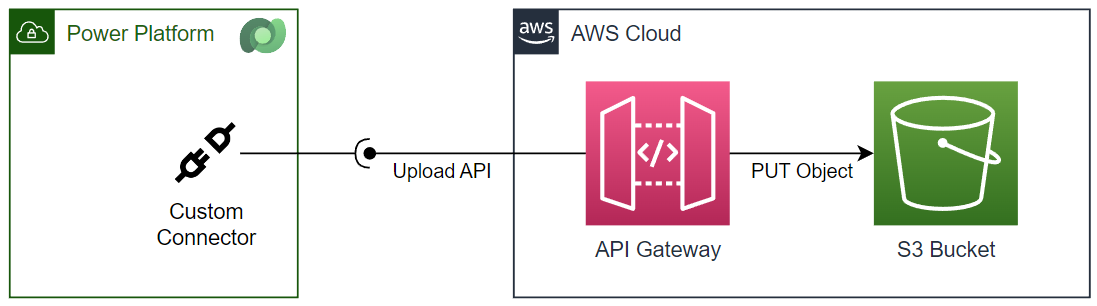
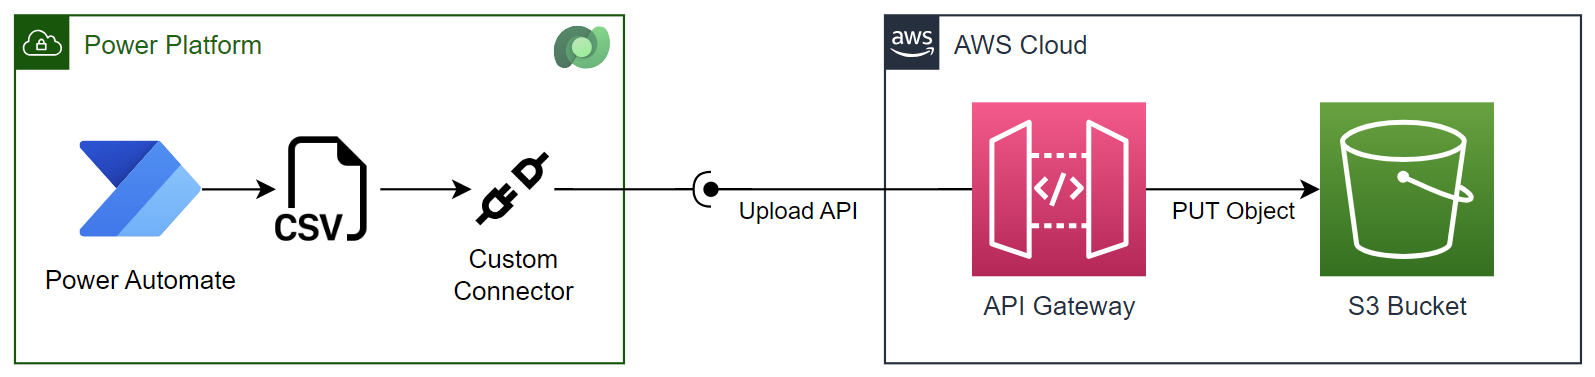
Custom Connector for AWS S3
In other words, I set up a custom connector in Power Platform. This means my custom connector must store a csv file in my Amazon S3 Bucket:
Well, that sounds simple, but it isn’t. Let me explain that for you. Each AWS cloud service provides a REST API, and this is great. In addition, I can use these APIs from my services. Per example I can store a new object in my AWS S3 bucket from C#. This is also not the problem.
However, to invoke these API’s, I must set up the authentication for my request in my custom connector. In other words, I must authenticate all my requests with the AWS Signature Version 4. That isn’t simple. In detail, Amazon uses a lot of generated checksums, specifically Hash-based Message Authentication Codes (HMAC). This signing process involves creating a canonicalized version of my request, which includes the request’s path, headers, and body.
Hmm, there is no out-of-the-box solution to do this with a custom connector in Power Platform.
AWS API Gateway
For that reason, I must simplify the accessibility of my AWS S3 Bucket API. In Microsoft Azure I would choose an API Management Gateway for this task. But here I work with components in the AWS cloud. For that reason, I use an AWS API Gateway.
An API Gateway is a fully managed service in AWS cloud that enables developers to create, publish, maintain, monitor, and secure APIs. Yes, this is exactly the component I need for this task.
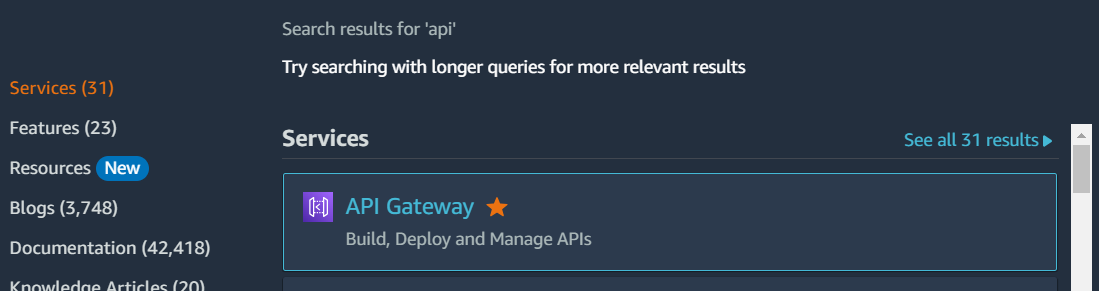
I start my example from my AWS Management Console where my AWS S3 Bucket mme2k-s3-upload already exists. Here, I navigate to my API Gateways:
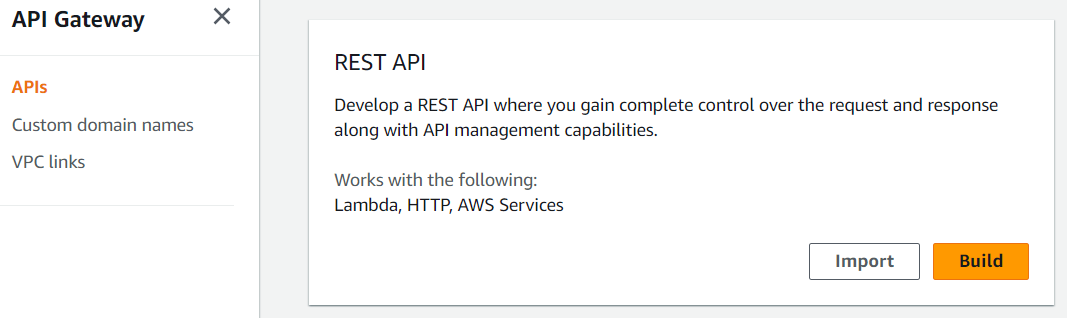
Now I select APIs and create a new API Gateway with the REST API template:
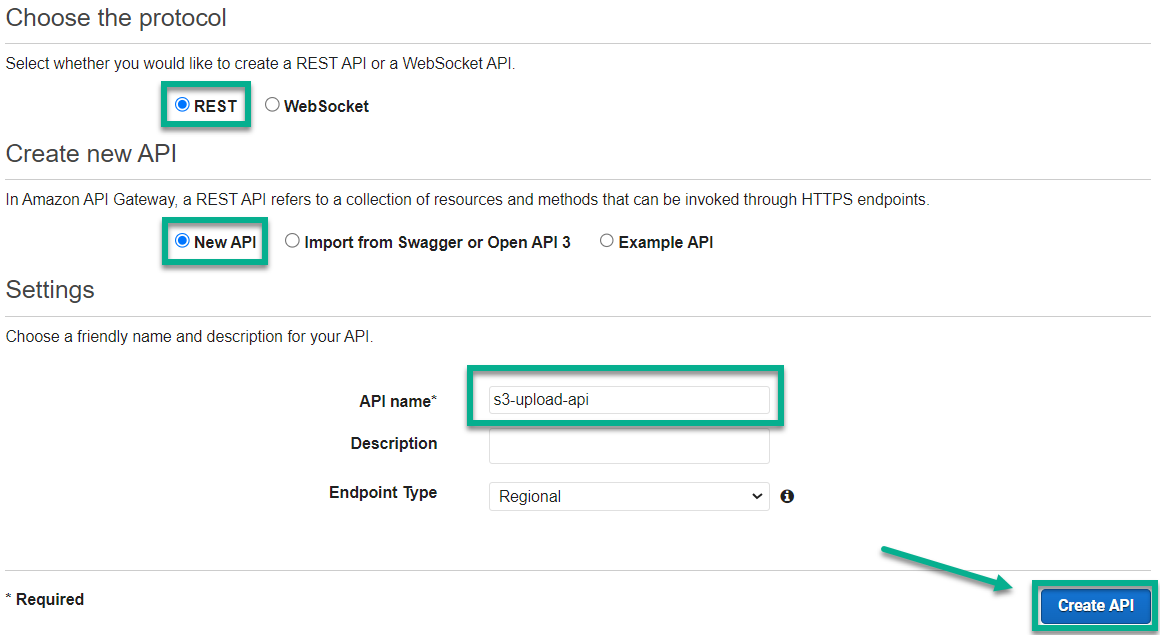
Afterwards, I select as protocol REST and create a New API. I use s3-upload-api as name for my API and click on Create API:
API Resources
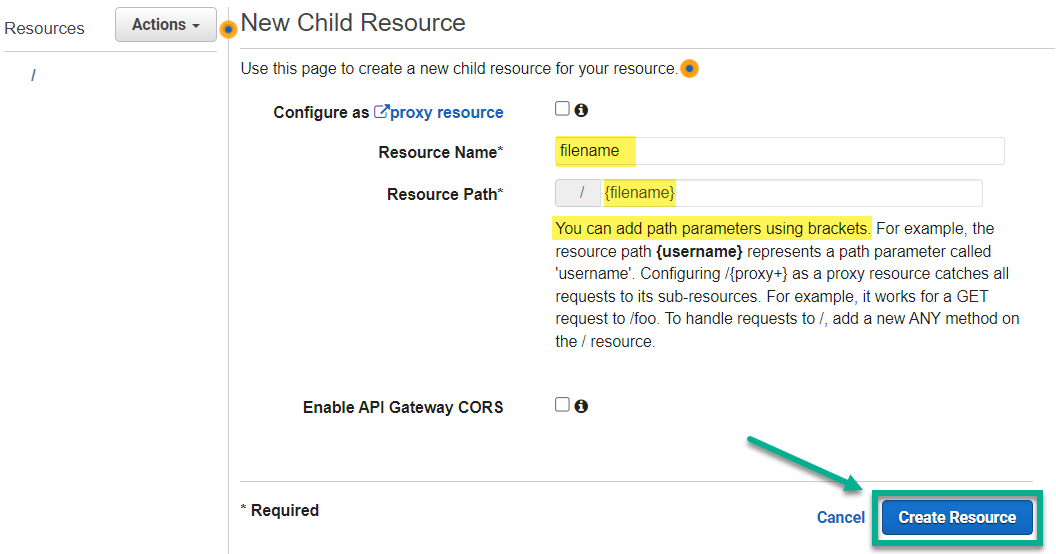
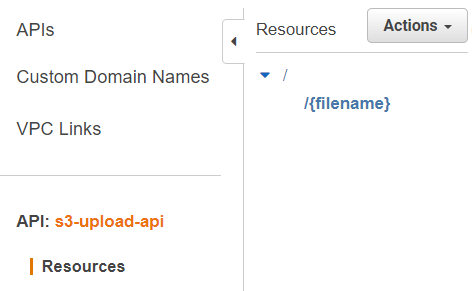
As next step, I add a new Resource to my API. In other words, I define the paths of my API. Moreover, I want to upload files. Therefore, I use filename for my Resource Name. In addition, I enter at Resource Path the value {filename}. I do this, because I want access and forward that path value later to my S3 Bucket. Finally, I create the API resource based on my configuration:
My API now looks like this:
API Method
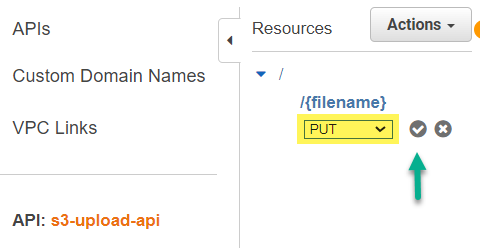
Now, I’m adding a new Method underneath my resource filename. I choose PUT for my upload:
Afterwards, I start configuring my PUT method:

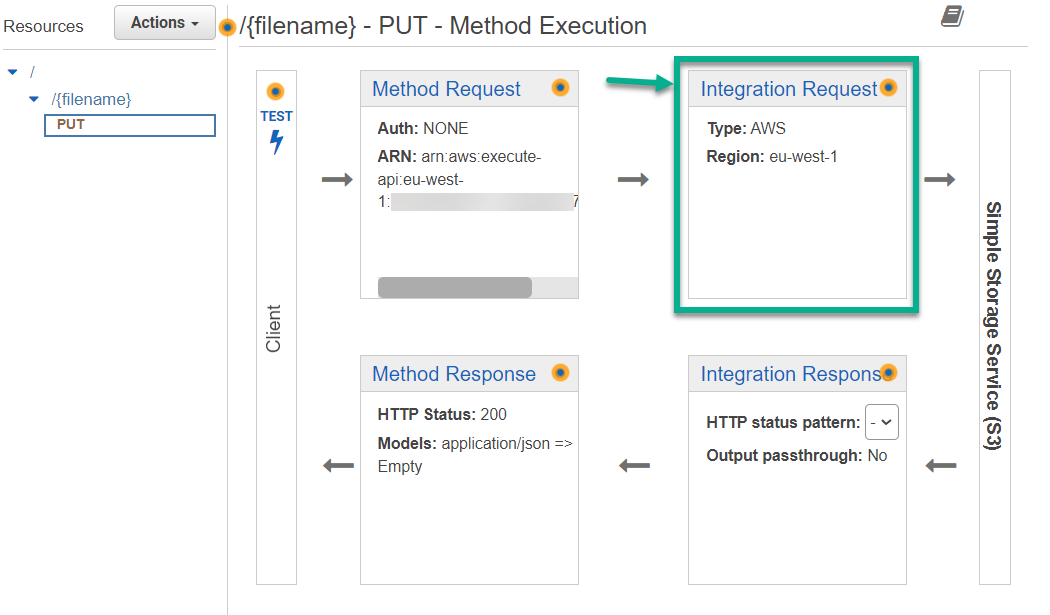
First, I select as integration type AWS Service. In addition, I configure as AWS Region eu-west-1 and select my AWS Service Simple Storage Service (S3). Next, I also use the PUT method for my S3 Bucket service. This is because I want to store an object. This is in my case my uploaded file.
Furthermore, I override the path to my S3 Bucket service (bucket/key). I use the name of my bucket mme2k-s3-upload and the parameter {filename}. Additionally, I set up the ARN of my execution role for my API Gateway and save my method:
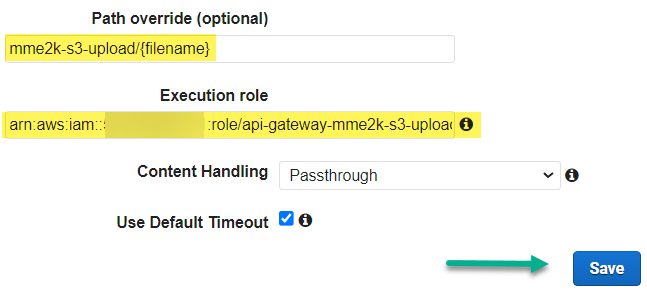
Note: The creation of my role is described later in my blogpost.
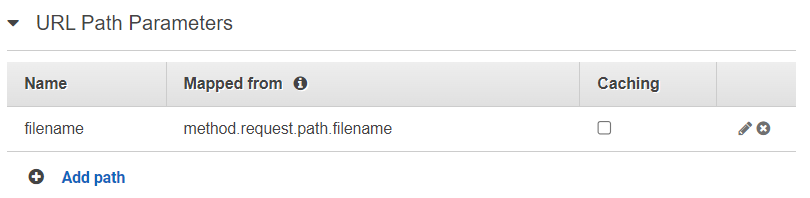
Finally, I override the path to my S3 Bucket and use the correct values from my inbound request. For this, I click on Integration Request:
I set up my path mapping in section URL Path Parameters where I assign my inbound route parameter {filename} to the my resource path parameter method.request.path.filename:
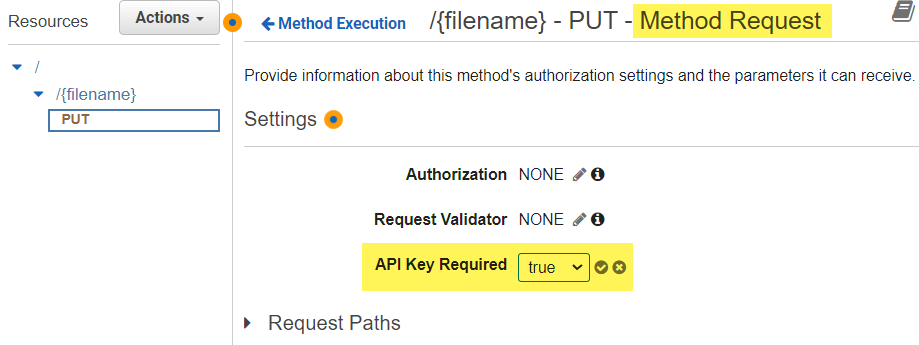
Perfect I also improve the security for my API method and enable API Key Required in section Method Request:
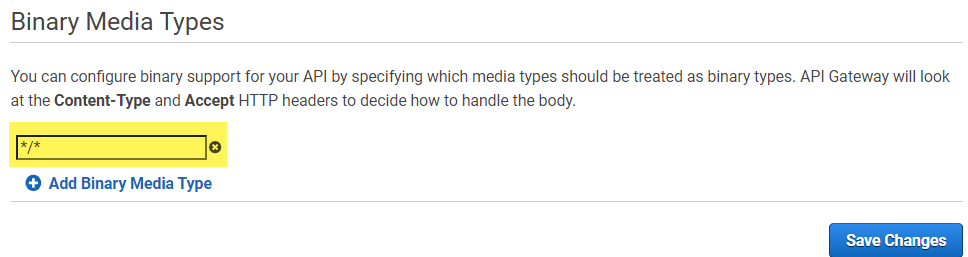
As the last step, I navigate to the settings of my API. Here I set up the allowed Binary Media Types. I use as value */* which allows me to upload any content:
Now I’m ready to deploy my API:
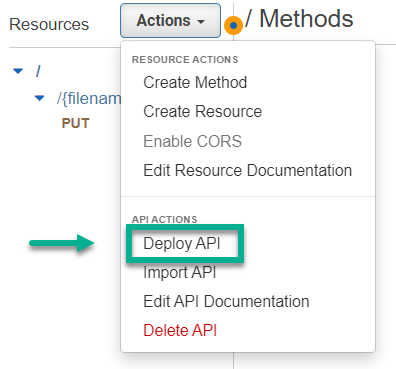
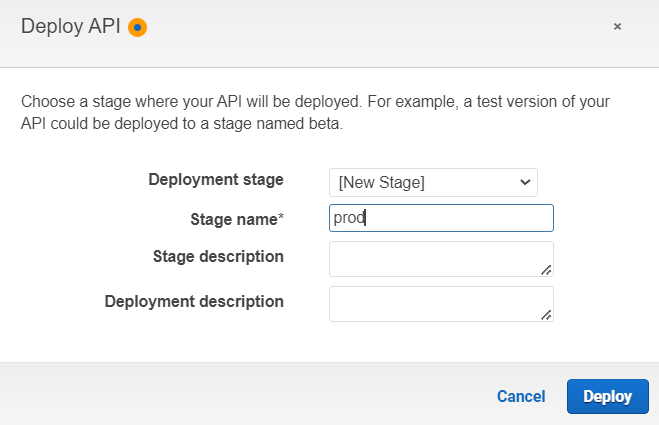
Note: Changes to the API Gateway must be deployed before the change becomes active.
After my deployment, I can invoke my API by using this URL:

I will use this URL later in my custom connector. However, before I move to the setup of my custom connector, I want also to describe the setup of my IAM role with the correct permissions for my API Gateway. In addition, I explain how you get the needed API Key.
IAM Execution Role
My API upload files to my S3 Bucket. For that reason, I must grant access to my API. First, I define a new role for my API Gateway in AWS IAM (Identity and Access Management):
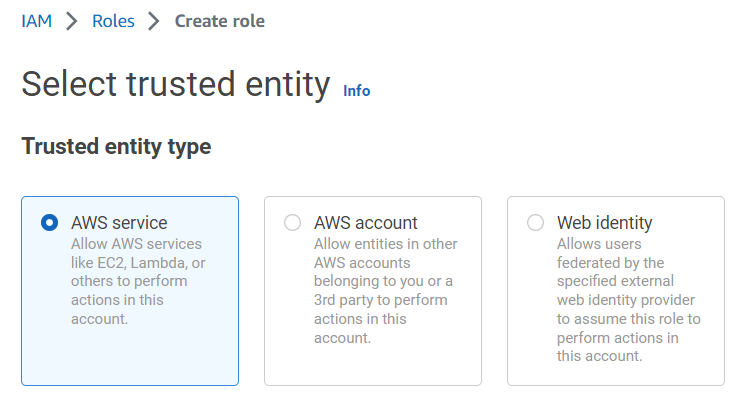
Next, I choose as AWS Service API Gateway:
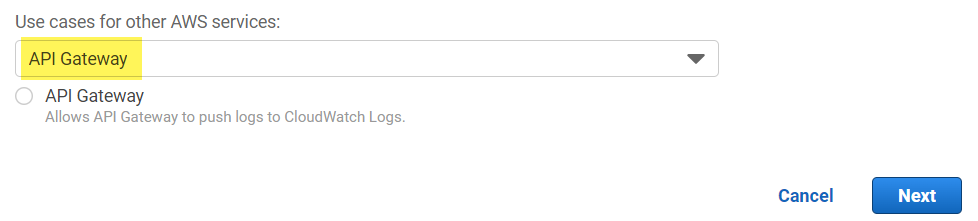
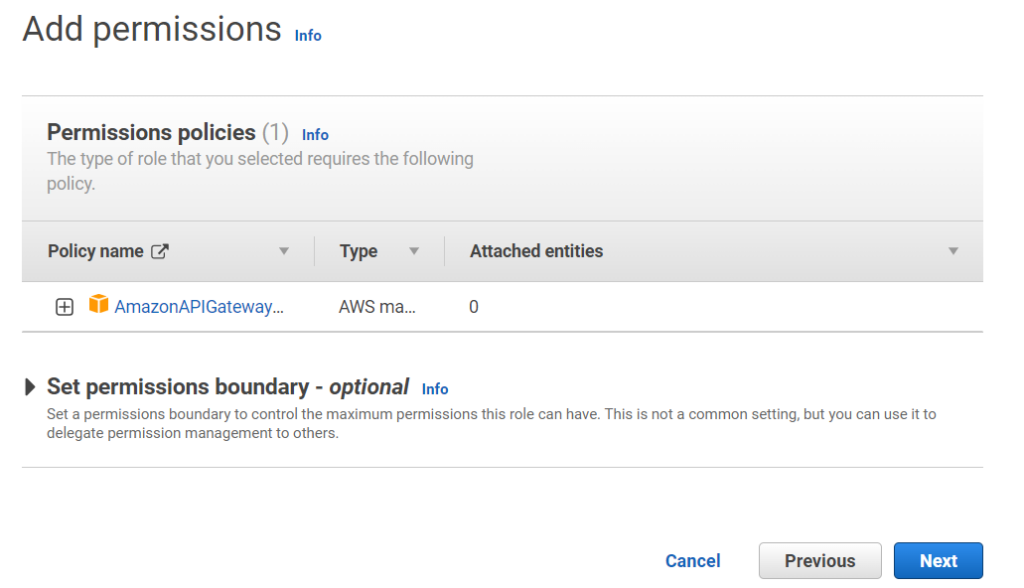
Moreover, I can only continue by selecting API Gateway as a use case. However, this attach by default a permission set to my role. I will replace this later with the right permission.
As next step, I give my role a name:

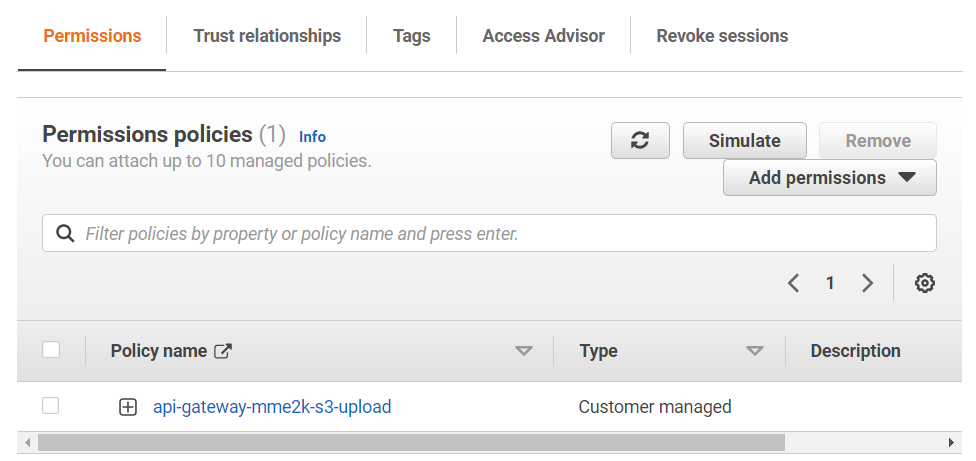
Finally, I attach my policy api-gateway-mme2k-s3-upload to my role. This is because my API must access my S3 bucket with a correct set of permissions.
IAM Execution Policy
I have previously created the policy api-gateway-mme2k-s3-upload for my IAM Role. Furthermore, I have added these permissions:
{
	"Version": "2012-10-17",
	"Statement": [
		{
			"Action": [
				"s3:PutObject"
			],
			"Resource": [
				"arn:aws:s3:::mme2k-s3-upload",
				"arn:aws:s3:::mme2k-s3-upload/*"
			],
			"Effect": "Allow"
		}
	]
}
As you see, my permission allows only to put new objects to my configured S3 bucket resources mme2k-s3-upload. That ensures that my API can only upload data into my specified S3 bucket.
API Key and API Usage Plan
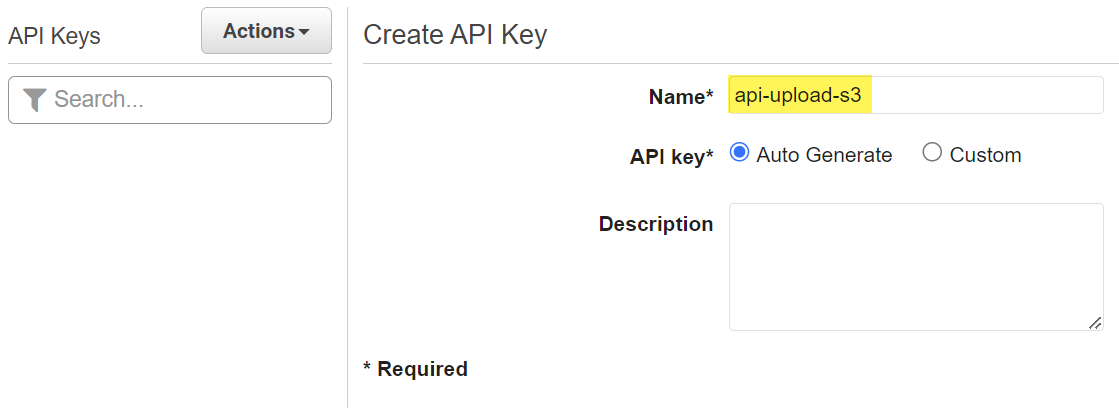
Finally, I’m creating an API Key for my API Gateway by navigating to API Keys in my selected API Gateway. I use the name api-upload-s3:
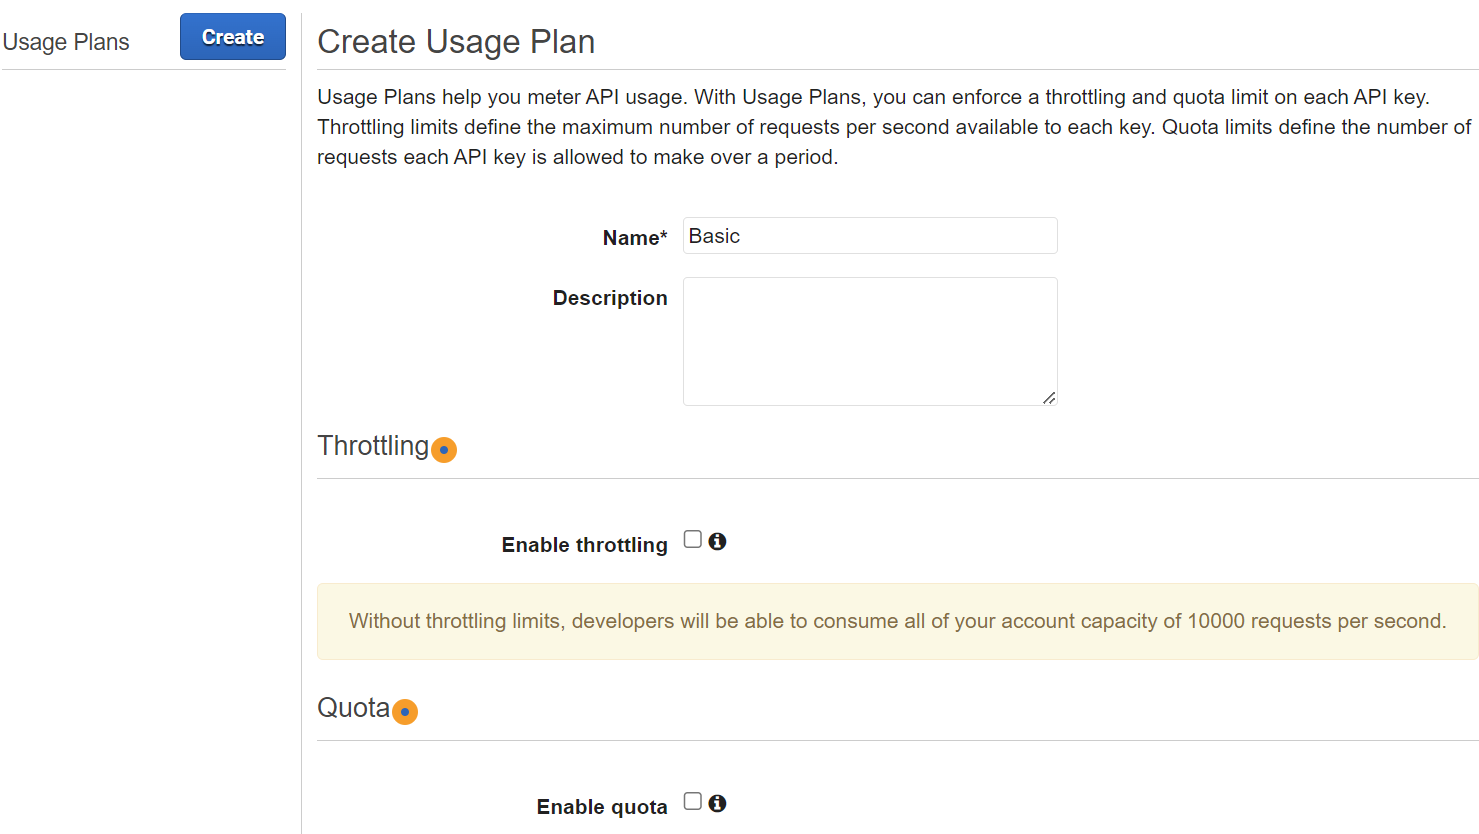
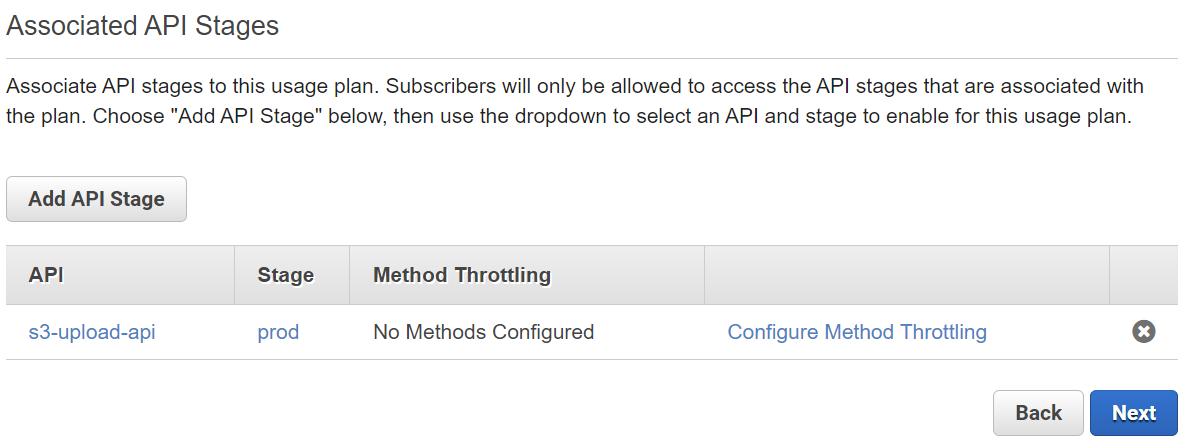
Next, I create a usage plan for my API and assign my API stage prod:
Furthermore, I add my created API key to the usage plan:
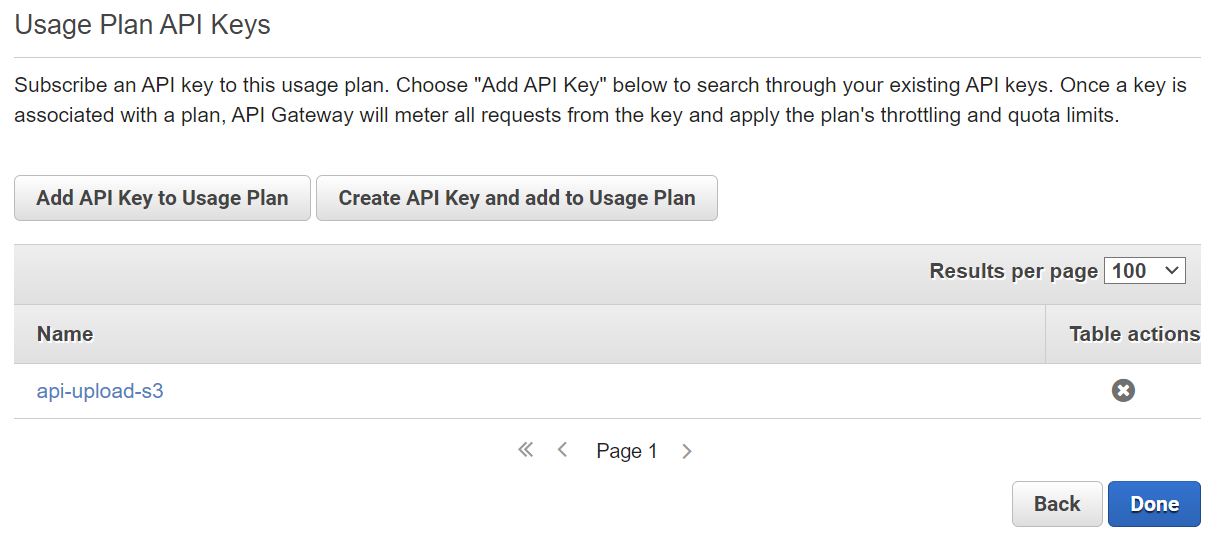
That’s all. Now I can use my created and assigned API key in my requests as parameter X-API-Key in the request header. Here is an example:
POST https://.../Upload
X-API-Key: 1234567890
Custom Connector for AWS API Gateway
My API is already deployed in AWS Cloud. This means, I start with creating a new custom connector in Power Platform for my API. In detail, I will use my custom connector afterwards to upload files into my AWS S3 Bucket:
The setup of a custom connector is straightforward when you can use a service definition. For that reason, here is my definition:
swagger: '2.0'
info:
  title: API-Upload-S3
  description: 'API to upload files to an AWS S3 Bucket'
  version: '1.0'
host: 123456789.execute-api.eu-west-1.amazonaws.com
basePath: /prod
schemes:
  - https
consumes: []
produces: []
paths:
  /{filename}:
    put:
      responses:
        200:
          description: Success
          schema:
            type: string
      summary: Upload
      description: Upload
      operationId: Upload
      parameters:
        - name: filename
          in: path
          required: true
          type: string
        - name: file
          in: body
          schema:
            type: string
            format: utf8
          required: true
      consumes:
        - text/plain
definitions: {}
parameters: {}
responses: {}
securityDefinitions:
  API Key:
    type: apiKey
    in: header
    name: X-API-Key
security:
  - API Key: []
tags: []
Note: You must change the values of host and basePath to the values from your deployed API Gateway.
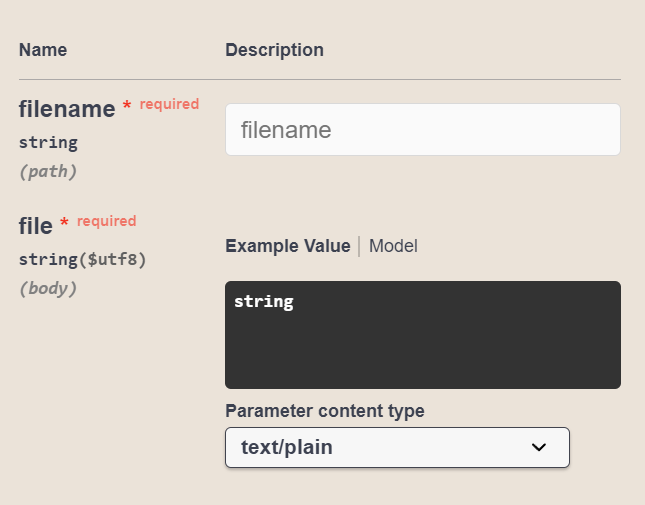
My method Upload consumes two parameters. The first parameter is filename, part of the service route and used for the S3 object name. My second parameter is file and stores the content of my file into the request body. Furthermore, my content is a CSV-file. In other words, my content is a text file. For that reason, I use that definition:
      parameters:
        # ...
        - name: file
          in: body
          schema:
            type: string
            format: utf8
          required: true
      consumes:
        - text/plain
You see the result, when I switch to the Swagger editor of my custom connector and navigate to the method preview:
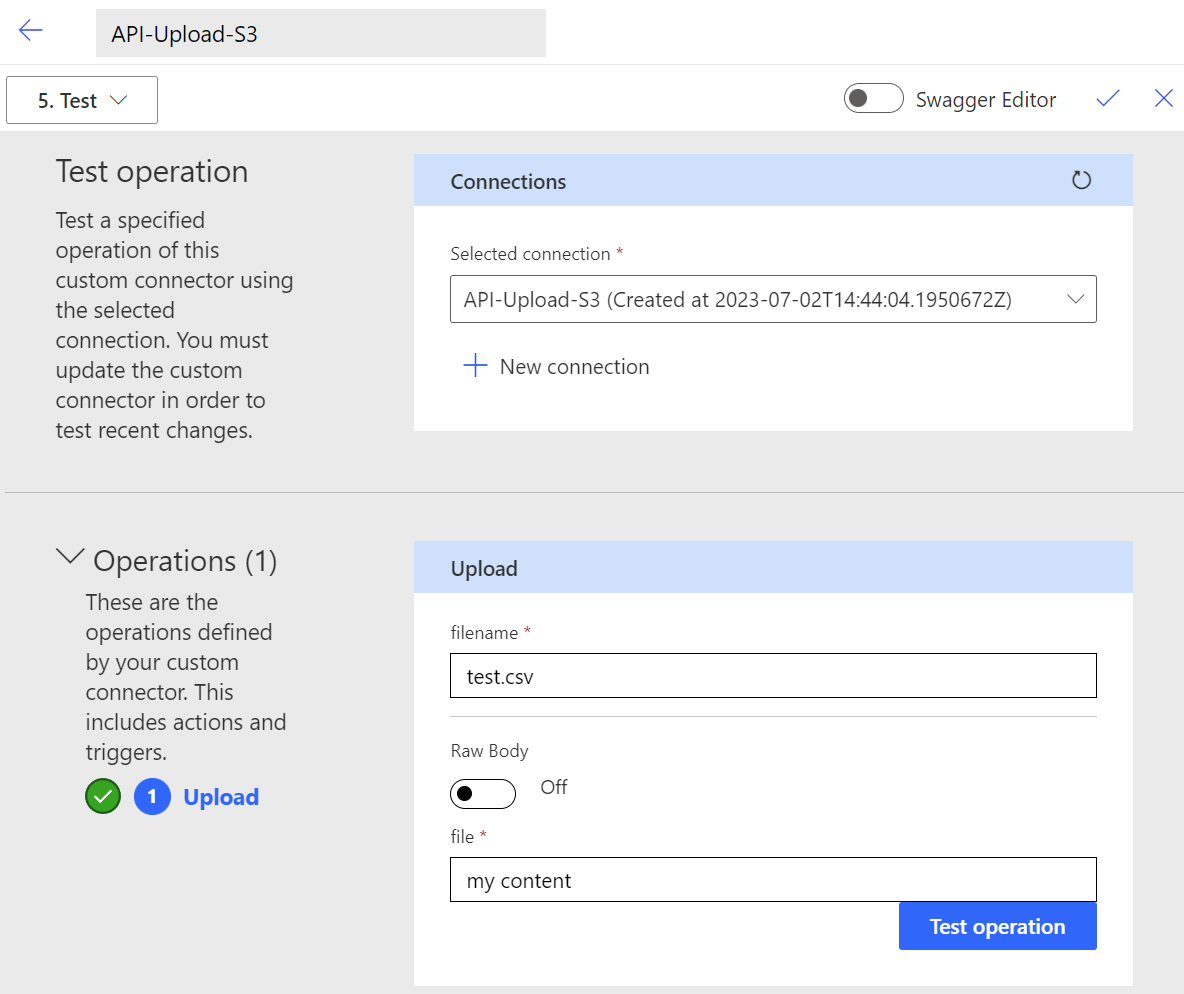
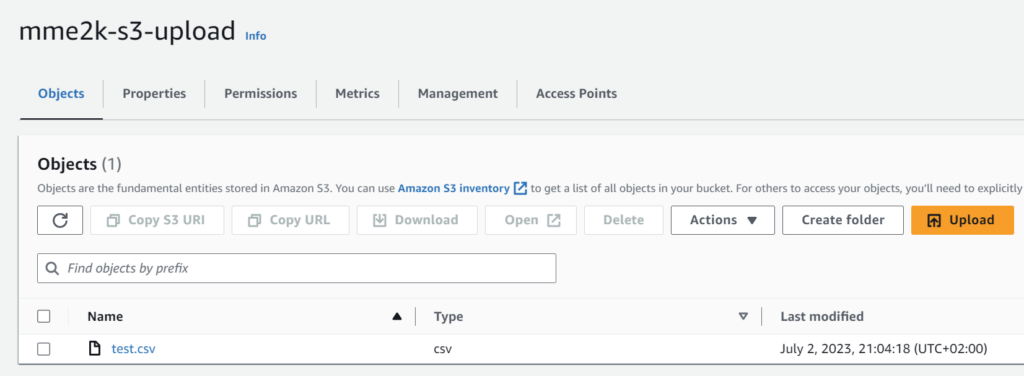
Let’s do a final test. I will upload a file test.csv with the content “my content“. The operation was successful:
Now, my S3 bucket contains a new file:
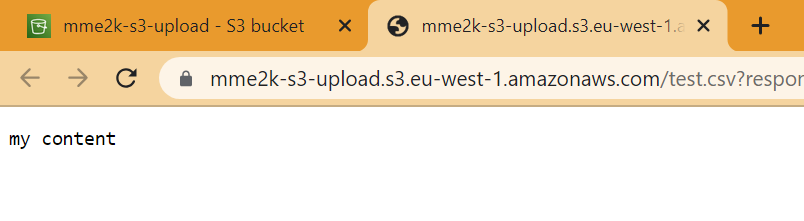
Let me doublecheck, yes, the content of my uploaded file is also present:
Power Automate Flow upload to AWS S3
Mow, I complete my example. I create a Power Automate Flow to upload a CSV file into my S3 Bucket. Furthermore, I use my custom connector and upload a CSV file into my S3 Bucket.
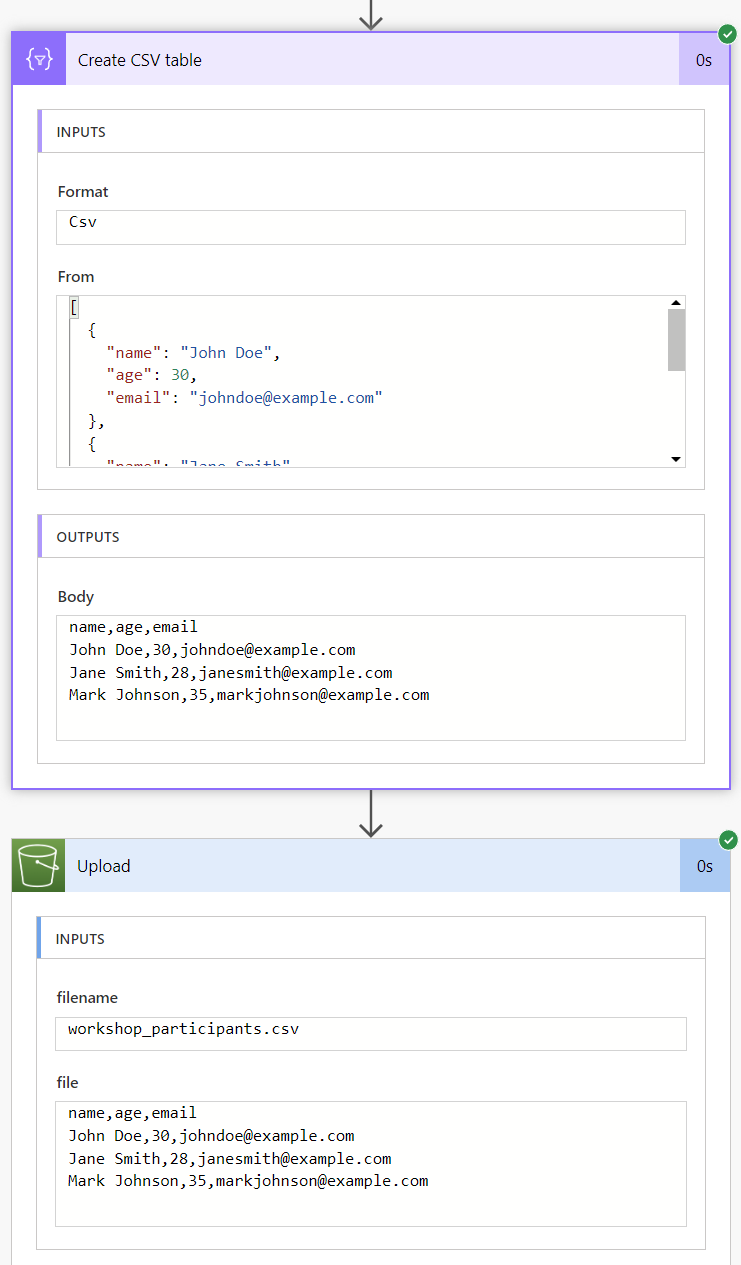
For my example, need test data. Azure OpenAI provide me quickly a JSON example which I add to a compos action:
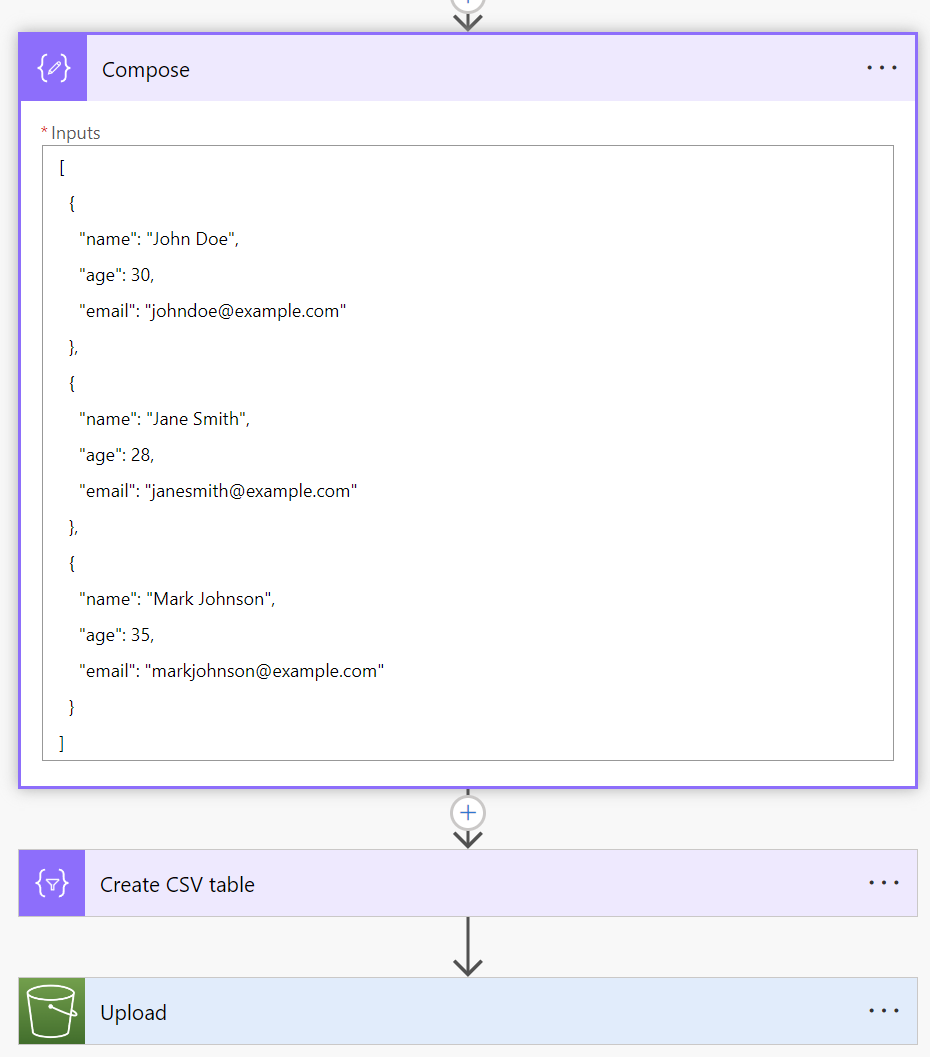
You see also, I use the output of my Compose action as input of my Create CSV table action. Next, I provide the output of my Create CSV table action as parameter file in my Upload action:
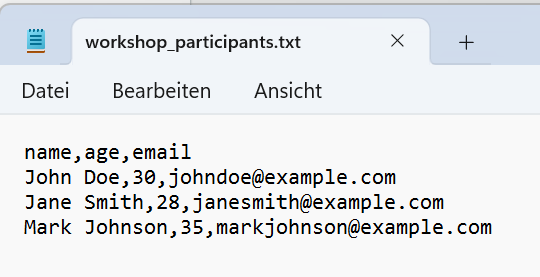
Finally, my CSV file workshop_participants.csv is correctly stored in my AWS S3 Bucket. Here is the content after downloading as a text file:
Summary
To summarize, I first encountered a problem with Power Automate Flow while trying to upload CSV files to an AWS S3 Bucket. The standard Amazon S3 connector lacked the capability to upload files, so I had to find an alternative solution. My solution was to set up a custom connector for the S3 Bucket in the Power Platform. Moreover, I discovered that authentication with AWS Signature Version 4 would be challenging a custom connector.
To simplify my API accessibility, I used an AWS API Gateway. Furthermore, I created a REST API and configured a PUT method for file uploads to the S3 Bucket. I also described the setup of the necessary IAM execution role and policy. In addition, I secured my API with an API key.
Finally, I have set up a custom connector for my API. In addition, I created a Power Automate Flow using my custom connector to upload CSV files into my AWS S3 Bucket. Overall, this approach bypassed the limitations of the standard connector and achieved the desired file upload functionality.
Note: Limitations of AWS API Gateway in terms of request size are documented here.