
AWS Single Sign-On with Microsoft Entra ID
Single Sign-On (SSO) is a great thing! It simplifies my life in more ways than one. With SSO, I only need one username and password from my Microsoft account to access multiple websites and apps. This is making my online experience easier and more secure. It also saves me from password fatigue and streamlines the management of my accounts.
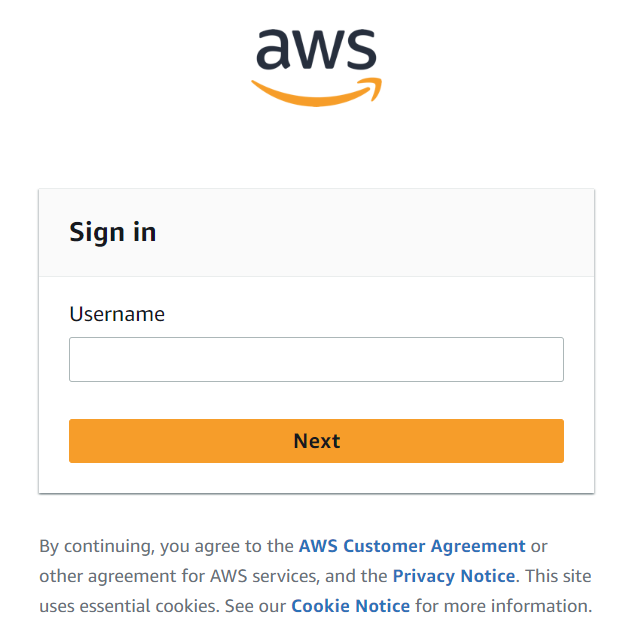
The benefits are huge, but how can I setup Single Sign-On for my AWS accounts? In other words, I want also to manage my AWS accounts with my Microsoft Entra ID account. Is this possible? Normally, I see only the AWS authentication screen from my AWS IAM Identity Center when I access my AWS account:
Yes, login with a federated identity provider is possible. Much better, the configuration is not so difficult. I will explain what you need to do here in my blog post.
Initial Situation
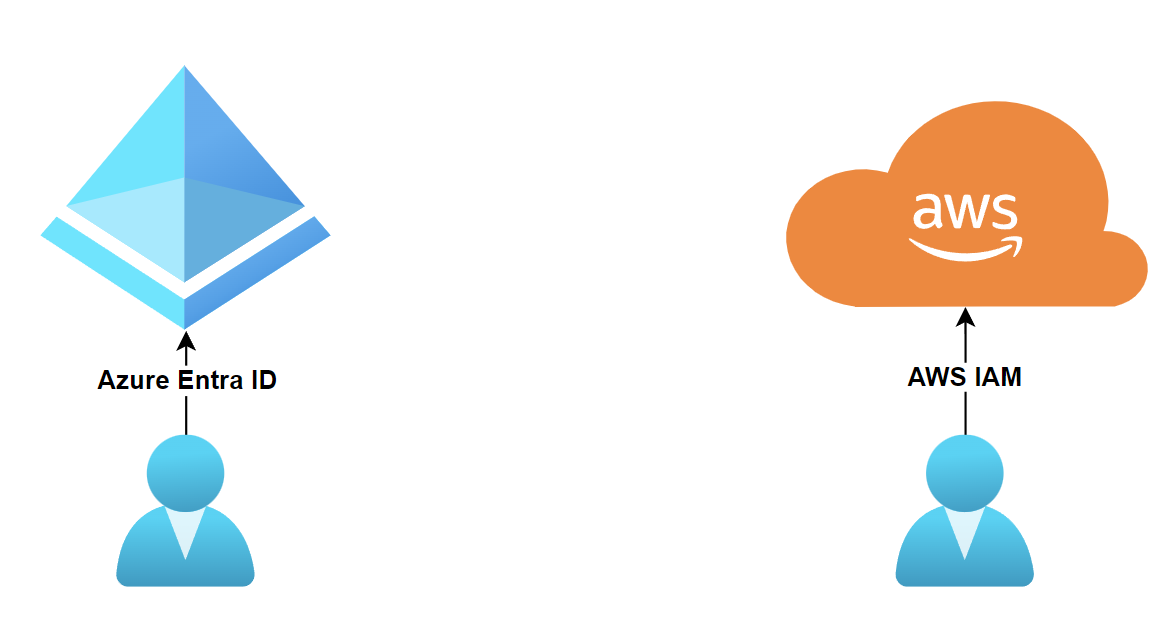
Right now, I have 2 Identity Providers. One is my Microsoft Entra ID (formally known as Azure Active Directory) and the second is my AWS IAM Identity Center:
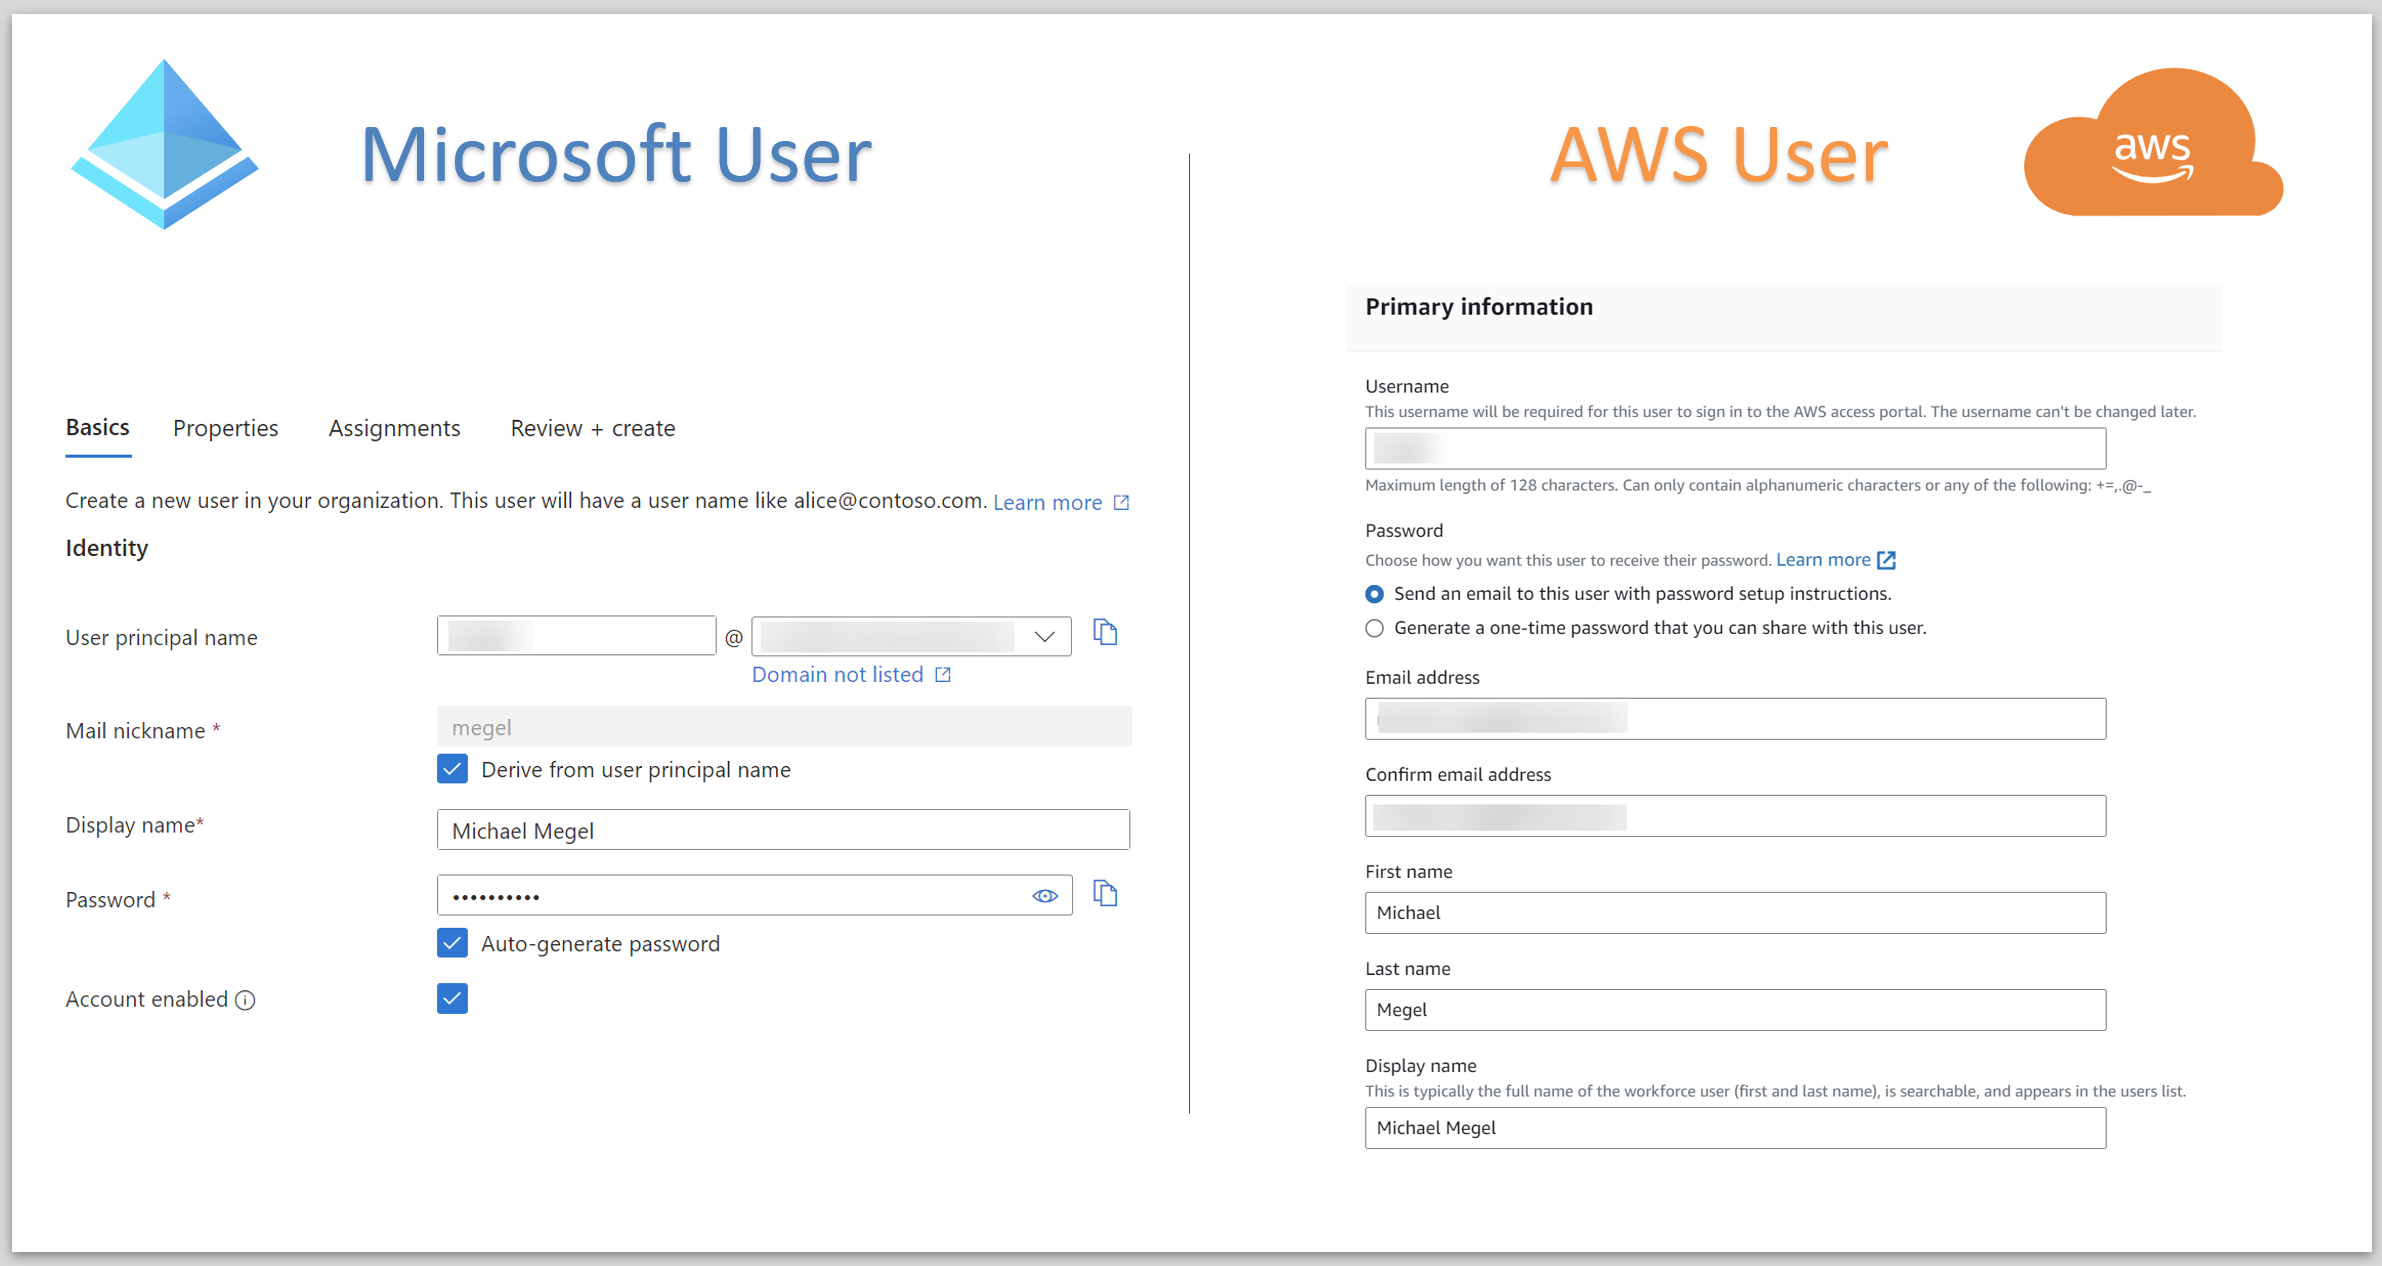
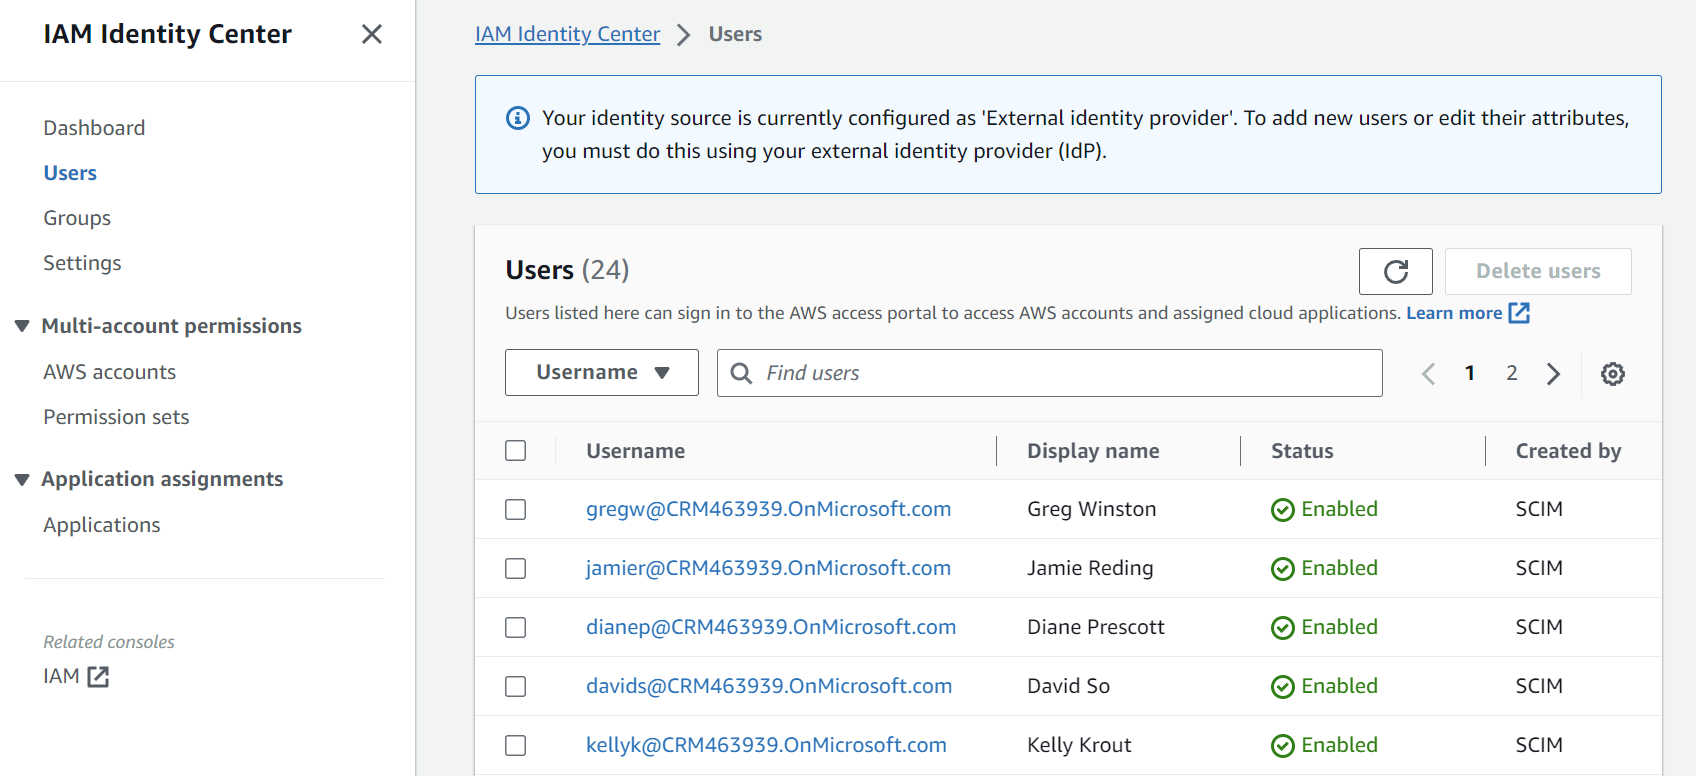
By default, I have also two accounts. One account belongs to Microsoft Entra ID (AAD) and the second belongs to my AWS account. For both accounts I can setup users with similar information:
However, this is not really what I want! My goal is to use my Microsoft account also in AWS:
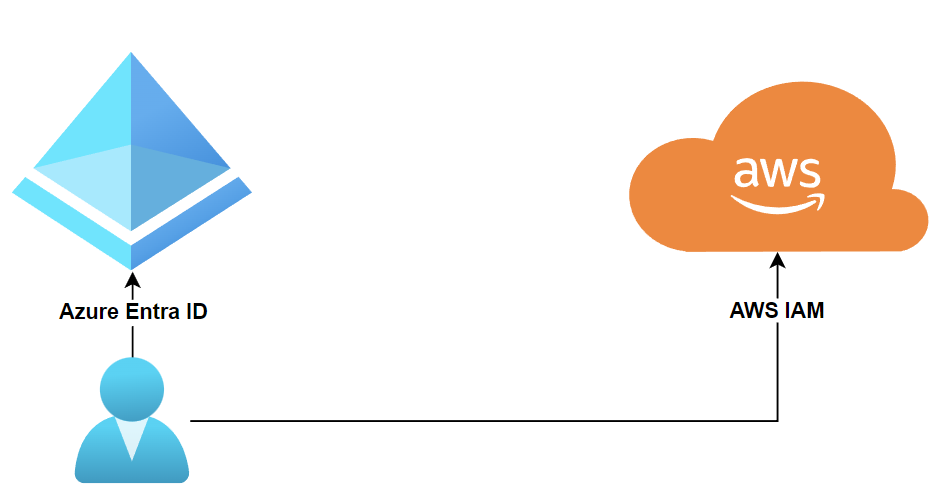
Correctly, I want to federate Microsoft Entra ID with my AWS Identity Center to use SSO for my AWS accounts.
I’ll start with my setup in AWS…
AWS Identity and Access Management
AWS IAM Identity Center is a service from Amazon Web Services that helps you manage who has access to your AWS account resources (see also AWS Docs). In other words, AWS IAM Identity Center is like Microsoft Entra ID (see also Microsoft Docs). Both services are responsible for Identity and Access Management (IAM).
Prerequisites: AWS IAM Identity Center is enabled
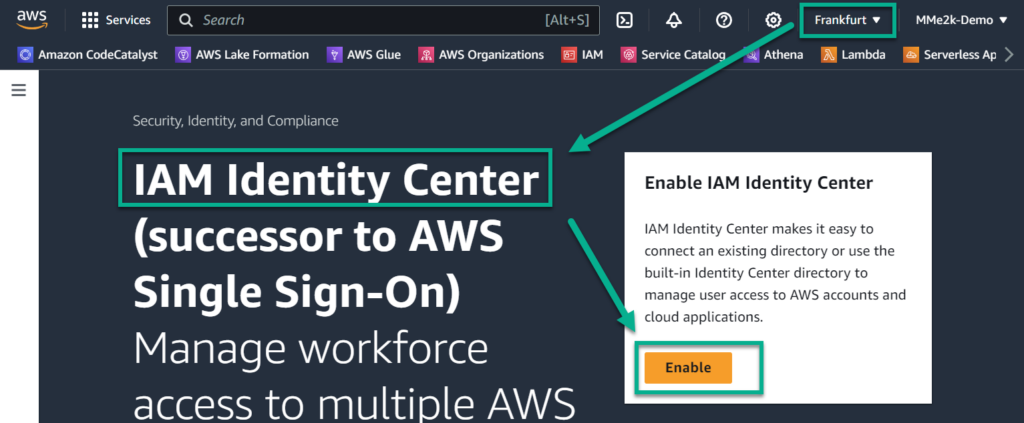
First I must activate the IAM Identity Center service for my AWS account. I do this directly from AWS Console.
Note: There might be a case that you want a dedicated AWS region for AWS SSO. You can do this by activating the IAM Identity Center in the right region. In other words, this must be done before you configure anything.
Here you see, I selected Frankfurt (eu-central-1) and navigated to my AWS IAM Identity Center. Now, I activate my IAM Identity Center by pressing the Enable button:
Changing the AWS IAM Identity Center region
Important: The IAM Identity Center is a regional service. Once the service is enabled you can’t change the region without removing the entire IAM Identity Center configuration:
If you have already enabled your IAM Identity Center service in a region that you do not want, you must delete the existing configuration and start over:

Setup SSO in AWS IAM Identity Center
Now, I start to setup AWS single sign-on with Microsoft Entra ID as identity provider in my AWS IAM Identity Center.
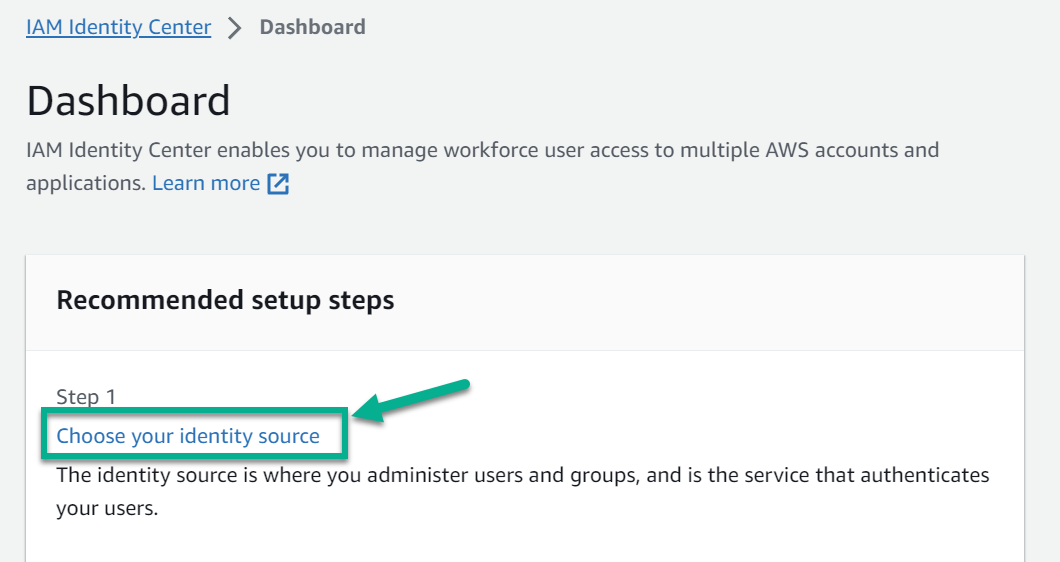
I open the AWS IAM Identity Center Dashboard and choose a new identity source:
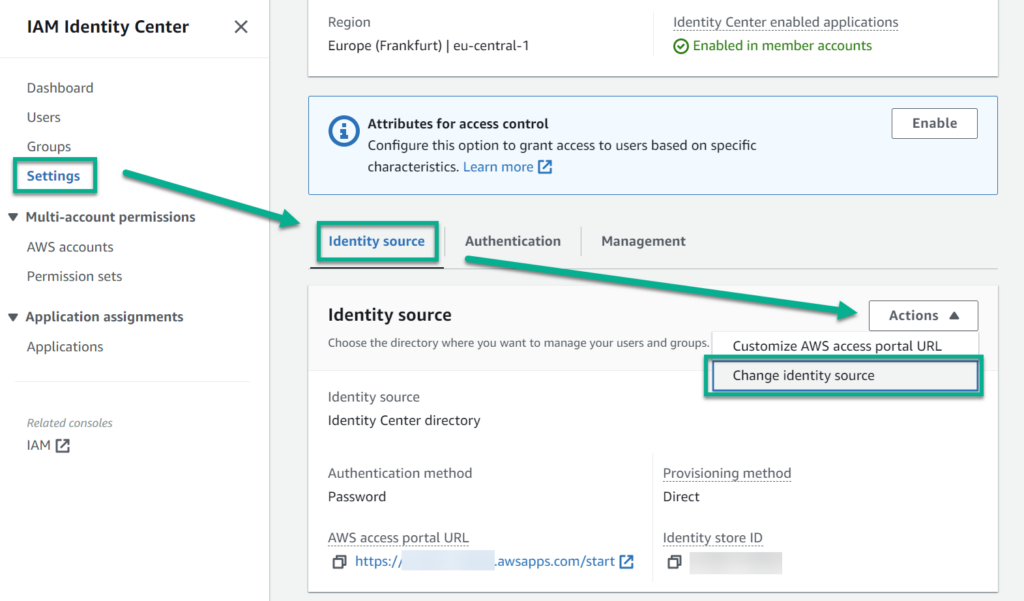
Alternatively I can also navigate to Settings and change there my identity source:
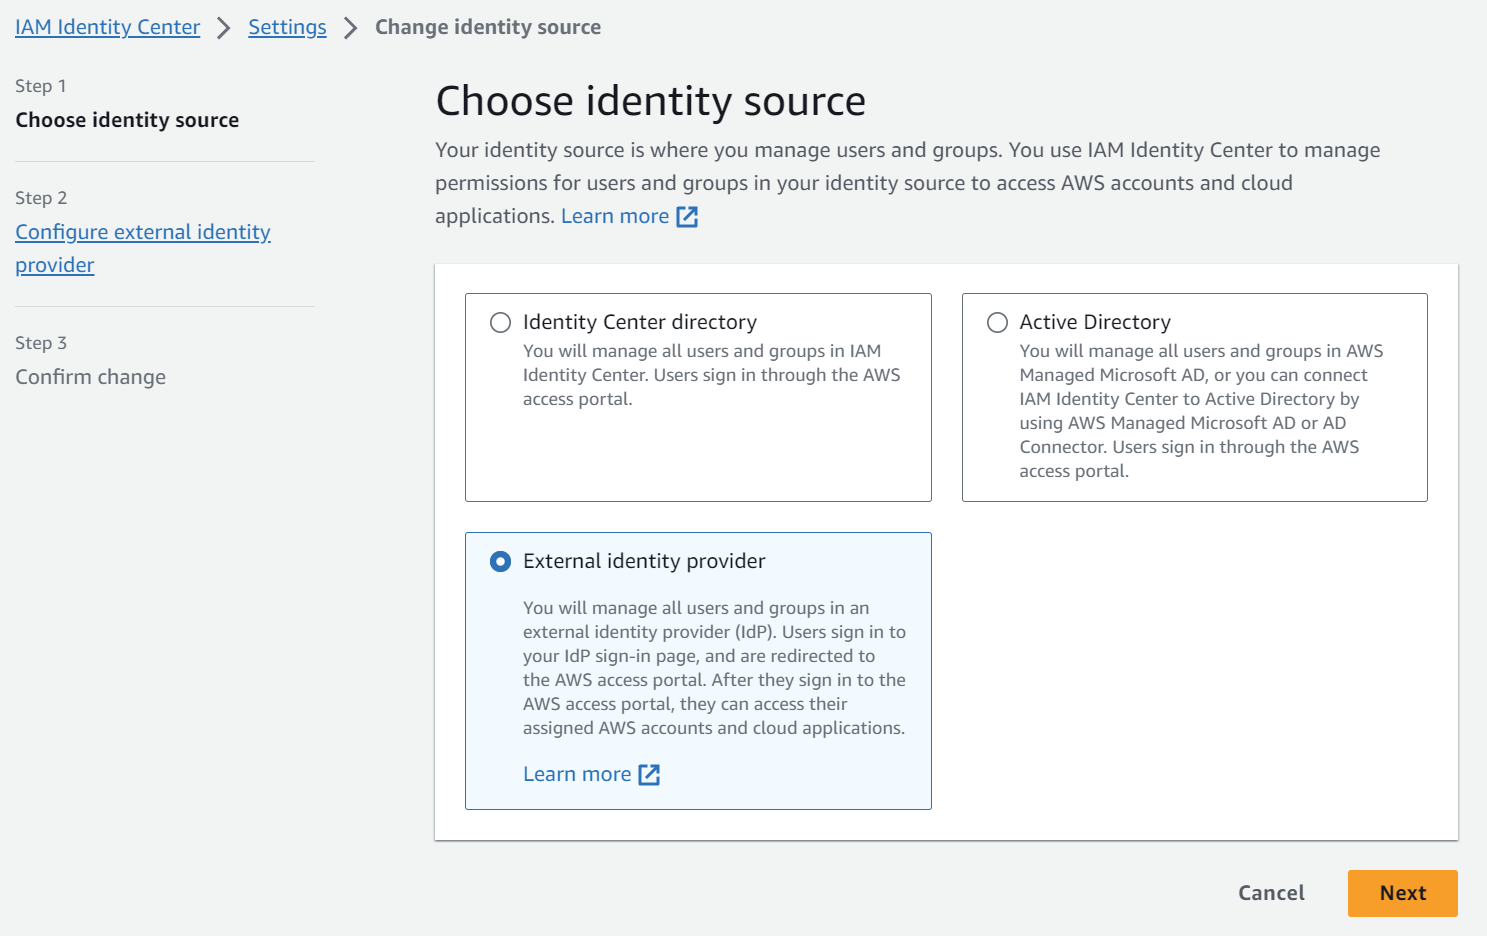
Here I use not Active Directory. This is because I haven’t configured my Azure Active directory as Identity Provider. I use instead External identity provider as my new identity source:
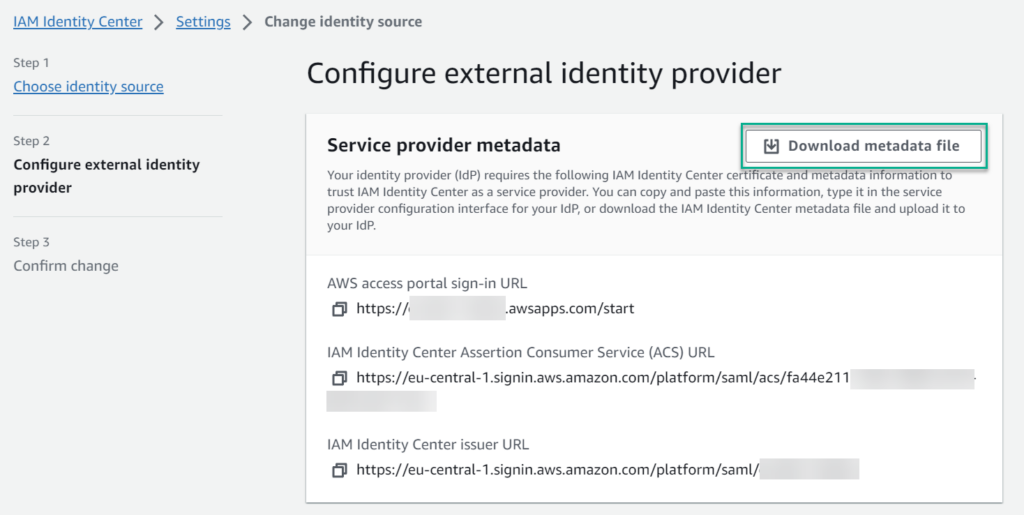
Now I start configuring my Azure Entra ID as external identity provider. I do this, because AWS provides here all information needed for Microsoft Entra ID. Here, I download the metadata file which describe my AWS service provider:
… and continue my setup in Microsoft Entra ID.
Setup SSO in Microsoft Entra ID
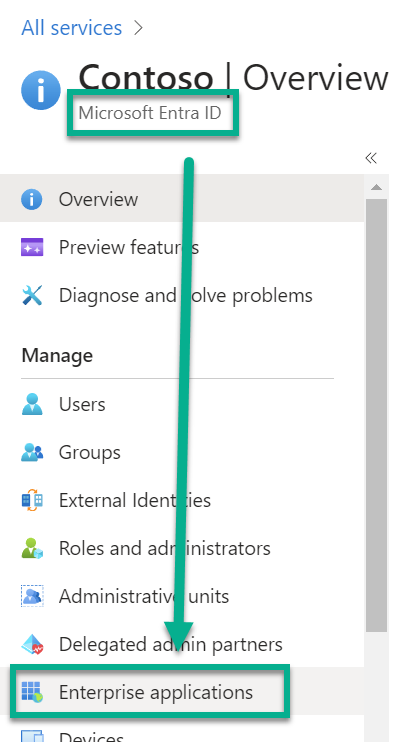
For this I open my Azure portal and navigate to the Microsoft Entra ID service:
Once Microsoft Entra ID have opened, I jump to Enterprise Applications:
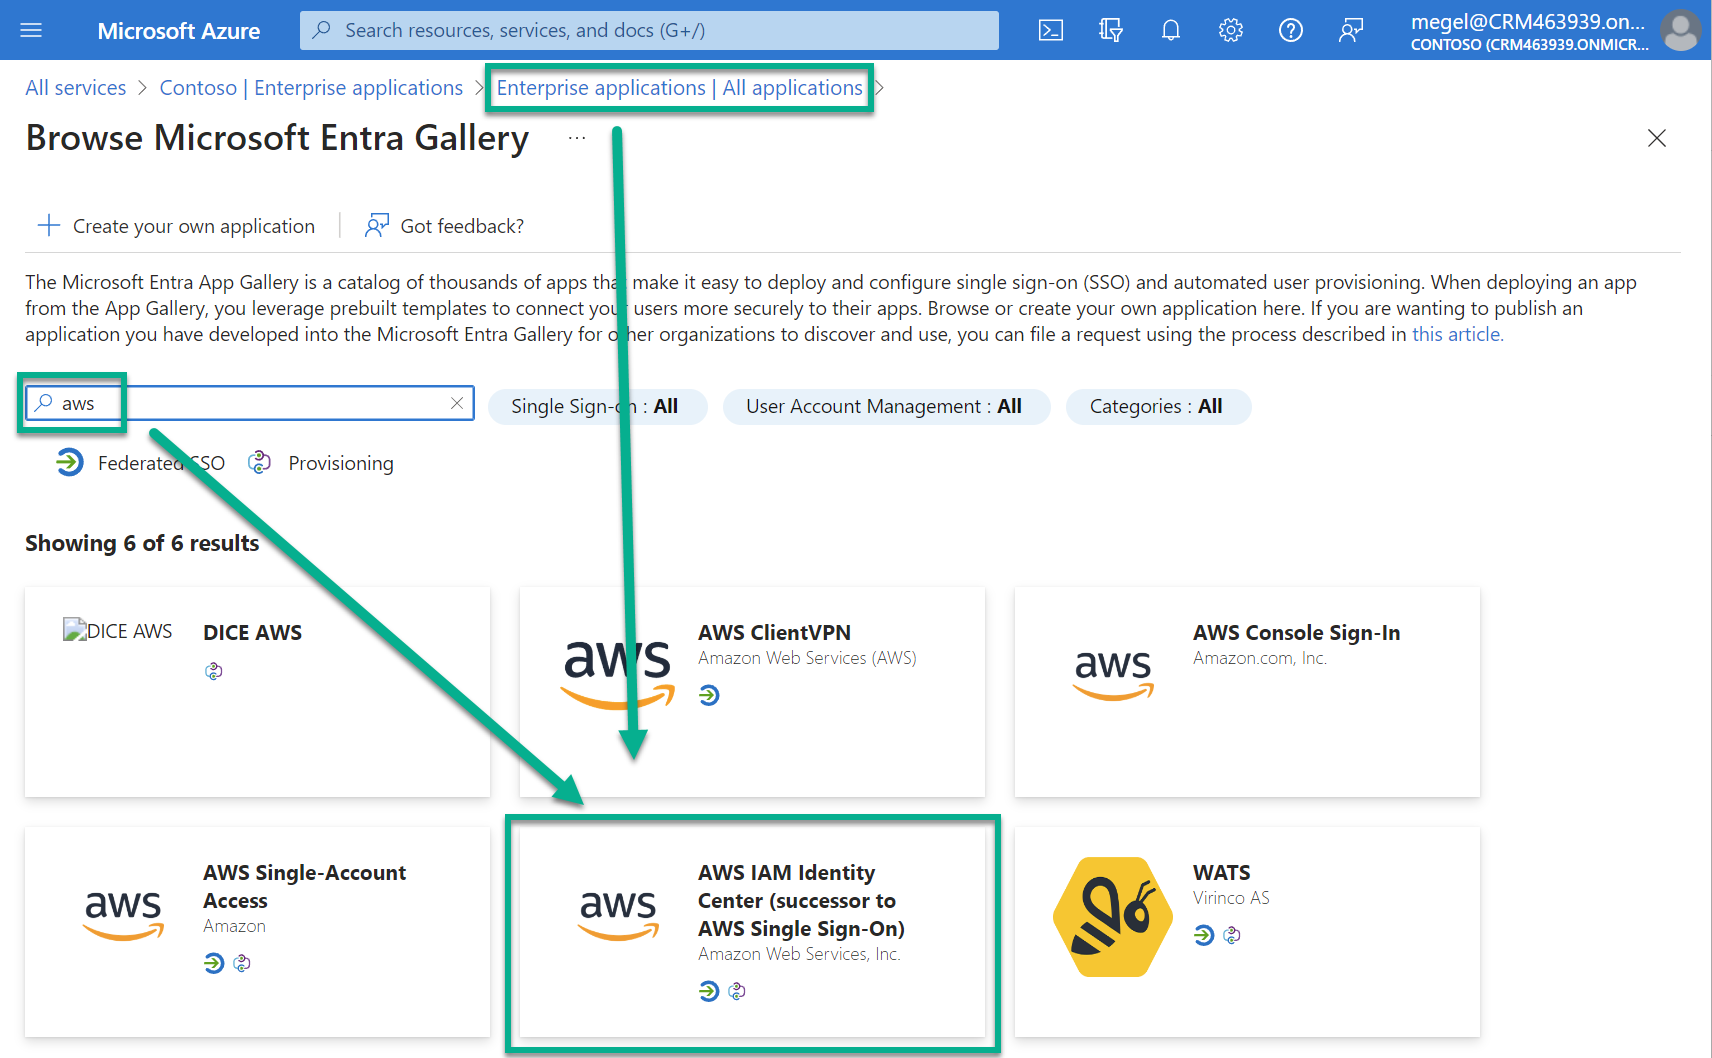
Here I start creating a new Enterprise Application and search for AWS IAM Identity Center:
…and this screen opens where I can change the name of my new Enterprise Application:
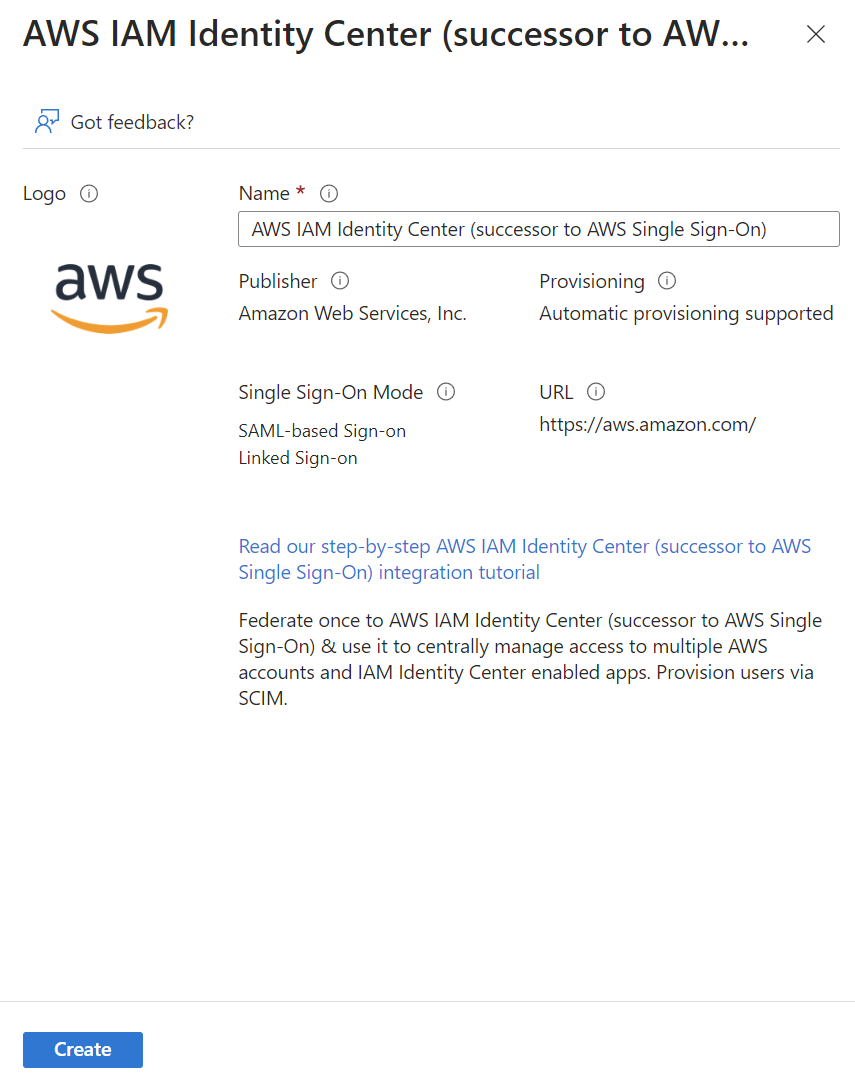
Note: There is also a detailed documentation included (read more in MS-Docs).
Perfect, my Enterprise Application is ready. What’s next?
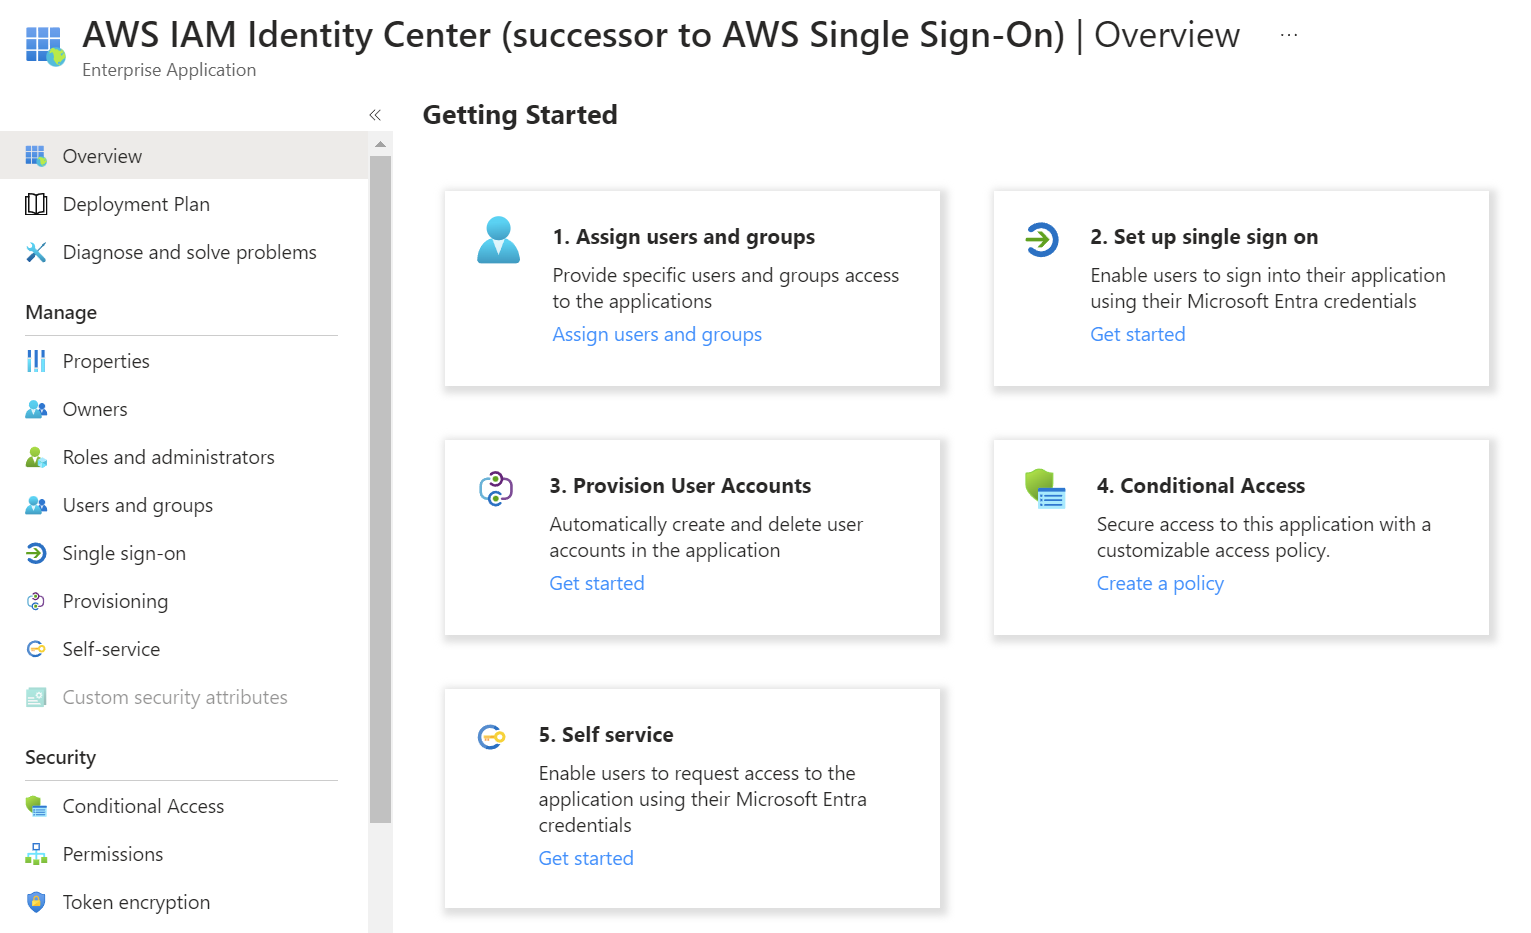
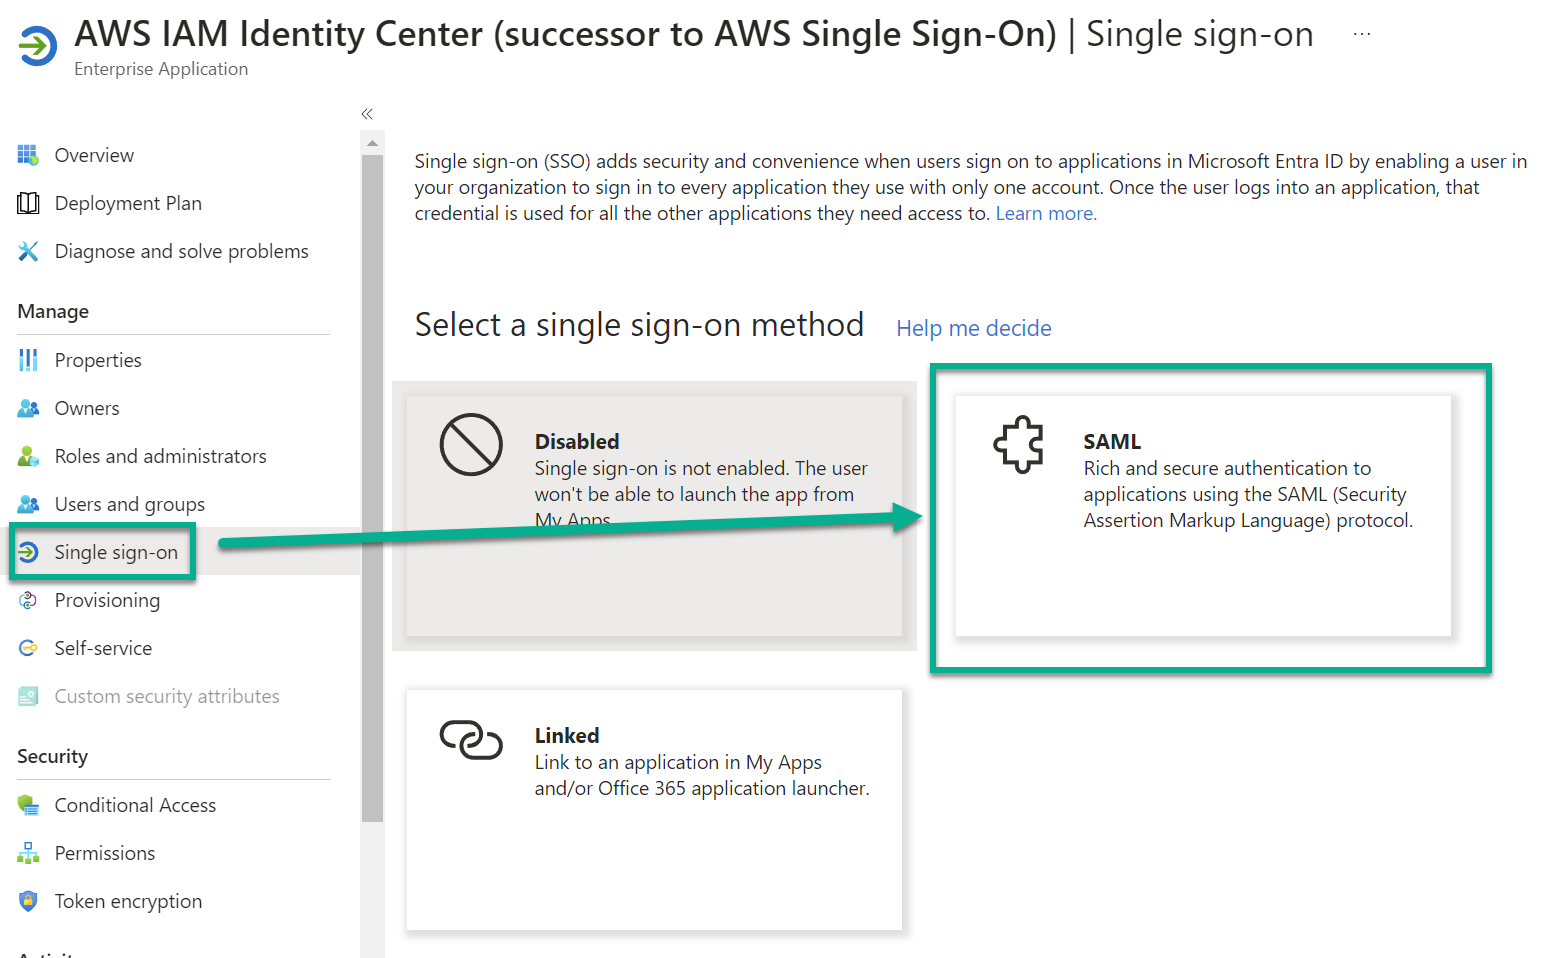
Correctly, set up a single sign on and select SAML. SAML stands for “Security Assertion Markup Language”. SAML is like a secure online passport. It lets different websites share your identity without revealing your personal details every time you log in.
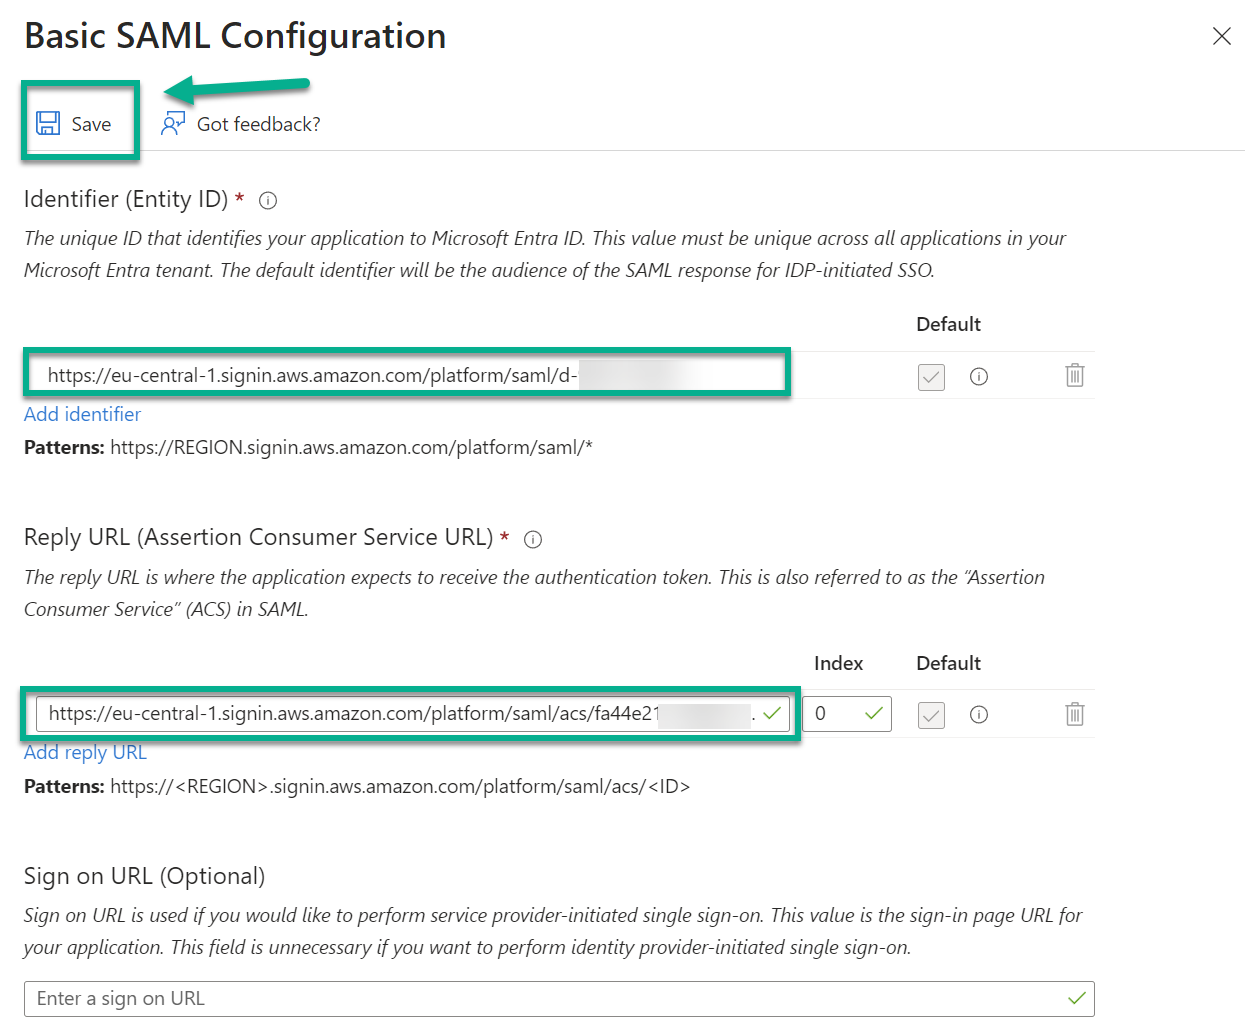
Another screen opens, where I must setup required information about my AWS service provider:
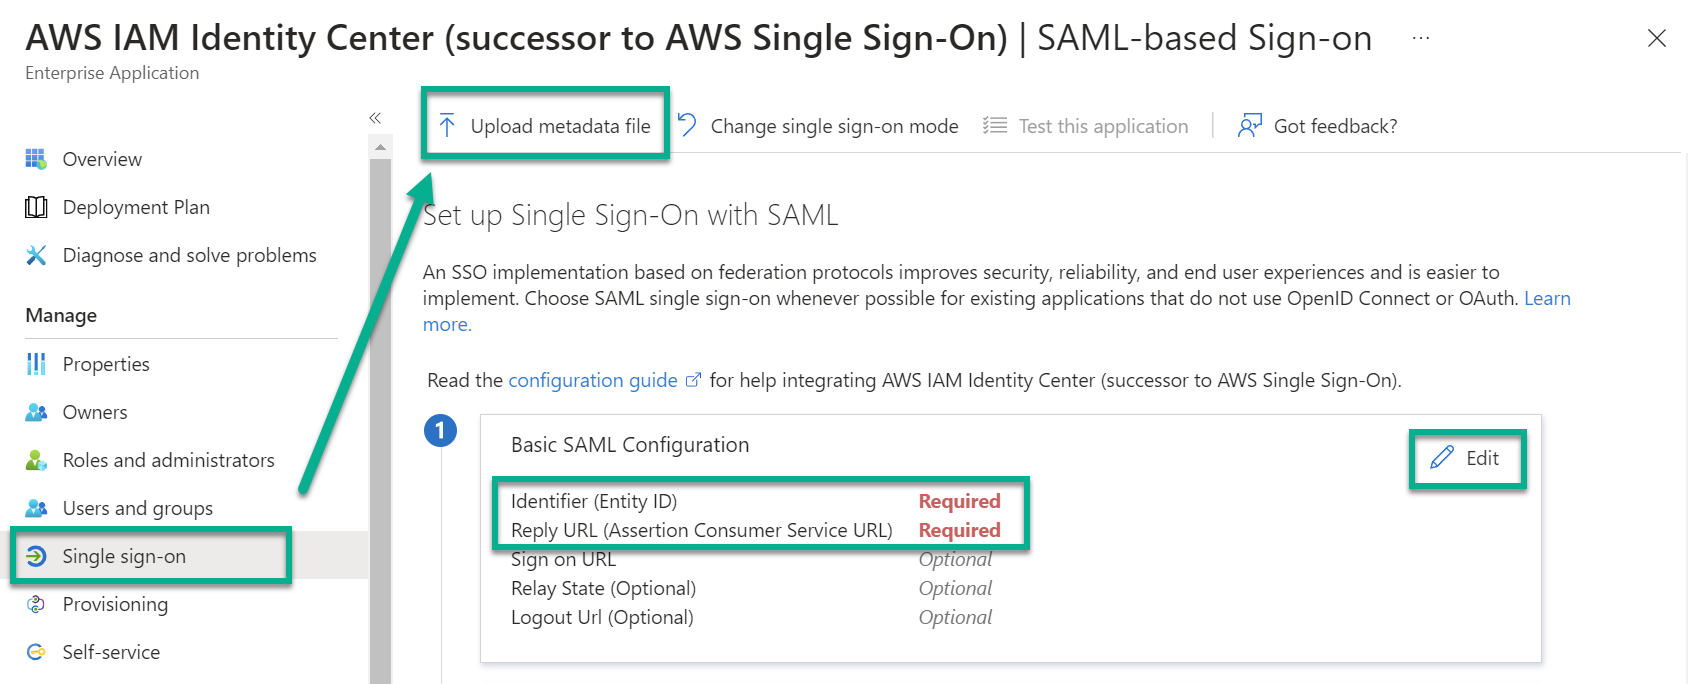
I continue uploading here the previously downloaded XML file from AWS. As explained, the XML file contains the information about my AWS service provider. After uploading, this information is presented to me:
Next, I review the Attributes & Claims which are passed to AWS:

Here I can add also a new claim per example to provide the user role (name: Role, source attribute: user.assignedrole, namespace: https://aws.amazon.com/SAML/Attributes/Role) to AWS (more in Microsoft Docs).
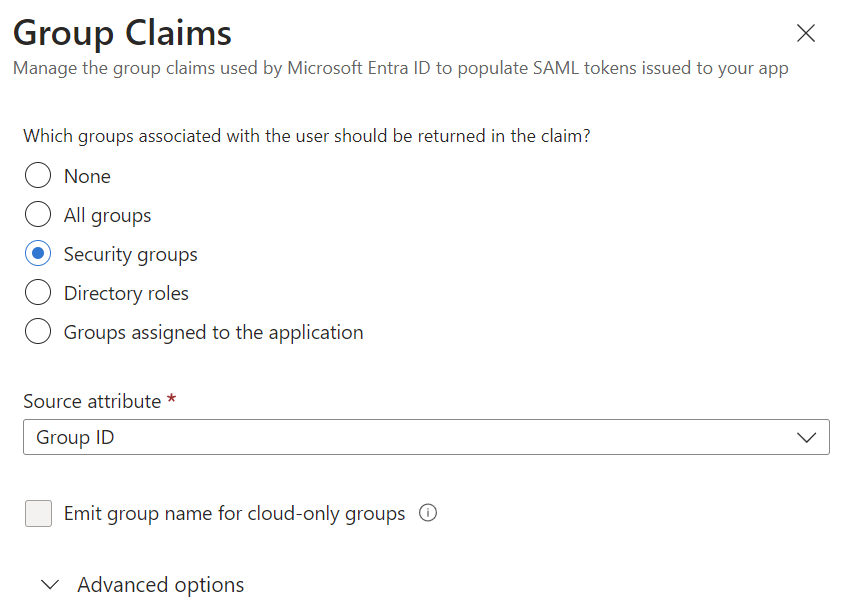
I skip additional claims for user roles, but I add a group claim. I choose as group claim my Security Groups:
Finally, I download the Federation Metadata XML in SAML Certificates:
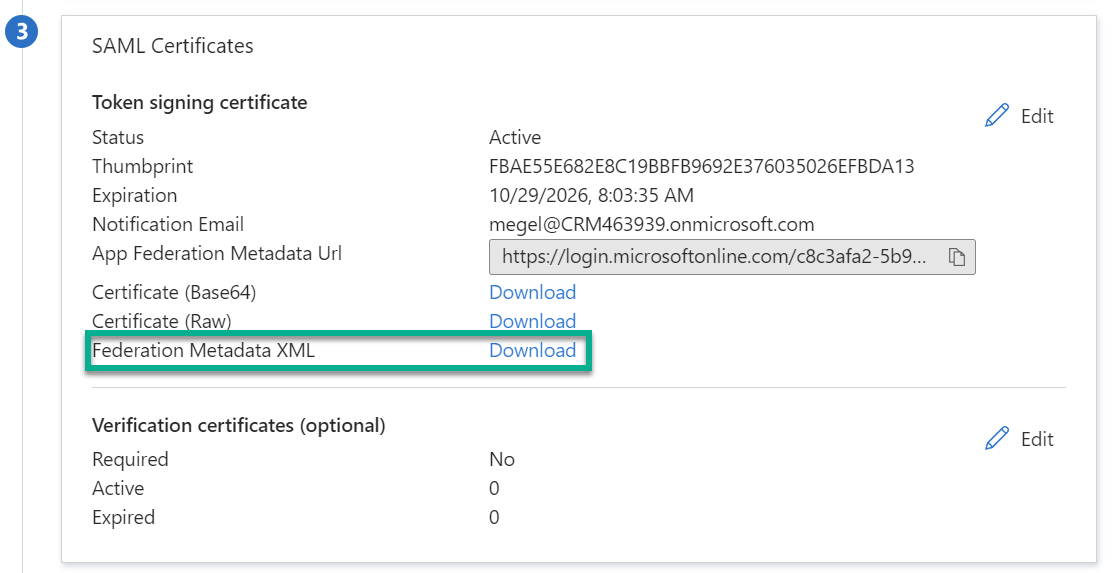
The downloaded file contains now the information about my Microsoft Entra ID identity provider (the enterprise application). I will use this file in my AWS IAM Identity Center to finalize my new source identity provider configuration.
Assign Users in Microsoft Entra ID
Before I continue, I assign also some users to my Microsoft Entra ID Enterprise Application. I navigate to Users and groups where I add users and groups from my Active Directory:
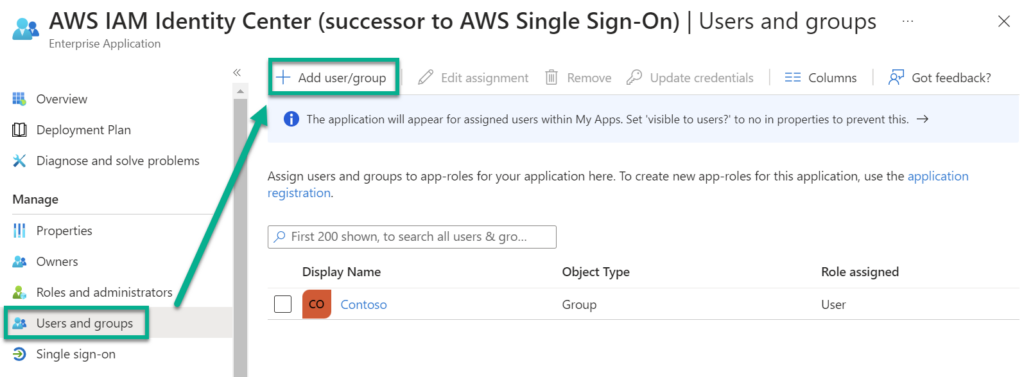
As you see, I have chosen the group Contoso which contains here each user of my demo organization.
Configure Federation in AWS IAM Identity Center
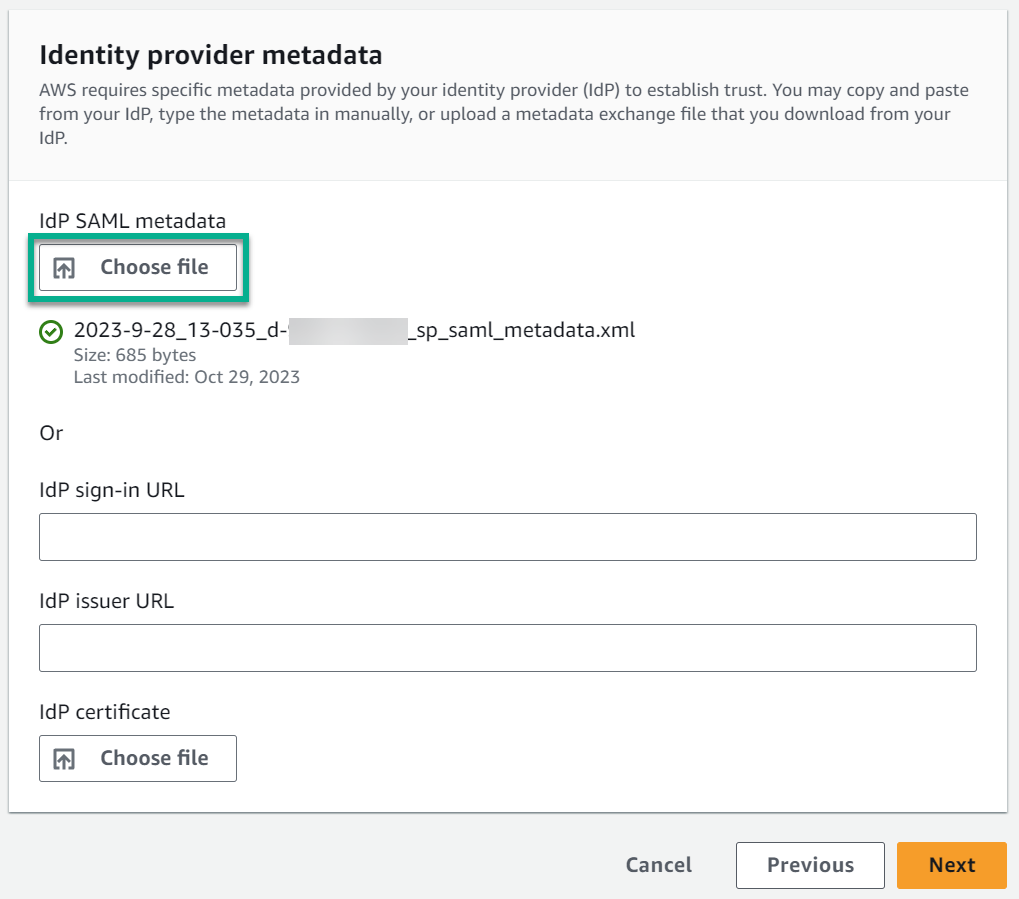
I navigate back to my AWS IAM Identity Center. Here I upload now the Federation Metadata XML from Microsoft Entra ID as IdP SAML metadata:
Next, I confirm and accept the change of my identity source in AWS:
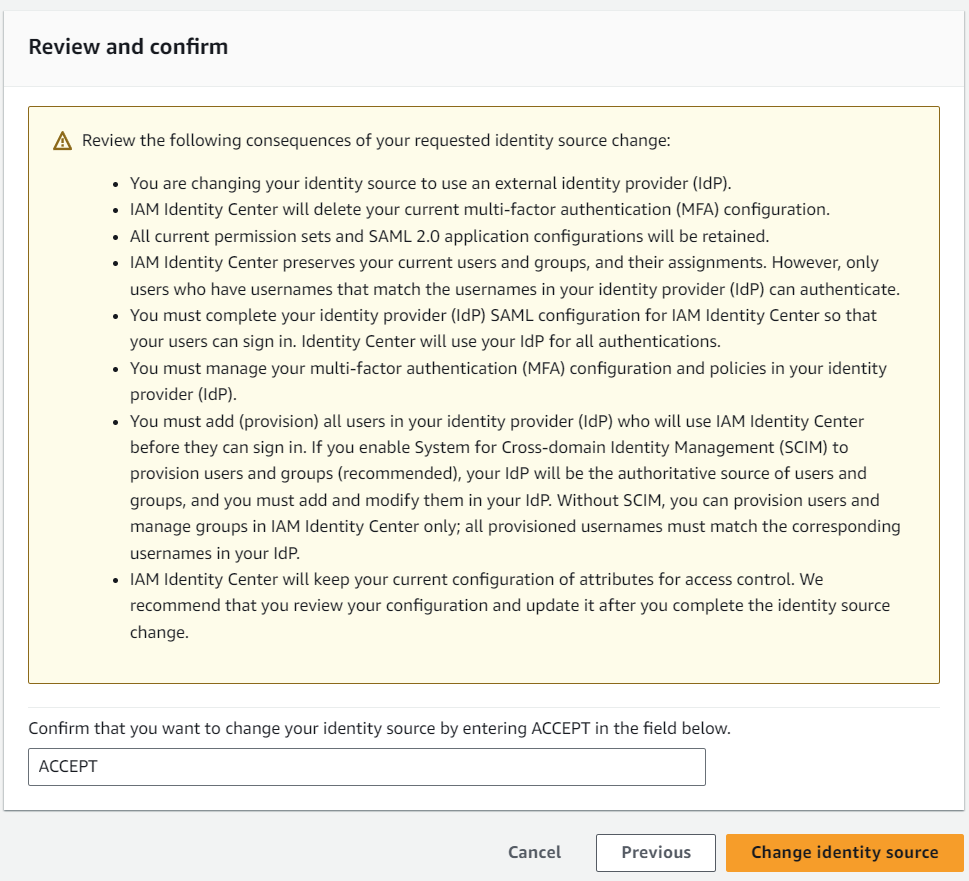
So good so far this was easy. AWS has accepted Microsoft Entra ID as a new identity source.
Automatic Provisioning for Users and Groups
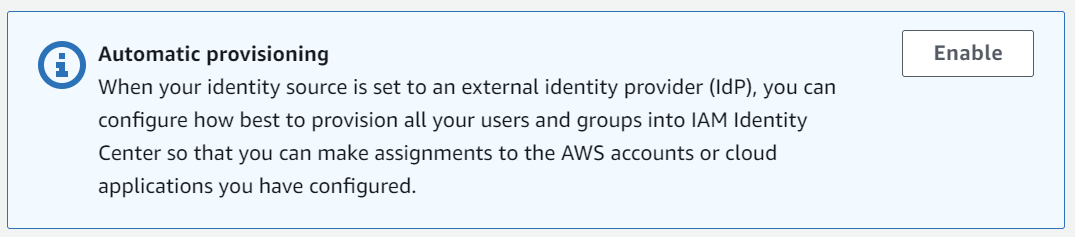
But there is a final step. I must enable the Automatic Provisioning from my new external identity provider in AWS. Enabling automatic provisioning is a critical step in the process of setting up Single Sign-On (SSO) between Microsoft Entra ID (formerly known as Azure Active Directory) and AWS. This feature allows AWS to automatically create and manage user accounts and groups based on the information received from my external identity provider (IdP).
In other words, I must give AWS the ability to create users and groups for my Microsoft Entra ID accounts and groups. This can be done also in my configuration here in my AWS IAM Identity Center:
The following dialog opens, after hitting the Enable button:
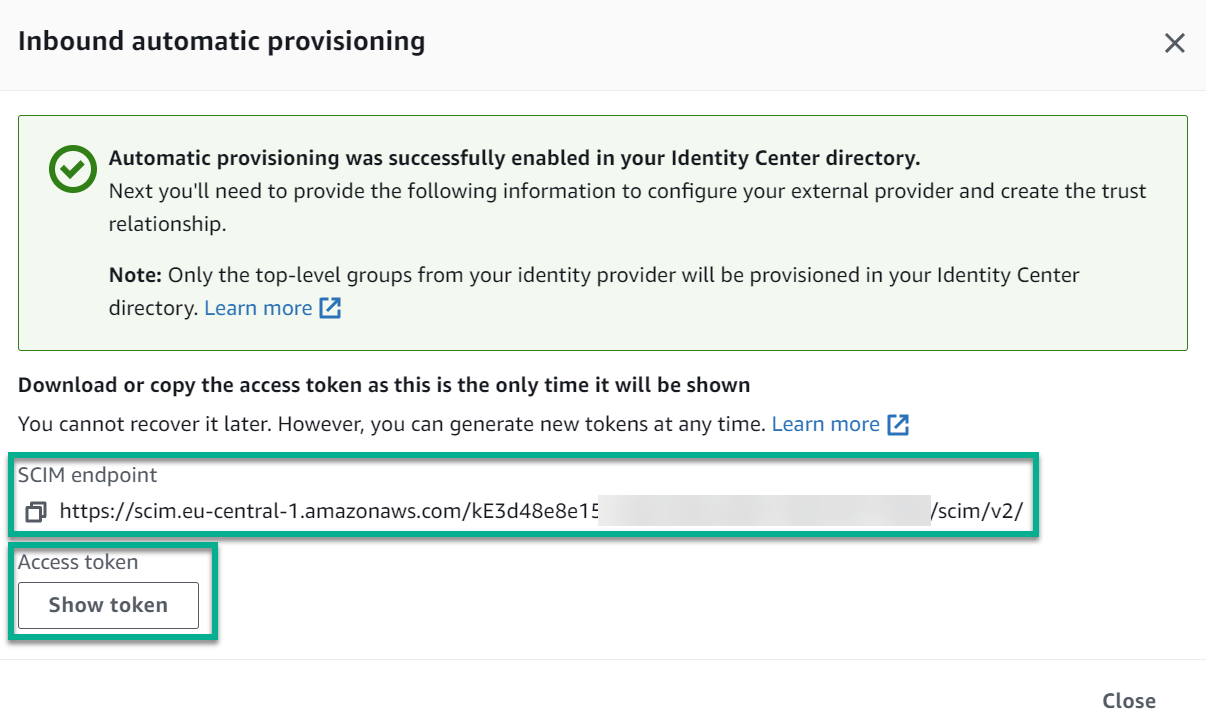
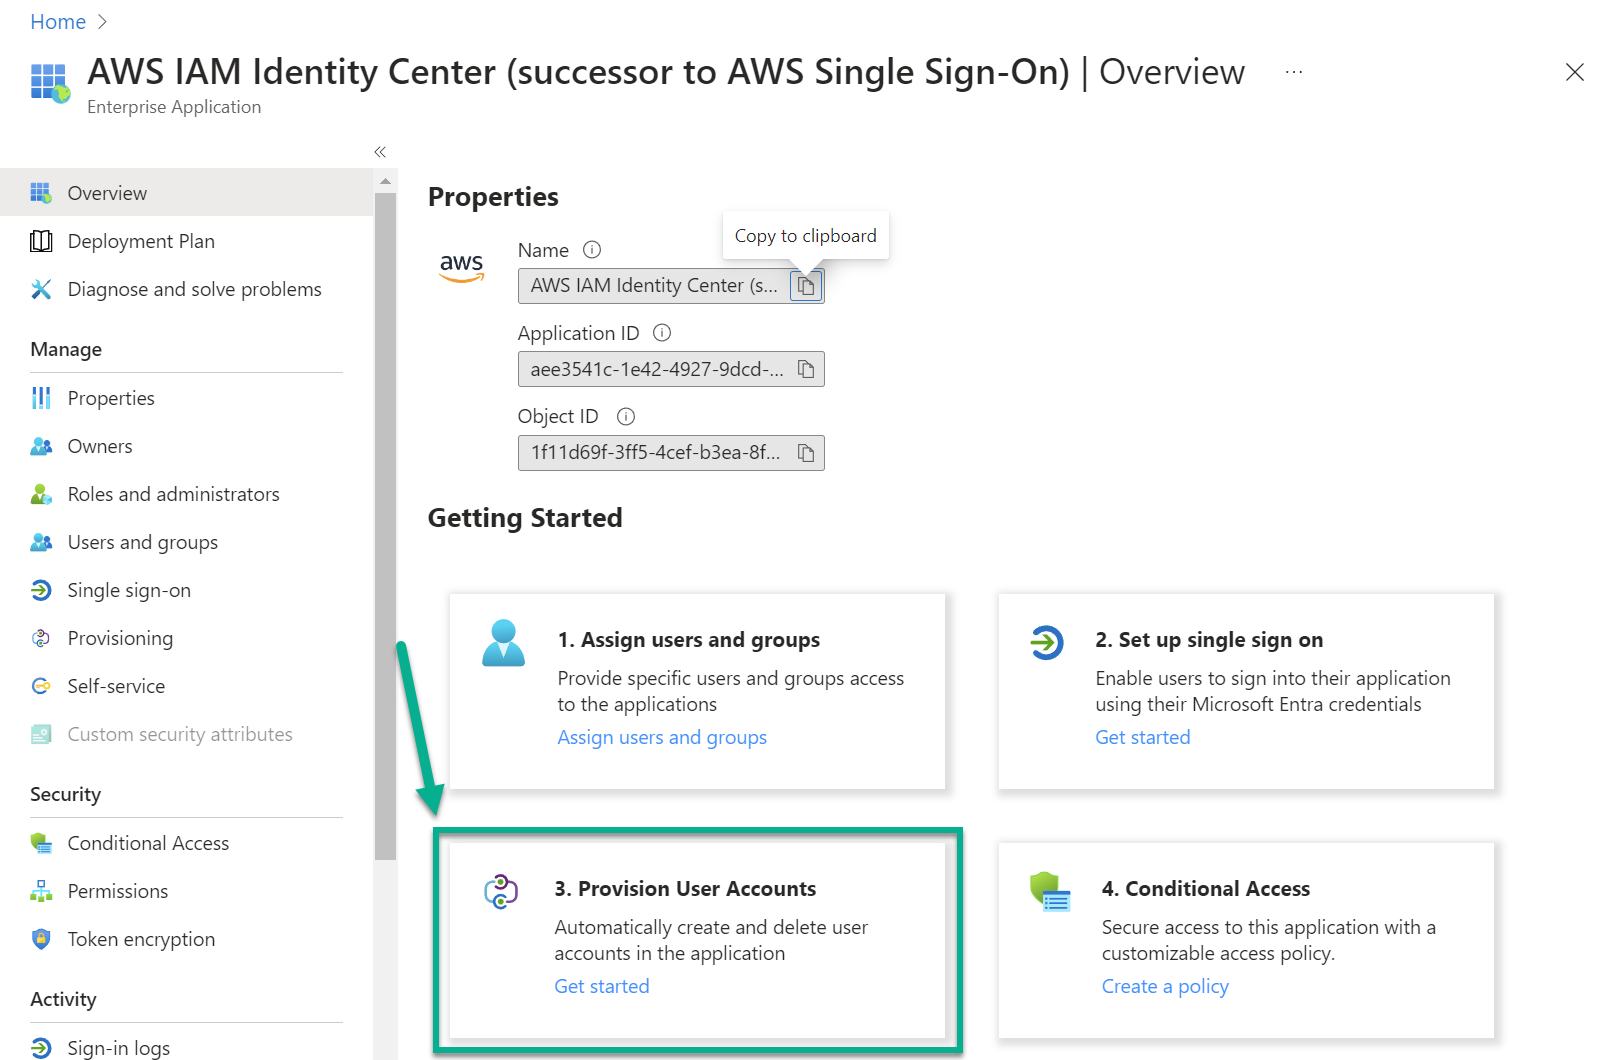
Here I copy out both information. I copy the SCIM endpoint and the Access Token and navigate back to Microsoft Entra ID. I click on Provision User Accounts:
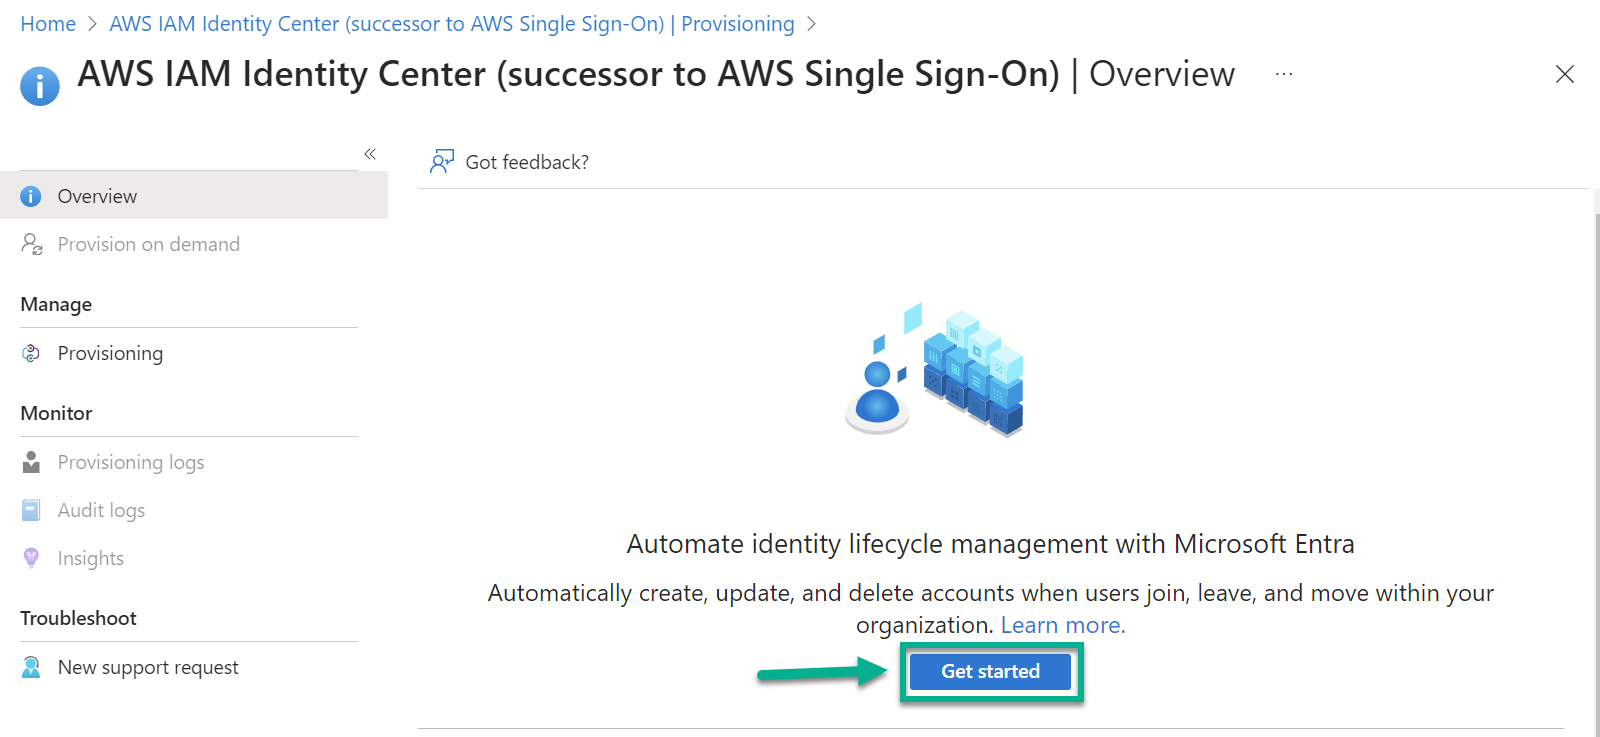
Next, I use Get started to setup the auto provisioning for my Entra ID users in AWS:
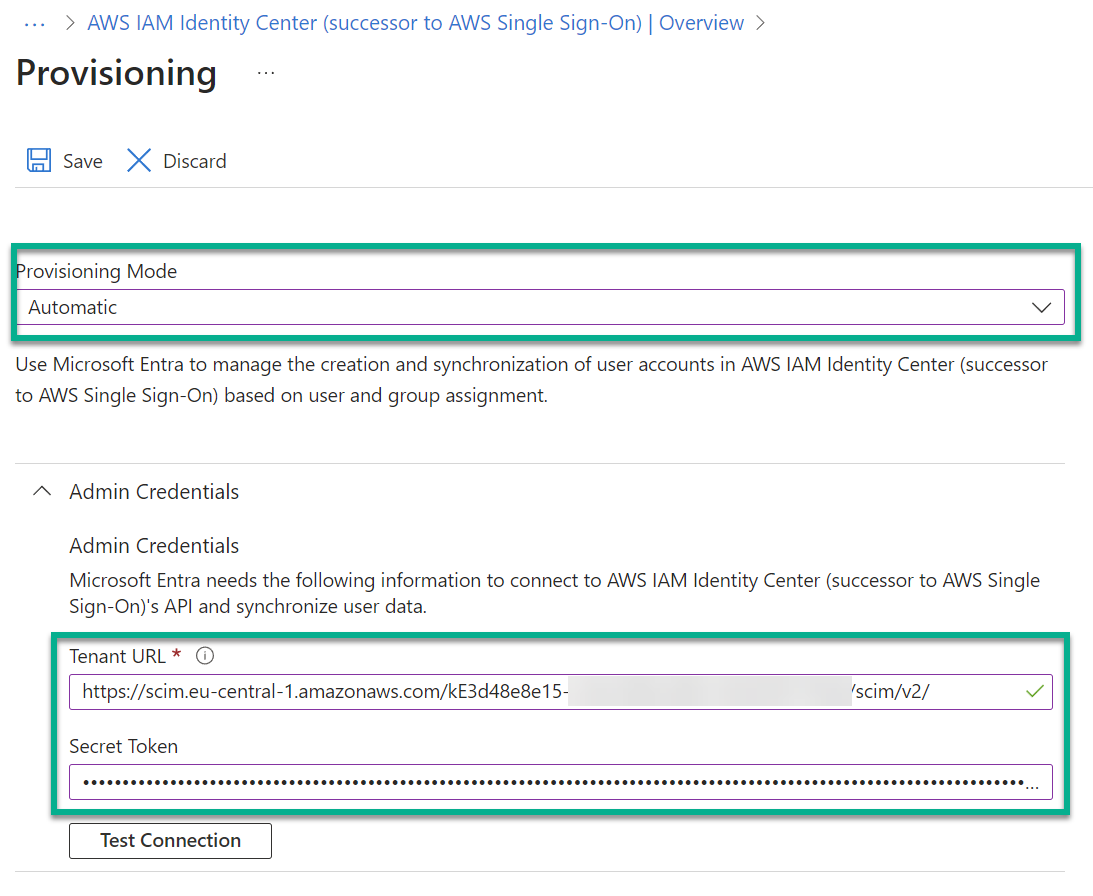
Afterwards, I am changing the Provisioning Mode to Automatic. In addition, I setup Tenant-URL and Secret Token with information from AWS (SCIM endpoint and Access Token):
Finally, I navigate back to the Provisioning Overview and run Start provisioning:
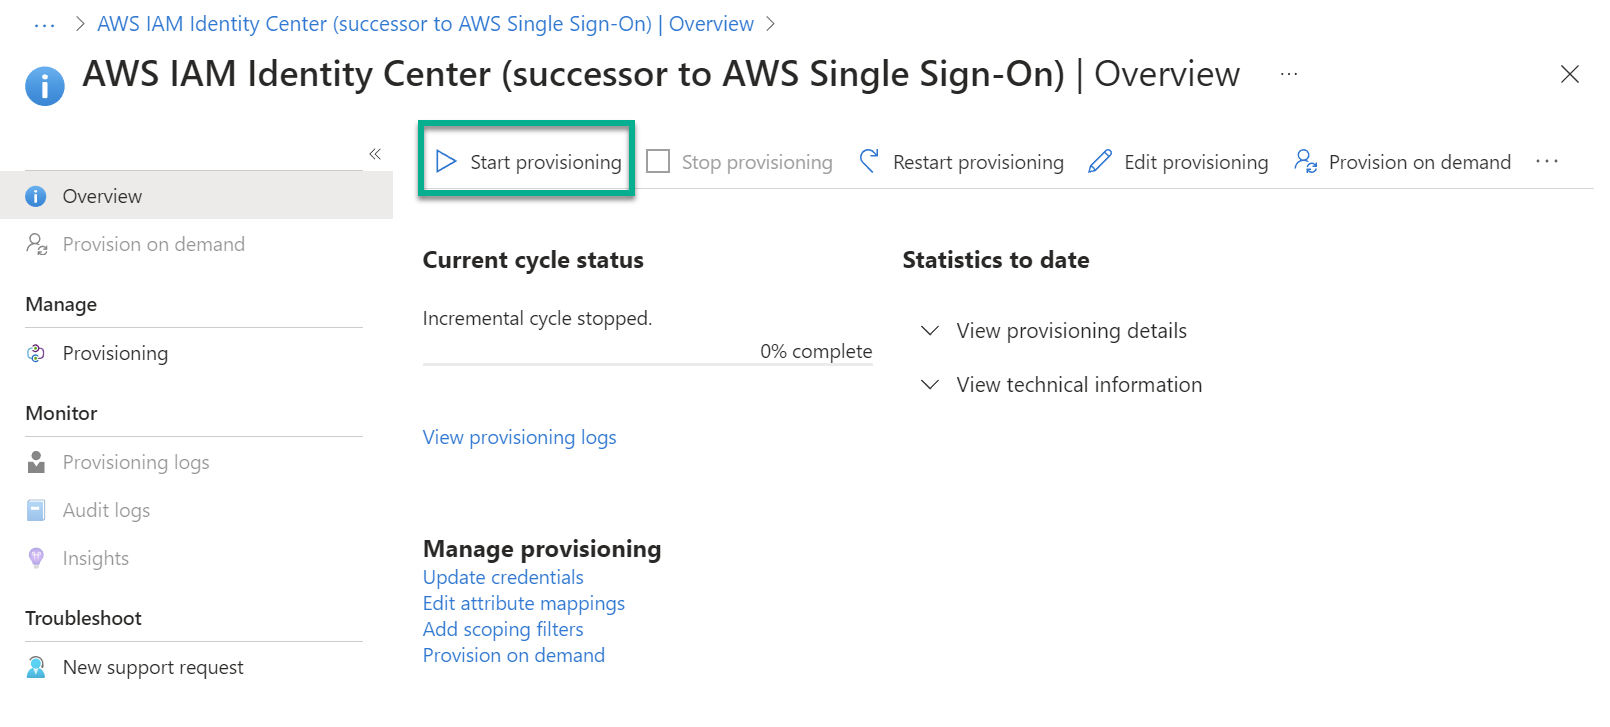
Note: You can also use Provision on Demand for dedicated users or groups.
A double check in AWS shows me after some seconds that my users and groups from Microsoft Entra ID are now created in AWS:
So good so far – easy again! There is one more step to do for me. Right, my users need permissions in my AWS account.
Setup Permissions for SSO Users and Groups
I navigate into my AWS IAM Identity Center and create permissions sets based on the recommendations of AWS:
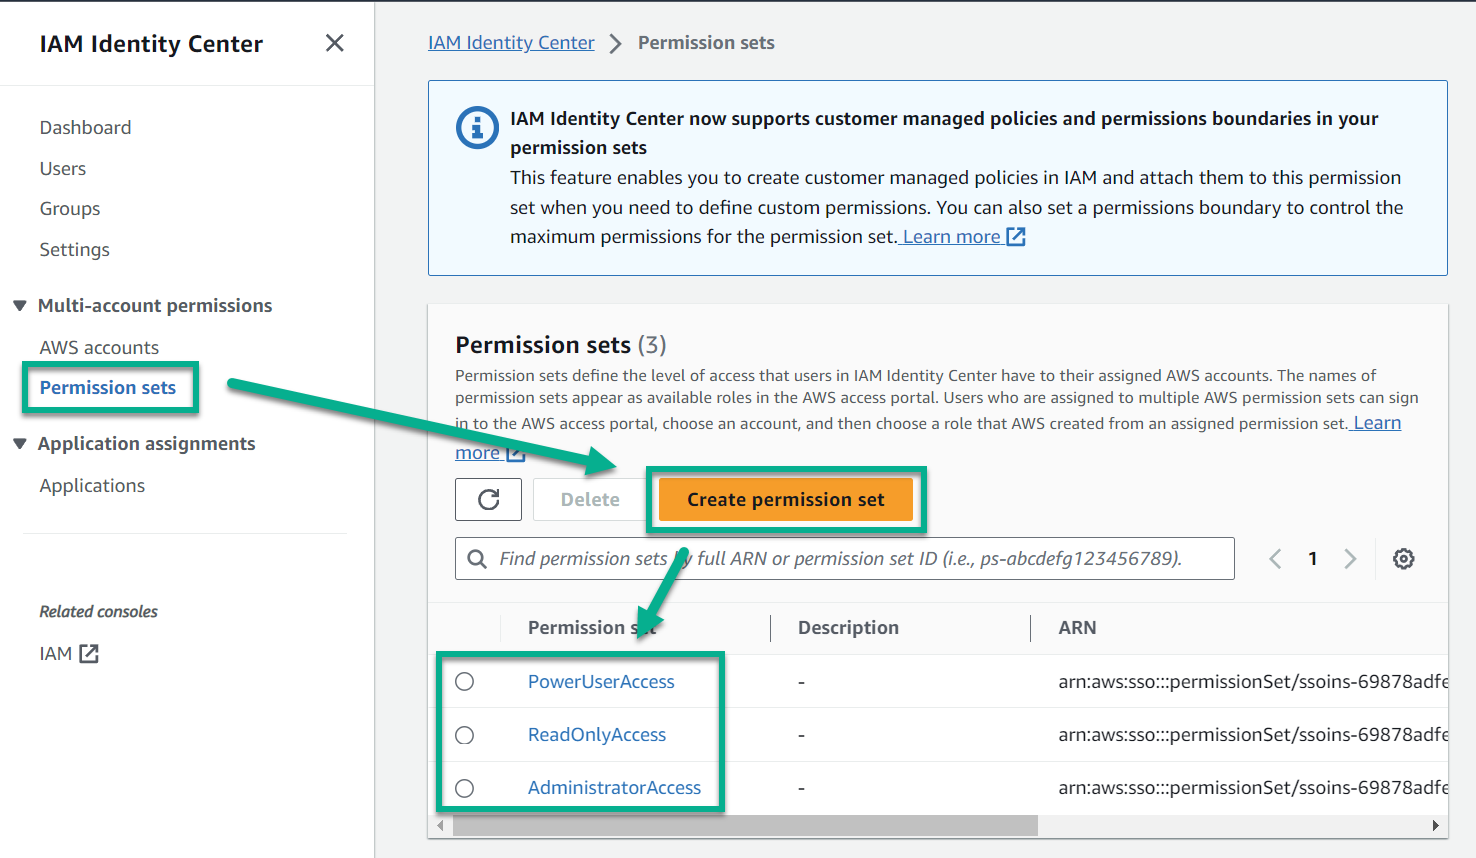
AWS offers common permission sets here based on usage scenarios such as Administrator, Power User (Contributor), or Read-Only access.
Afterwards, I navigate to my AWS accounts and assign the created permission sets to my user groups or dedicated users:
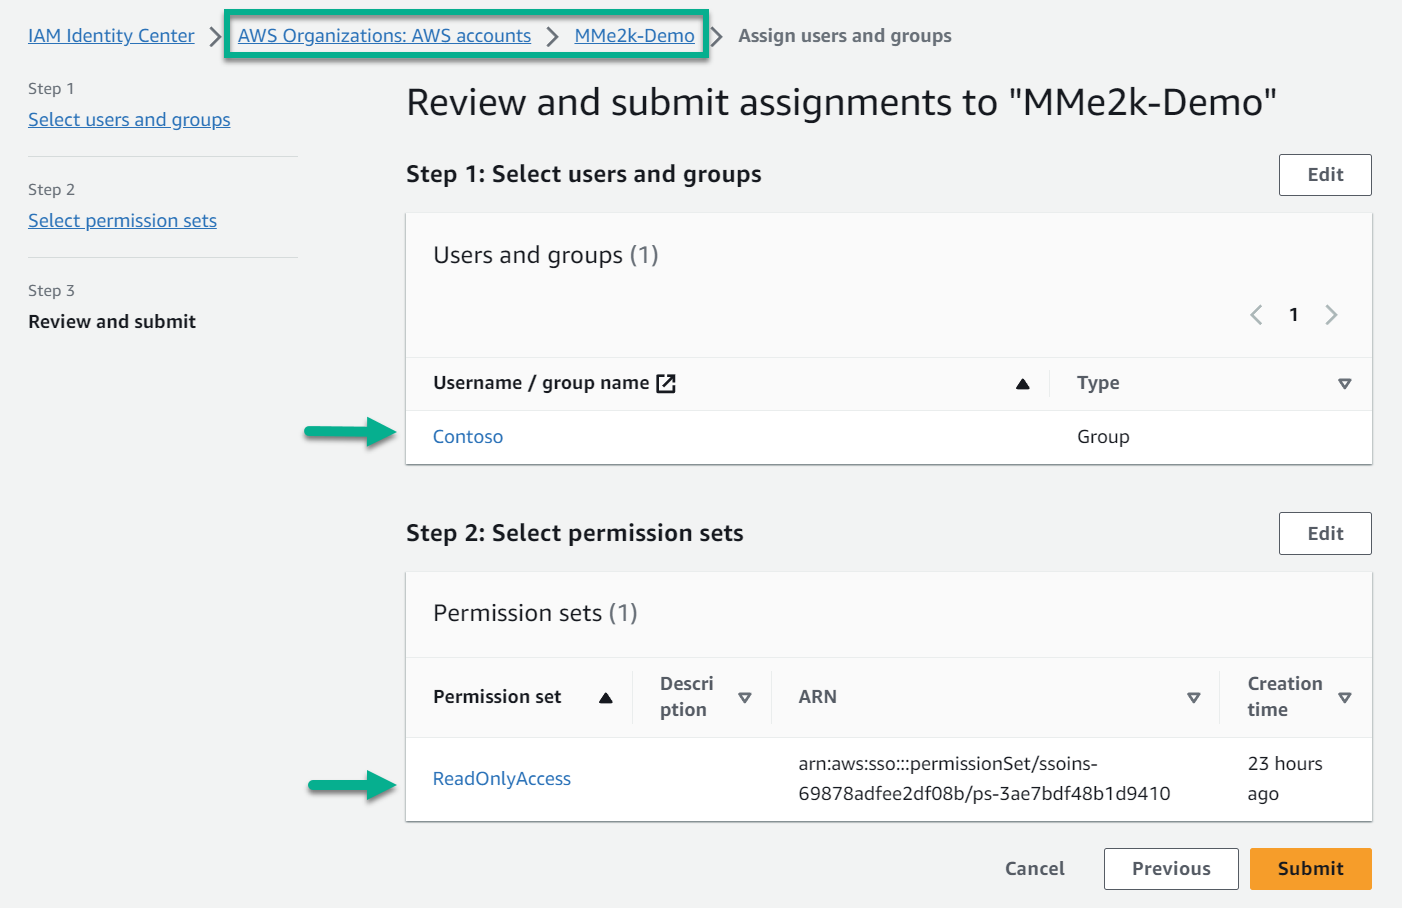
You see here in my example; I added the user group Contoso to my AWS Account MMe2k-Demo and assigned the created permission set ReadOnlyAccess. In conclusion, my users from my Azure demo account (Microsoft Entra ID) can now access with single sign-on my AWS account, but have only read access to my AWS services.
Using AWS Single Sign-On with Microsoft Identity Provider
Now it’s time to verify if my SSO setup works! Before I can start, I need to get the SSO URL for my AWS account first. I navigate to the Settings summary in my AWS IAM Identity Center Dashboard:
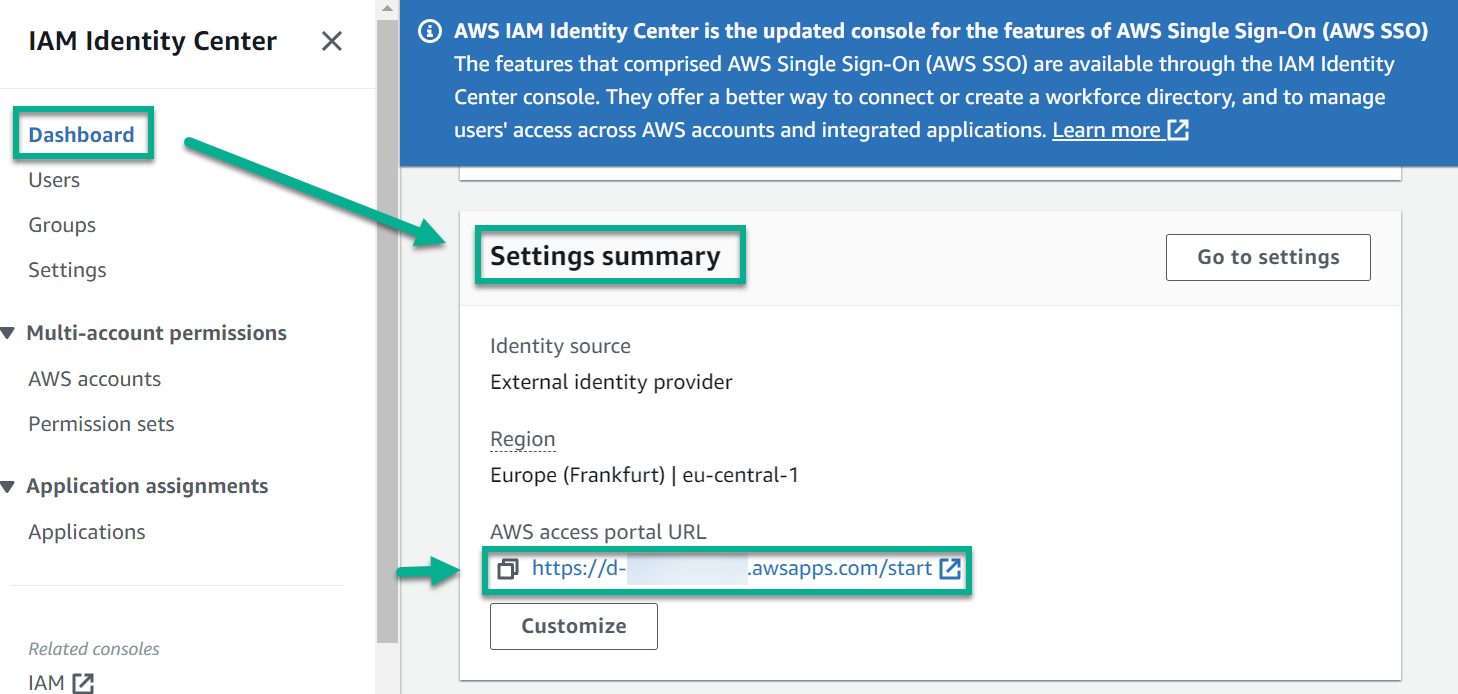
You see, here is my AWS access portal URL.
Note: You can also customize the AWS access portal URL.
Afterwards, I open a new browser session (In-private mode) and navigate to this URL. As result, the Microsoft login dialog appears, where I use my Microsoft account from my demo tenant:
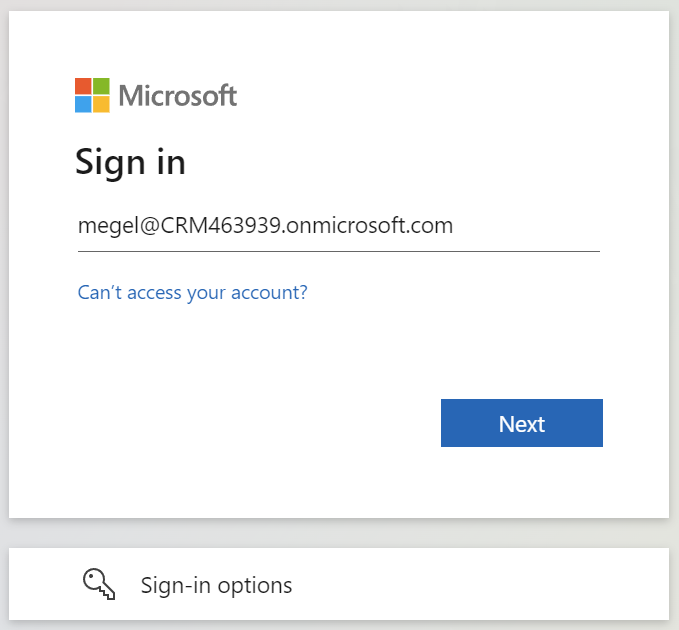
I continue with my password, and I’m redirected to this screen:
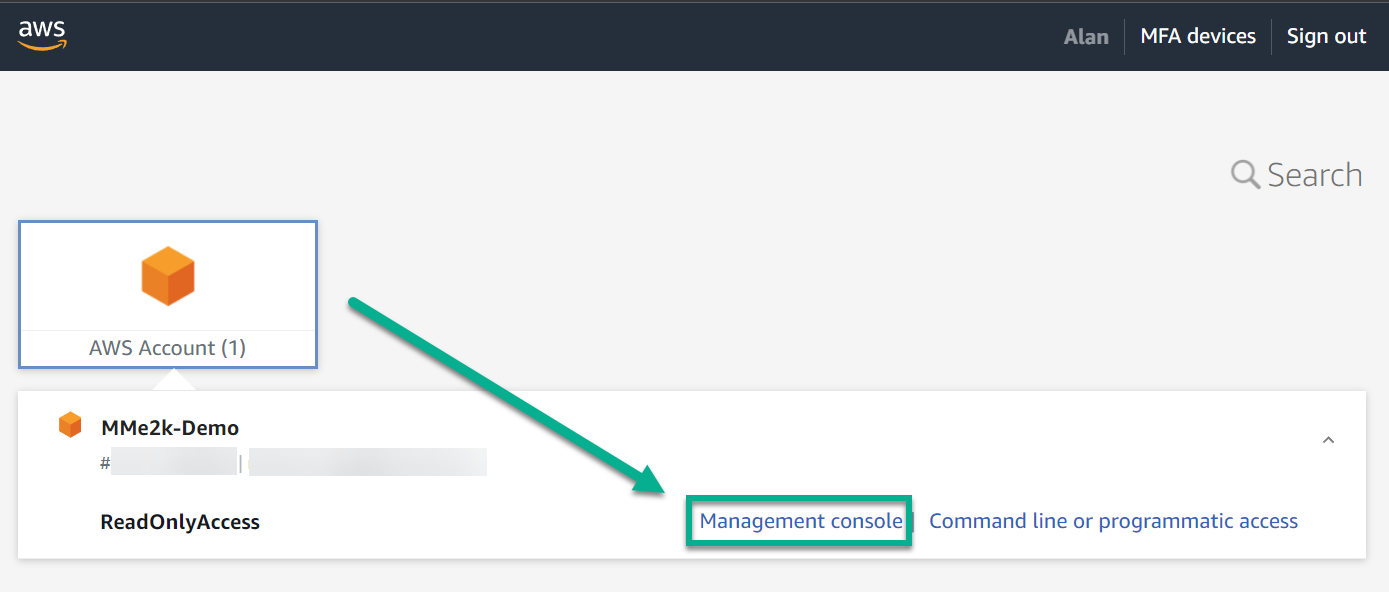
Perfect! Now I can log into my AWS Management console with the correct rights.
Summary
Single Sign-On (SSO) have lots of benefits. It simplifies my online experience by allowing me to use my Microsoft Entra ID (Azure Active Directory) credentials to access multiple websites and apps, including AWS. While it may seem difficult to set up at first glance, it is straightforward to implement AWS Single Sign-On with Microsoft Entra ID as the Identity Provider.
Here’s how I accomplished it in 10 simple steps:
- I activated AWS IAM Identity Center in my desired region (e.g., Frankfurt).
- I configured AWS SSO with Microsoft Entra ID as an external identity provider and downloaded the AWS service provider metadata.
- I have set up a new Enterprise Application in Microsoft Entra ID for AWS IAM Identity Center.
- I established SAML-based SSO, uploaded the AWS service provider metadata file, and defined attribute claims.
- I downloaded the SAML Federation Metadata XML from my Enterprise Application in Microsoft Entra ID.
- I assigned users and groups in Microsoft Entra ID.
- Uploaded the SAML Federation Metadata XML into my AWS IAM Identity Center.
- I enabled Automatic Provisioning to sync users and groups from Microsoft Entra ID to AWS.
- I have set up permissions for SSO users and groups in AWS.
- Finally, I successfully accessed the AWS Management Console using SSO.
This setup streamlines access management and enhances security for my AWS accounts, providing a seamless SSO experience. What more can I say…
Additional Links
Finally, here are a couple of useful links related to this topic for you: