
Azure Cognitive Search and SharePoint for Azure OpenAI
In my last blog post, I explained how I use a Power Automate Flow to add my documents to Azure Cognitive Search. In detail, I copied selected files to my central Azure Blob Storage. This is not the best solution, but it outlines the possibilities of Automation in combination with Azure Cognitive Search.
This time I show you, how I index my documents from SharePoint directly with Azure Cognitive Search. Right, I don’t copy my files to another storage. Now, I integrate my SharePoint folder as data source in Azure Cognitive Search. For this, I follow the instructions in Microsoft Docs: Index data from SharePoint document libraries.
Accessing SharePoint Files
Before I can add SharePoint as Data Source, I must setup an authentication mechanism for Azure Cognitive Search. This is because my Search Indexer must access my files stored in SharePoint. Microsoft Docs describe detailed how to setup an App Registration in Microsoft Entra ID (formally known as Azure Active Directory).
First of all, I enable as described in the documentation the Managed Identity in my already setup Azure Cognitive Search. Microsoft Docs says, the identity is used by my search service to automatically detect my tenant when my SharePoint and my Search Service are provisioned in the same tenant.

Afterwards, I follow again the description, create and configure my App Registration. During this, I must decide how my Indexer will access my SharePoint files. There are 2 options:
- Delegated Permissions mean the indexer (a tool that organizes information) works as if it’s the person or app making the request. It can only access data from the sites and files that person has permission to view. To do this, the person needs to sign in, and sometimes a special code is needed to do so.
- Application Permissions mean the indexer works on behalf of the whole SharePoint system and can see all sites and files within it. To do this, it needs a secret code. But before it can start organizing any information, the person in charge of the SharePoint system must give permission.
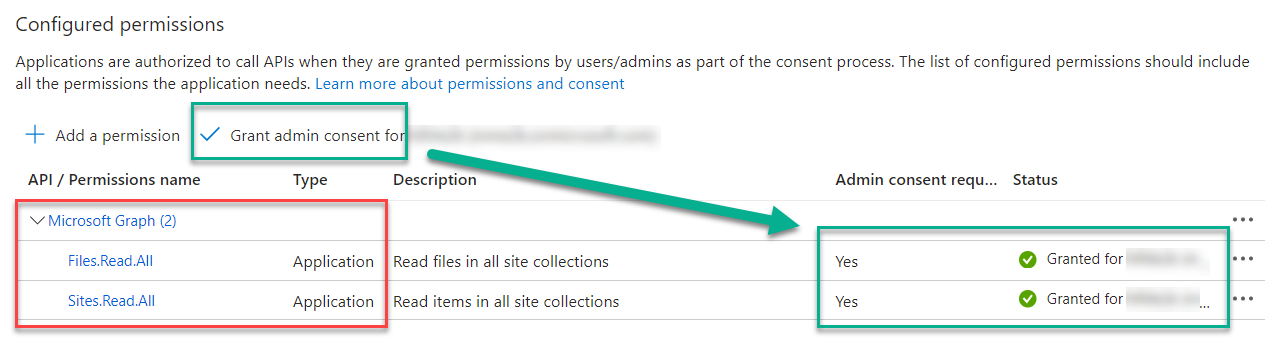
I use Application permission for my example. This is because I’m the Tenant Administrator in my demo organization. Moreover, I have no restrictions and want to access all my SharePoint sites and files. I add in conclusion the Application Permissions for Microsoft Graph to my App Registration and use Grant admin consent for my organization:
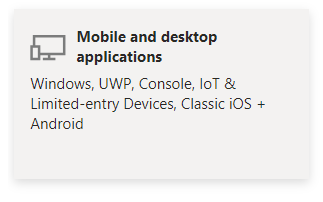
Finally, I navigate to Authentication tab to add a Mobile and desktop application:
Here I also select the native client URI provided by the wizard:

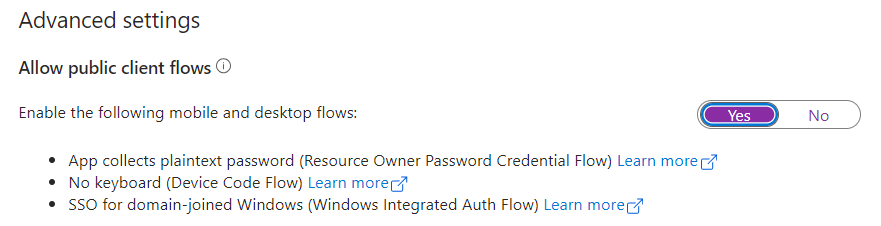
Afterwards, I allow public client flows for my Application Registration:
Now, everything is ready, and I can use my Application Registration.
SharePoint as Data Source for Cognitive Search
Currently, SharePoint as data source for Azure Cognitive Search is only available as preview. This means, I must use the REST API of my Azure Cognitive Search to add my SharePoint as a data source.
I use for this Visual Studio Code and the REST Client extension. Furthermore, I share my REST Client script with you. You can reuse this script to add your share point library as data source to your own Azure Cognitive Search. You just need to adjust the variables accordingly to your own environment:
### Variables:
@service_name     = [Search Service Name e.g. my-demo-search]
@api_key          = [Search Service API Key]
@data_source_name = sharepoint-datasource-presentations
@site_url         = [SharePoint UTL like: https://my-tenant.sharepoint.com/sites/Presentations]
@app_id           = [Application Registration ID]
@client_secret    = [Application Registration Client Secret]
@tenant_id        = [Application Registration Tenant ID]

### Create a Data Source for a SharePoint Site / Library
POST https://{{service_name}}.search.windows.net/datasources?api-version=2020-06-30-Preview
Content-Type: application/json
api-key: {{api_key}}

{
    "name" : "{{data_source_name}}",
    "type" : "sharepoint",
    "credentials" : { "connectionString" : "SharePointOnlineEndpoint={{site_url}};ApplicationId={{app_id}};ApplicationSecret={{client_secret}};TenantId={{tenant_id}}" },
    "container" : { "name" : "defaultSiteLibrary", "query" : null }
}
As result, my data source is now present in my Search Service:

As you also see, I use as example a SharePoint folder where I have previously uploaded some of my conference slides (PPTX) and handouts (PDF).
Setup the Index
In the next step I setup a new Index for my SharePoint files. I use basically the recommended fields from Microsoft Docs to store the metadata information and the raw content of my indexed SharePoint files:
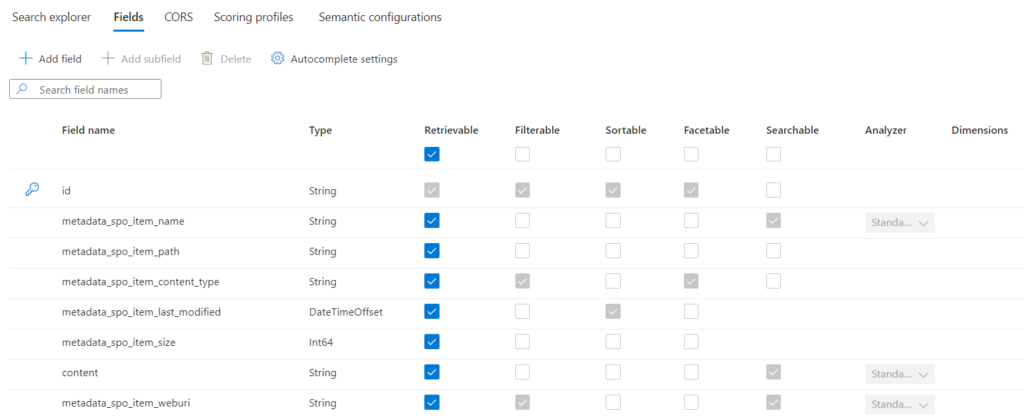
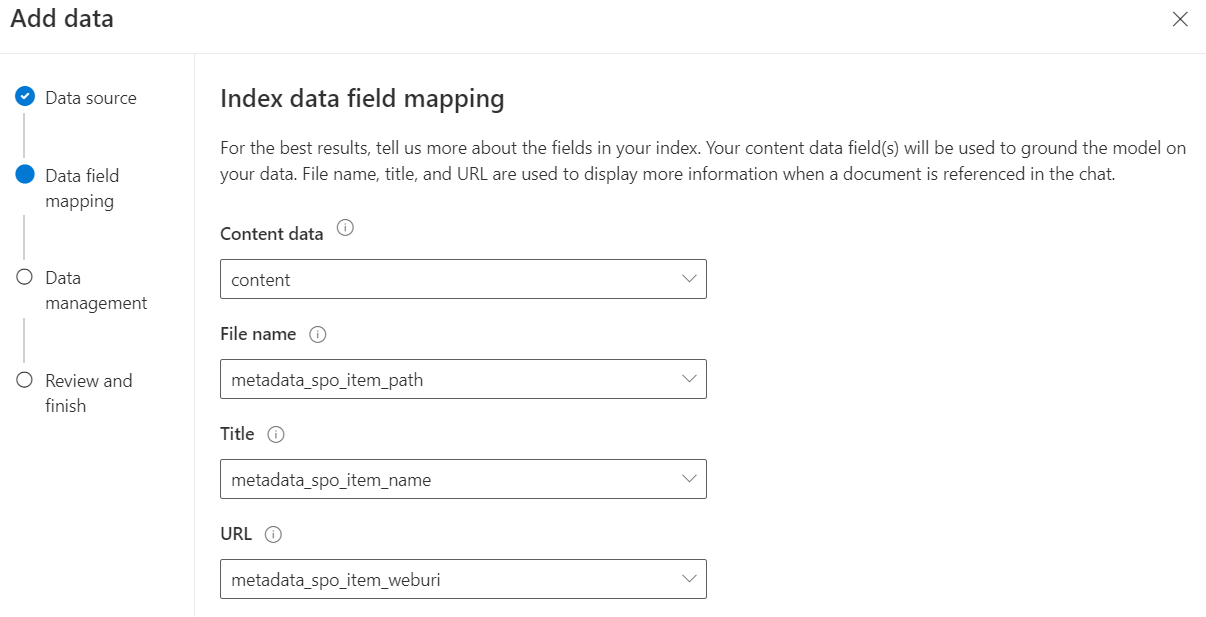
Furthermore, you see from the screenshot I added another field. This is right, I added metadata_spo_item_weburi to store also the URI of my indexed file (Metadata Information). This is because I can provide an URL later for Azure OpenAI.
Setup the Indexer
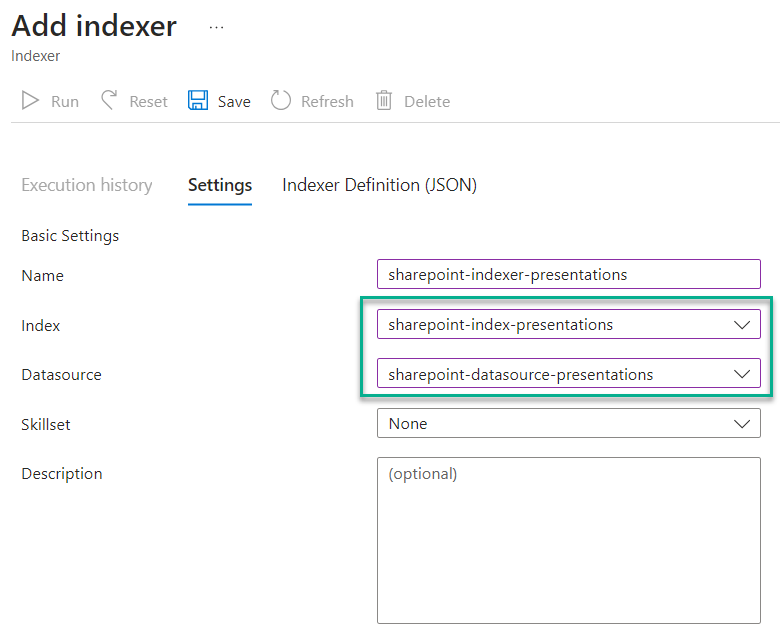
Now, I setup a new Search Indexer to query information from my SharePoint data source and fill my Azure Cognitive Search Index with the retrieved data.
First, I select my data source and my index:
Afterwards, I switch to Indexer Definition (JSON) and change the highlighted parameters:
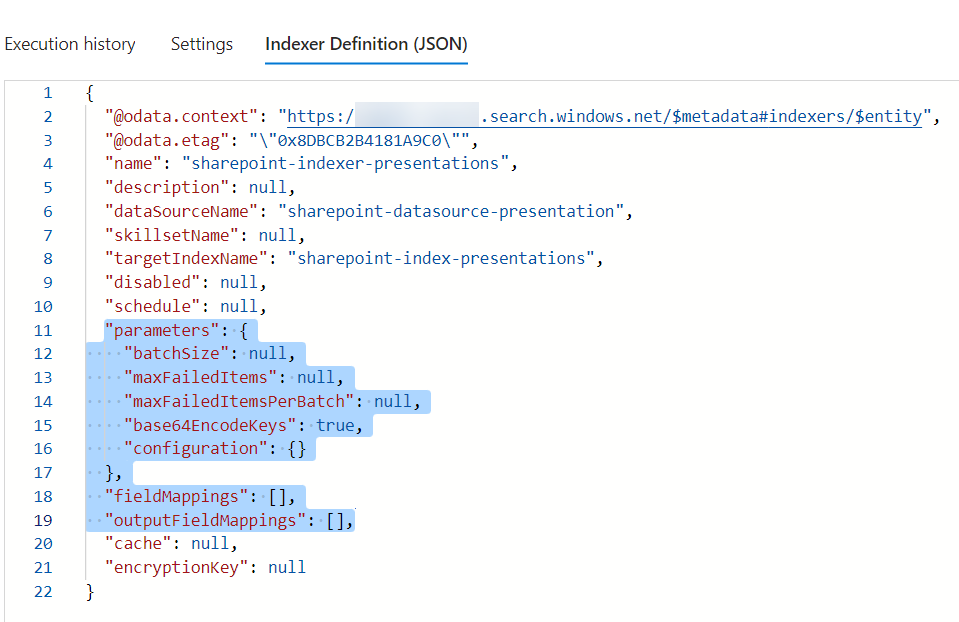
In detail, I change the parameters into this to index my PDF, PPTX, and DOCX files:
 "parameters": {
    "batchSize": null,
    "maxFailedItems": null,
    "maxFailedItemsPerBatch": null,
    "base64EncodeKeys": null,
    "configuration": {
      "indexedFileNameExtensions": ".pdf, .docx, .pptx",
      "excludedFileNameExtensions": ".png, .jpg",
      "dataToExtract": "contentAndMetadata"
    }
  }
Furthermore, I map all source fields provided by SharePoint to my index fields by using this configuration:
"fieldMappings": [
    {
      "sourceFieldName": "metadata_spo_site_library_item_id",
      "targetFieldName": "id",
      "mappingFunction": {
        "name": "base64Encode",
        "parameters": null
      }
    },
    {
      "sourceFieldName": "metadata_spo_item_name",
      "targetFieldName": "metadata_spo_item_name",
      "mappingFunction": null
    },
    {
      "sourceFieldName": "metadata_spo_item_path",
      "targetFieldName": "metadata_spo_item_path",
      "mappingFunction": null
    },
    {
      "sourceFieldName": "metadata_spo_item_content_type",
      "targetFieldName": "metadata_spo_item_content_type",
      "mappingFunction": null
    },
    {
      "sourceFieldName": "metadata_spo_item_last_modified",
      "targetFieldName": "metadata_spo_item_last_modified",
      "mappingFunction": null
    },
    {
      "sourceFieldName": "metadata_spo_item_size",
      "targetFieldName": "metadata_spo_item_size",
      "mappingFunction": null
    },
    {
      "sourceFieldName": "content",
      "targetFieldName": "content",
      "mappingFunction": null
    },
    {
      "sourceFieldName": "metadata_spo_item_weburi",
      "targetFieldName": "metadata_spo_item_weburi",
      "mappingFunction": null
    }
  ]
My indexer is ready after saving my updated configuration. To ensure correct results, I reset my index first and run my indexer afterwards:

You see, I got some warnings. A closer look shows me this:

This is correct because my Azure Cognitive Search is running as Pricing tier Basic. You don’t have this limitation with Pricing tier Standard.

Note: The Pricing tier Basic have some limitations like the file size of maximum 16MB.
Nevertheless, some of my added files were indexed correctly. Let me double check my index:
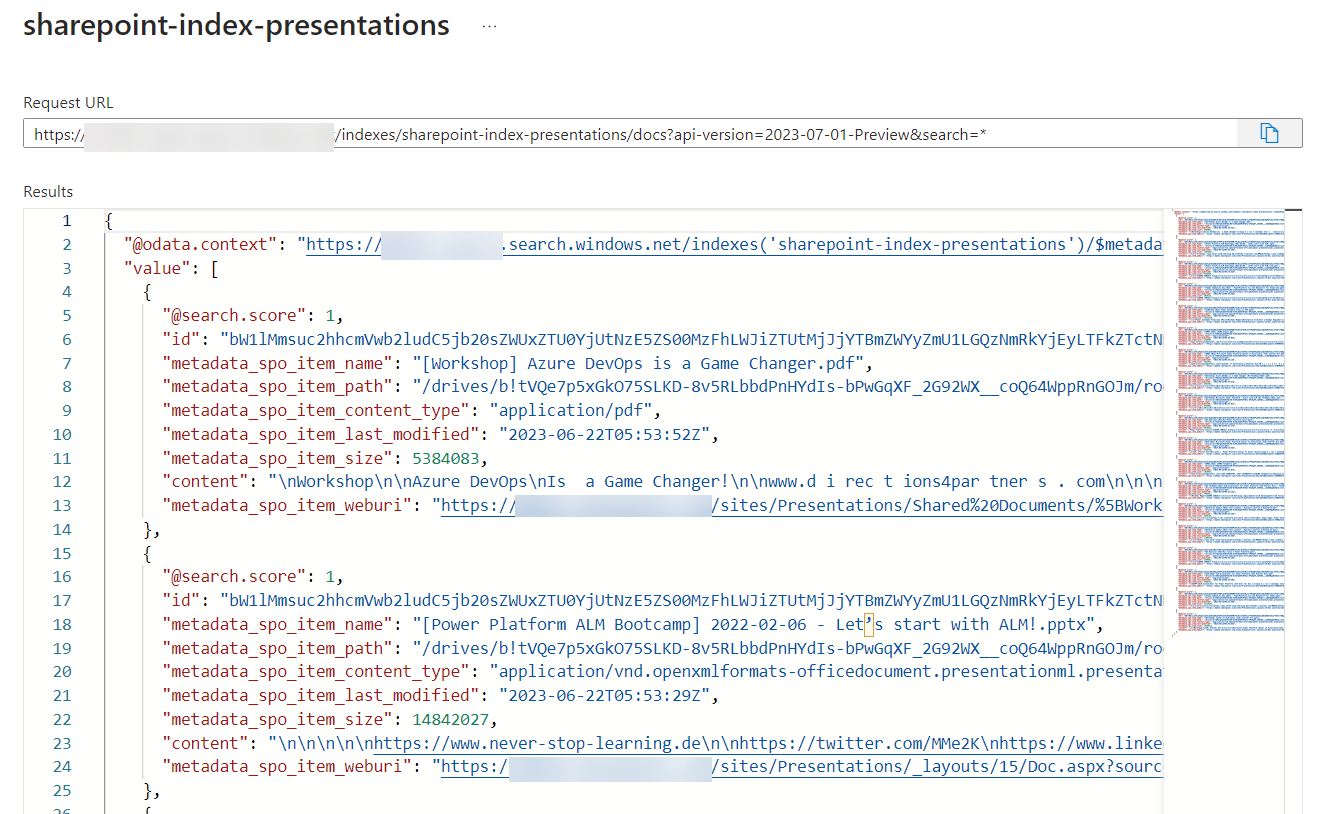
Perfect, my index contains information about my conference presentations including the metadata.
Azure OpenAI
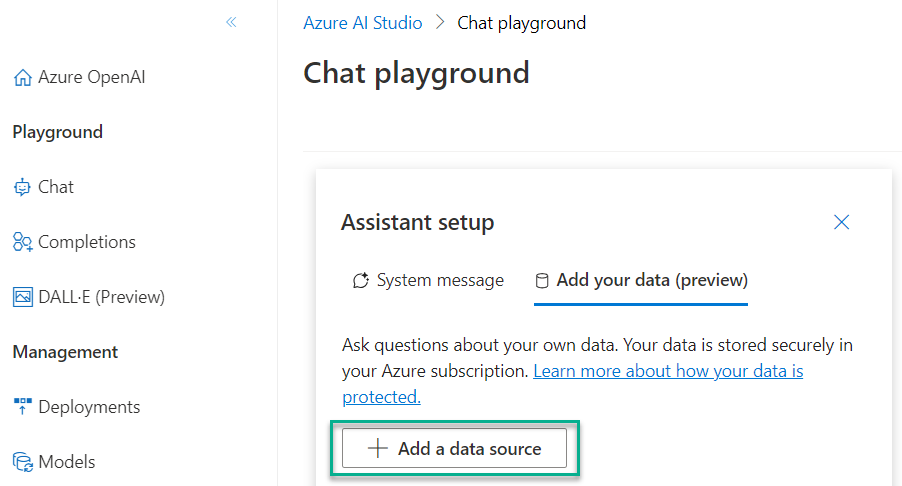
My Azure Cognitive Search index is ready and contains search information about my conference presentations and handouts. From here it is a simple task to use this information directly in Azure OpenAI.
I navigate into my Azure AI Studio, open the chat playground, and add a data source:
Furthermore, I can now select my Search Index in the configuration wizard:

… and then I map the data fields to my index fields including the URL field:
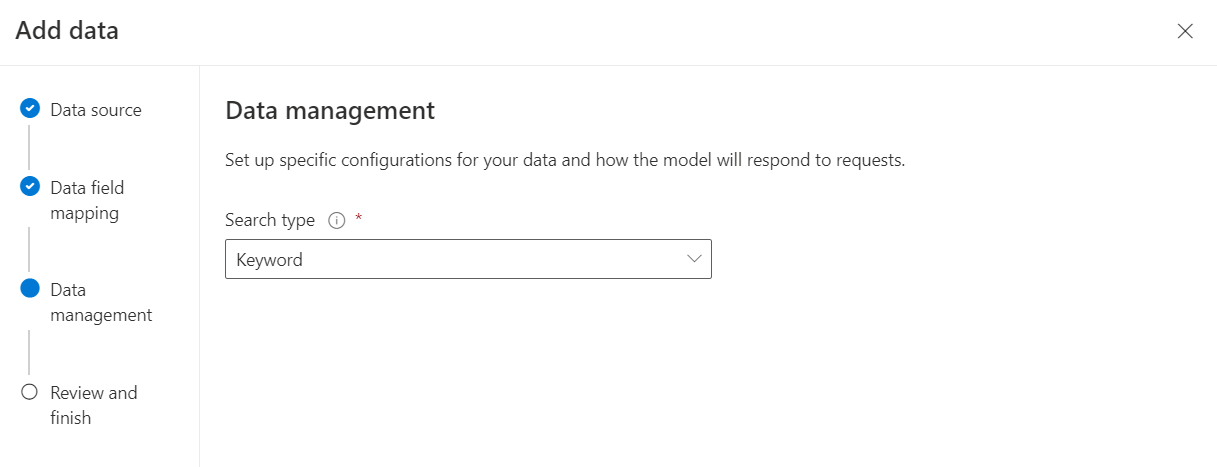
Next, I stay with the Search type Keyword. This is because I haven’t configured semantic search in my demo setup.
After completing the wizard, I double check directly in the Chat playground the result of my configuration:
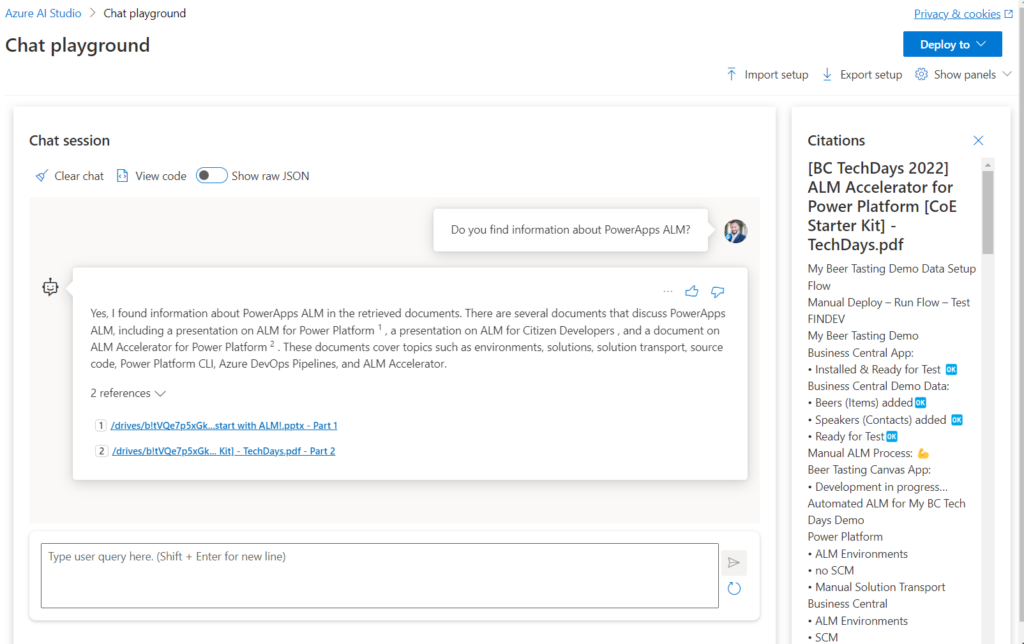
As you see, Azure OpenAI provides answers based on my indexed SharePoint documents. Furthermore, the index information is used for the included citations.
Finally, I can deploy this setup as a Web Page in my Azure subscription. I skip this step here because I already blogged about this amazing option in: Using Azure OpenAI Chat Completion in Business.
Summary
This time, I presented an improved approach to demonstrate how you can effortlessly index your documents stored in SharePoint. Prior to adding SharePoint as a data source to Azure Cognitive Search, I established an App Registration for authentication. Following this, I proceeded to create a new data source using the Azure Cognitive Search REST API. I did this, because SharePoint as data source is in preview and there is no UI option available yet. From there, I have setup a new search index and configured an indexer with accurate field mappings.
Finally, I illustrated how you can seamlessly utilize the newly created search index in Azure OpenAI. I integrated my search index as a data source into the chat completion playground and verified the outcomes through testing. As result, information from my SharePoint files were found from Azure OpenAI.
To sum up, SharePoint as data source for Azure Cognitive Search allows me to index my files without creating a copy. This is in my opinion a huge step in the right direction. Furthermore, Azure Cognitive Search can also handle larger files with a proper service tier. But this is something for a future blog post…