Improving PowerApps by Centralized Processing
PowerApps are promoted as Low-Code / No-Code platform to write Apps and this is right! Power users can easily adopt the “programming” language which is similar to the Microsoft Excel Formula language.
On the other hand, when developing PowerApps, users tend to duplicate command snippets and code fragments. I did this until I found a way to reduce this redundancy of my code copies in my apps.
Let me show you this on a very simple example:
Calling a Power Automate Flow from PowerApps with different parameters.
Prerequisites – Power Automate flow
My example uses a Power Automate flow similar to the flow in “Avoiding Parameter Chaos in PowerApps“. Therefore, my input parameter is still “delaySeconds”.
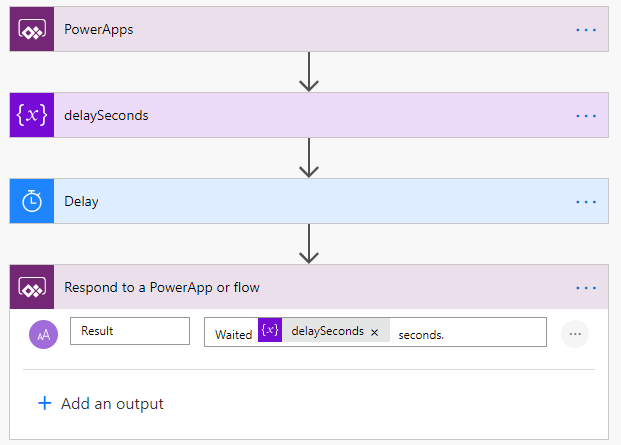
As you see, the difference to my former example is my added action “Respond to PowerApp or flow”. This action return parameters from a Power Automate flow to the calling PowerApp.
In other words, my example flow returns an information text as “Result” parameter to my PowerApp.
This change is necessary because I want to wait until my flow is finished. Therefore my flow must return at least one result parameter. Otherwise, the flow would run in the background without waiting.
Calling a Flow from PowerApp
As you also know, you can select and add a Power Automate flow as data source or action to your PowerApp:
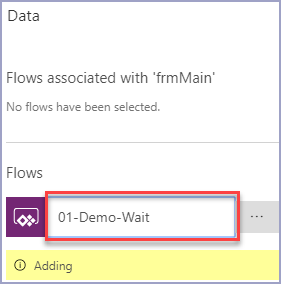
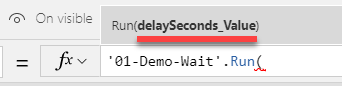
The added flow is now ready to use. I can invoke my flow by using a Control-Trigger. Within this function body, I need to call the “Run” command with the specified parameters:
Finally, my flow is executed when the trigger event raises.
So far, so good, let’s increase the complexity! …
Start Processing with different Parameters
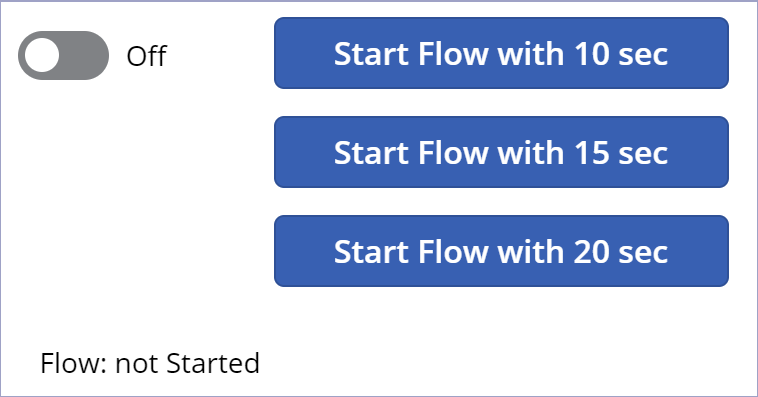
My Power Automate flow example is executed from 3 buttons. Each of these button “OnSelect” triggers will pass a different value as “delaySeconds” parameter to my flow.
Additionally a label control is showing some information during the execution. This “Message” will provide information about the current operation to our user:
My first button “OnSelect” trigger uses 10 seconds as parameter “delaySeconds”. Therefore the code is:
UpdateContext({lValue: 10});
UpdateContext({lMessage: "Starting the flow… with " & lValue & " sec. delay…"});
'01-Demo-Wait'.Run(lValue);
UpdateContext({lMessage: "Flow done."});
The 2nd button passes 15 seconds as parameter to the flow:
UpdateContext({lValue: 15});
UpdateContext({lMessage: "Starting the flow… with " & lValue & " sec. delay…"});
'01-Demo-Wait'.Run(lValue);
UpdateContext({lMessage: "Flow done."});
And finally, the 3rd button and “OnSelect” trigger invoke the flow with 20 seconds. You see, the code is already similar:
UpdateContext({lValue: 20});
UpdateContext({lMessage: "Starting the flow… with " & lValue & " sec. delay…"});
'01-Demo-Wait'.Run(lValue);
UpdateContext({lMessage: "Flow done."});
As result of my programming I got 3 button triggers with obviously the same code and behavior. The only difference is the value stored as local context variable “lValue”.
In other words, a lot of “copy-paste” from my code.
Processing Workflow
Well, my example is quite simple and copy-paste works very well here.
But what if there are more complex parameters, the processing is error-prone or time-consuming?
… Then I should do a little bit more. Here are some examples:
- Pre-processing to prepare or transform my data for the flow
- Post-processing to transform the received results for presentation
- Error handling if my result is unexpected 😮
- And finally, during such a long period of operation, I should give my user feedback on what is happening
Consequently, the amount of code will be increased. So, code cloning is not an option!
Additionally, from a maintainability and development point of view, it makes sense to centralize my code. It is easier to change one trigger instead of 3 triggers.
In other programming languages I would use a module or function to bundle functionality. Unfortunately, PowerApps Language works differently. You can’t create a module or function.
Moreover, I can’t call anything in PowerApps except a flow. As a result, I have to react to triggers where I can place my code.
So, my million dollar question is: “Is there a way to reduce code based on triggers?” … and my answer is: “Yes, I have found one!“
Centralized Processing
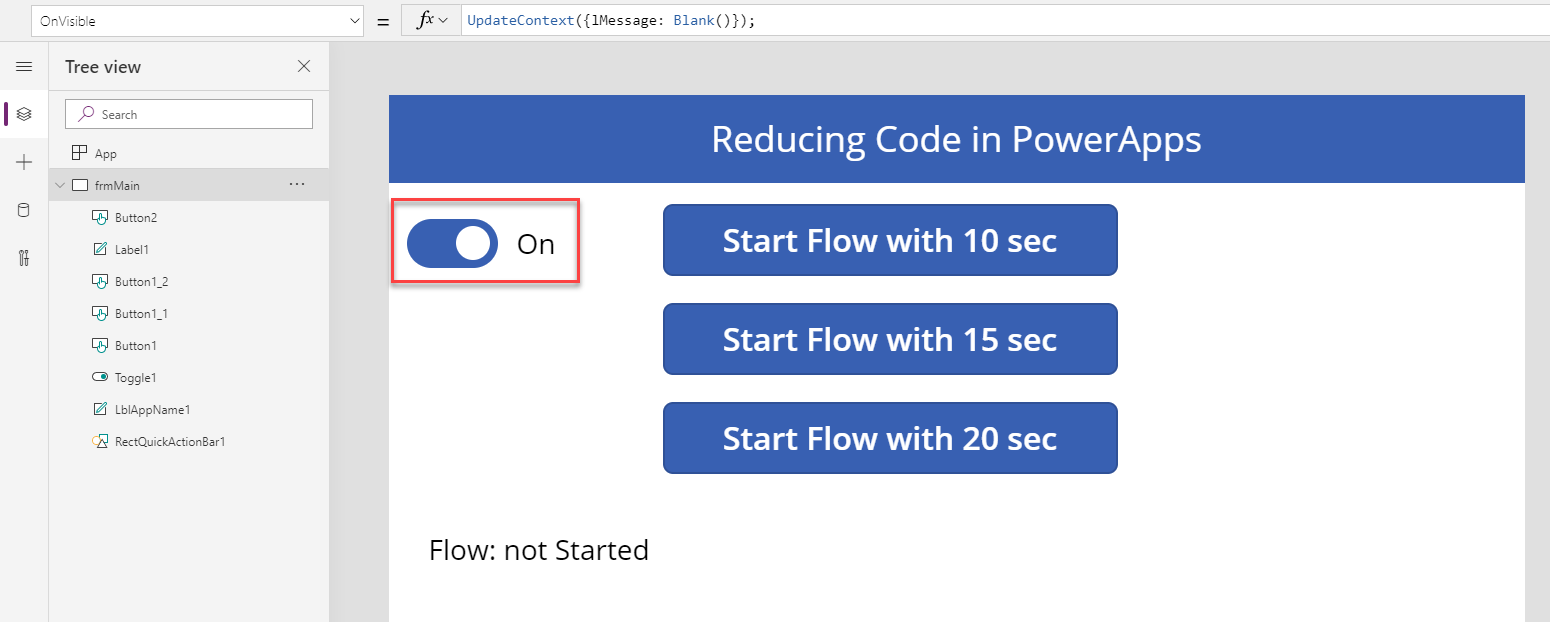
I use a Toggle Control to centralize my execution code. This control can react to variable changes and has its own trigger to handle changes.
This means, I set up the “Default Value” property of my Toggle Control to my context variable “lExecuteFlow”:
lExecuteFlow
Furthermore, changes to “lExecuteFlow” will raise the “OnChange” trigger of my Toggle Control.
So, my code is quite simple. I change the variable “lExecuteFlow” to its opposite value by using the logical function “Not(…)” … nothing more.
UpdateContext({lExecuteFlow: Not(lExecuteFlow)});Reducing the Trigger Code
Each of my buttons passes a parameter to my Power Automate flow. The update of the parameter “lValue” is added to the “UpdateContext“ call of each button trigger as follows:
UpdateContext({lValue: 10, lExecuteFlow: Not(lExecuteFlow)});
As result, I have now 3 triggers with 1 line of code instead of 3 triggers with the whole execution code. This is in my opinion much better!
Improved Flow Invocation
My flow is now centralized executed centrally by the “OnChanged” trigger of my Toggle Control:

Additionally, I added some comments to structure my code. I hope 🙂 this improve the readability and understanding of my code for future maintenance a little bit.
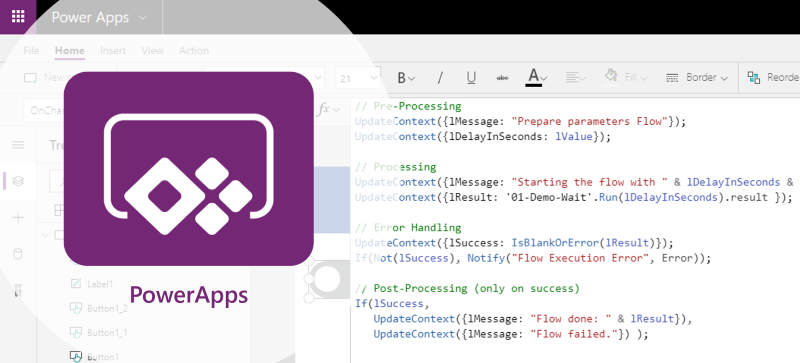
Now my “OnChanged” trigger code contains the whole logic. Therefore my trigger-body contains, prepare input parameters, invoke my flow, do some post processing, give user feedback, and error handling, as follows:
// Pre-Processing
UpdateContext({lMessage: "Prepare parameters Flow"});
UpdateContext({lDelayInSeconds: lValue});

// Processing
UpdateContext({lMessage: "Starting the flow with " & lDelayInSeconds & " sec. delay..."});
UpdateContext({lResult: '01-Demo-Wait'.Run(lDelayInSeconds).result });

// Error Handling
UpdateContext({lSuccess: IsBlankOrError(lResult)});
If(Not(lSuccess), Notify("Flow Execution Error", NotificationType.Error));

// Post-Processing (only on success)
If(lSuccess,
   UpdateContext({lMessage: "Flow done: " & lResult}),
   UpdateContext({lMessage: "Flow failed."}) );
This means, my execution code is now well structured and in one place. Furthermore I can maintain changes of the behavior easily.
Some Cleanup…
Well, I have added a Toggle Control and centralized my code. This is perfect for development.
On the other hand the added control is totally useless for my users of my PowerApp. In short, I need to hide my Toggle Control.
For debugging I prefer to switch the visibility of such “Centralized Trigger Controls” on and off by a global variable like “mShowTrigger”:

My PowerApp App-Trigger “OnStart” sets the initial value of my global variable “mShowTrigger”:
Set(mShowTrigger, true);
Every time I manually run the “OnStart” App-Trigger from popup menu, I reassign the value as defined:
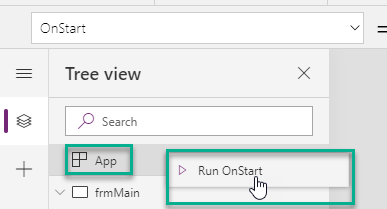
As a result, I can centrally switch the visibility of my “Trigger Controls” on and off.
Conclusion
I have showed you my example how I structure and centralize my execution code. This means: Avoiding unnecessary code-copies in PowerApps is possible!
There are good reasons why this make sense. First of all, I know where my code is. Second, I “hopefully” only have to change 1 line of code instead of many if something is wrong. Finally, using such a pattern in complex PowerApps greatly improves the readability and maintainability of my code.
In my opinion, such patterns greatly improve the quality of your PowerApps.
What do you think? … Do you use such patterns, tricks, or do you know a better way? Add your comments and/or share your examples!