
Databricks Service Principal in Power Automate
In the previous post, I built a Power Automate flow that uploads a document into a Databricks volume. It works. But it runs on my personal access token, and I called that a shortcut right away. Time to fix that with a Databricks service principal in Power Automate.
Why does that matter? The token belongs to my user account. It expires. And if my access changes, the flow breaks. That’s fine for a demo. However, it’s not fine for a flow that should run unattended.
A service principal is a dedicated identity just for this flow, with its own secret and only the permissions it needs. I create the service principal in Databricks, give it access to the volume, and teach the flow to fetch its own access token before every upload.
The good news: the upload itself stays untouched. Only the authentication changes.
Why Use a Databricks Service Principal
A personal access token is simple. You click a button, copy a string, and you’re done. A service principal takes a few more steps, so what do you get for the extra work?
First, ownership. A service principal is not a person. It has its own name, for example Dataverse-Expenses, and nobody has to leave the company for it to keep working. Then there’s blast radius. If the secret leaks, an attacker gets only what that one identity can do. In contrast, a leaked personal token carries everything I can do. And finally, auditability. When something lands in the volume, you know it was the flow and not me.
Now, how does a flow prove who it is? Databricks uses OAuth machine-to-machine authentication, and it works like this:
1. The flow sends the service principal’s client ID and client secret to the token endpoint of the workspace. 2. Databricks answers with a short-lived access token. It’s valid for one hour. 3. The flow sends that token as a Bearer header with every API call.
That’s it. Your flow asks for a fresh token on every run, so there’s nothing to store and nothing to refresh.
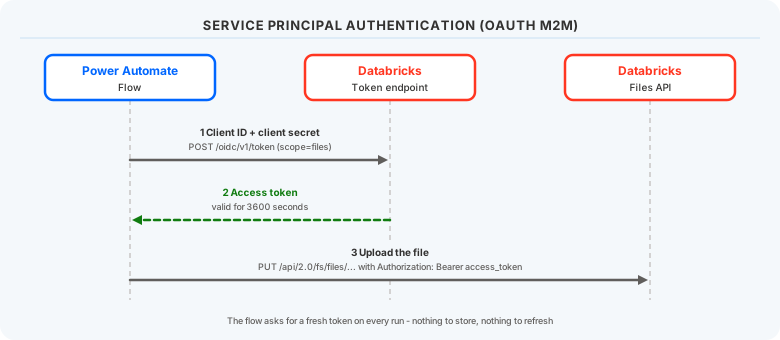
Databricks distinguishes between account-level tokens, which are for account APIs, and workspace-level tokens, which only work inside a single workspace. Uploading a file is a workspace call, so we use the workspace-level token. The Databricks documentation describes both.
One more thing: access is layered. The token carries a scope, which says which APIs it may call. We will request only files. Separately, Unity Catalog decides what the service principal may touch. Both must say yes. Miss one, and the upload fails.
First stop: creating the service principal.
Creating the Databricks Service Principal for Power Automate
I’m creating the identity in Databricks Free Edition, where I’m the workspace admin and there is no separate account console. Everything happens right in the workspace settings.
Adding the Databricks Service Principal
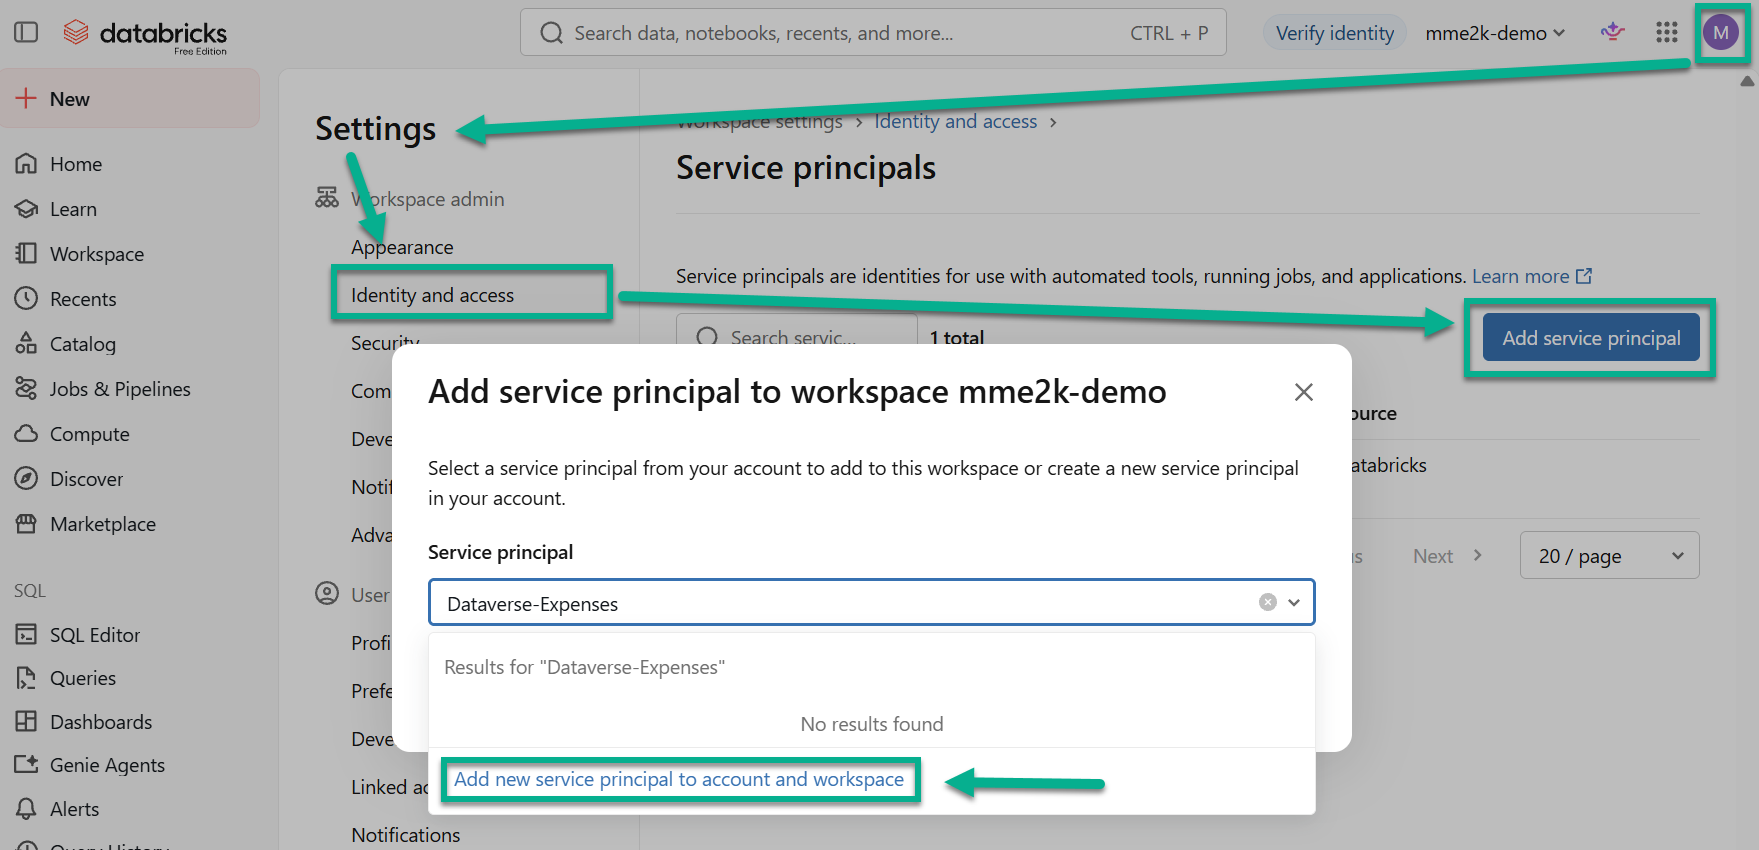
I click my avatar in the top right and open Settings. Under Workspace admin, I select Identity and access. Then I open Service principals and click Add service principal.
I type the name Dataverse-Expenses, because that’s the system calling Databricks. Since the name doesn’t exist yet, the dialog says “No results found”. That’s expected. I click Add new service principal to account and workspace.
Setting the Entitlements
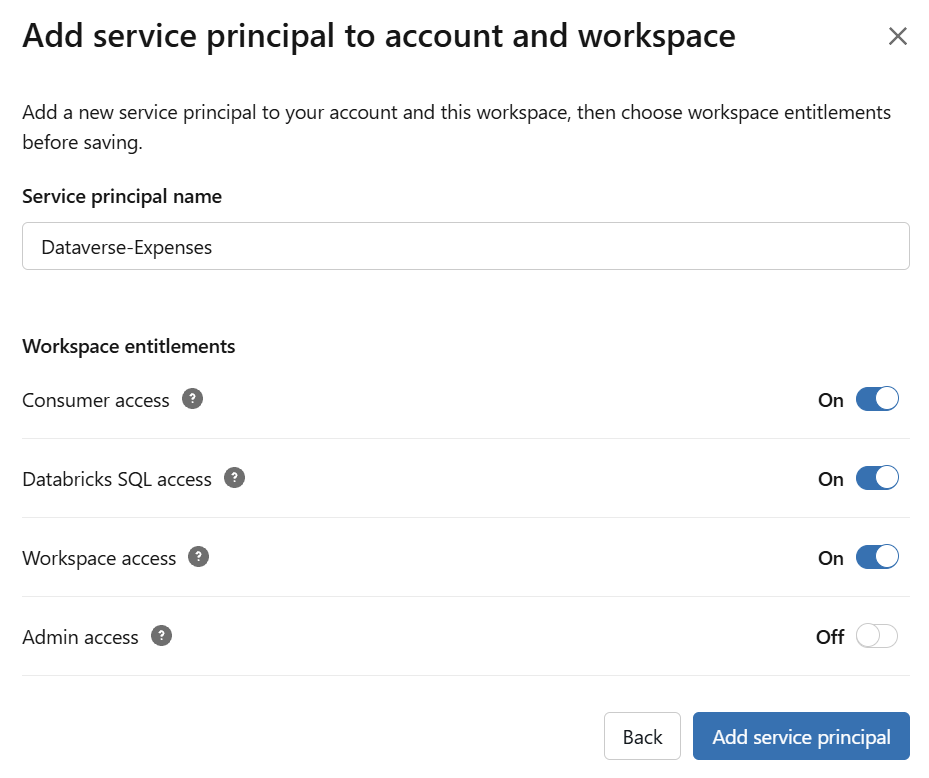
Next, Databricks asks for the workspace entitlements. I keep Admin access off. Our flow uploads files. It has no business managing the workspace. Then I click Add service principal.
Generating the OAuth Secret
I open the new service principal and switch to the Secrets tab. Then I click Generate secret.
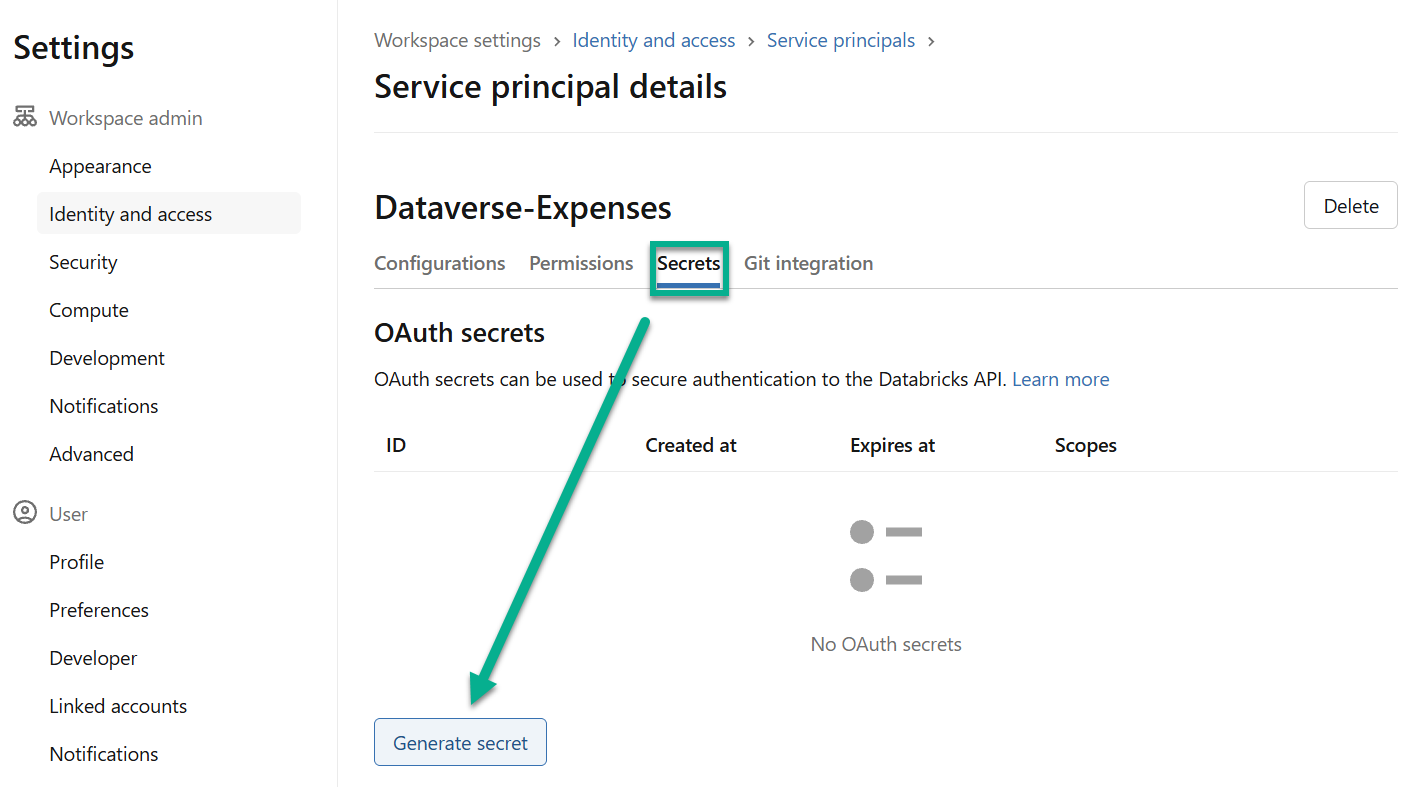
Now a few choices matter. First, the lifetime. I picked 90 days for my demo. In a real setup, your company’s security requirements decide how long a secret may live. Second, the scope. I select Other APIs, click Add scope, and choose files. That’s the only API this flow needs, so that’s all it gets.
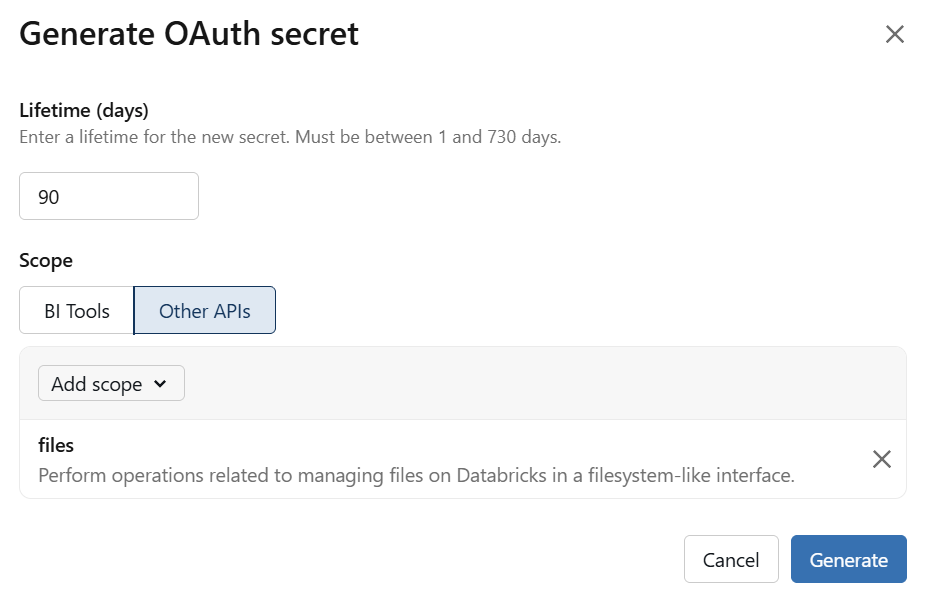
Finally, I click Generate. Databricks shows the client secret exactly once, so I copy it right away. If I lose it, I have to generate a new one.
Collecting the Client ID and Secret
The flow needs both the client secret I just copied and the client ID, which is the service principal’s Application ID. I find it on the Configurations tab of the same page.
A quick word on safety. Later in this post, I’ll paste both values directly into the flow to keep things simple. In production, store them in Azure Key Vault and reference them through an environment variable of type secret. We’ll come back to that.
The service principal is ready, but it can’t touch a single file yet.
Granting the Service Principal Access to the Volume
A brand-new service principal can do nothing, except authenticate. It has an identity and a secret, but Unity Catalog hasn’t granted it access to anything yet. That’s by design, and it’s exactly what we want.
Remember the layers from earlier? The files scope on the secret says which API the token may call. Now we tell Unity Catalog which volume the service principal may use.
Granting Access on the Volume
In Databricks, I open Catalog and navigate to the volume from the previous posts: expense_management, then bronze, then dropzone. I open the Permissions tab and click Grant.
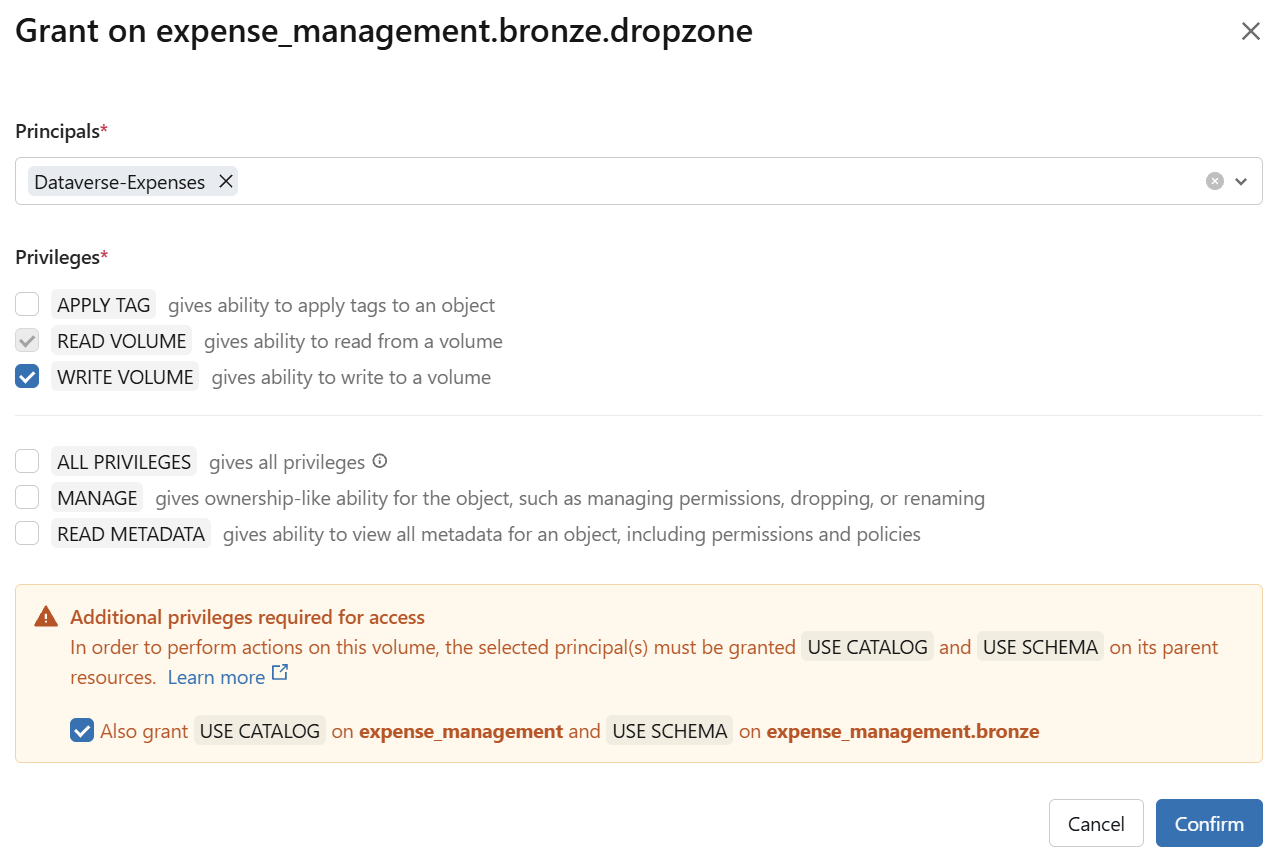
As principal, I select my service principal, Dataverse-Expenses. Under privileges, I tick WRITE VOLUME. Databricks automatically includes READ VOLUME, so the flow can write files and read them back.
Don’t Skip the Parents
Look at the orange box in the dialog. To work with a volume, a principal also needs USE CATALOG on the catalog and USE SCHEMA on the schema. Without them, the upload fails, even though the volume grant looks right.
I leave the checkbox Also grant USE CATALOG and USE SCHEMA ticked and click Confirm.
Notice what I did not select: ALL PRIVILEGES and MANAGE. The flow uploads files into a single volume. It does not need to rename it, drop it, or hand out permissions to others. Least privilege again.
Identity, secret, permissions: all set on the Databricks side. Now we switch to Power Automate.
Using the Databricks Service Principal in Power Automate
Now the flow from the previous post needs a change. New actions request the token, and the upload action learns to use it. The file path and the upload body stay exactly as they were.
Getting the Databricks Token in Power Automate
I’m adding an HTTP action after the file path step and naming it HTTP | Get Token. This is the call from the Databricks documentation, translated into Power Automate.
The URI is the workspace host from the earlier Parse JSON step, followed by /oidc/v1/token. The method is POST. I add the header Content-Type with the value application/x-www-form-urlencoded. The body is a plain form string:
grant_type=client_credentials&scope=filesNow the credentials. I open Advanced parameters, add Authentication, and choose the type Basic. The username is the client ID, the password is the client secret. Power Automate turns that into the Basic authentication header Databricks expects.
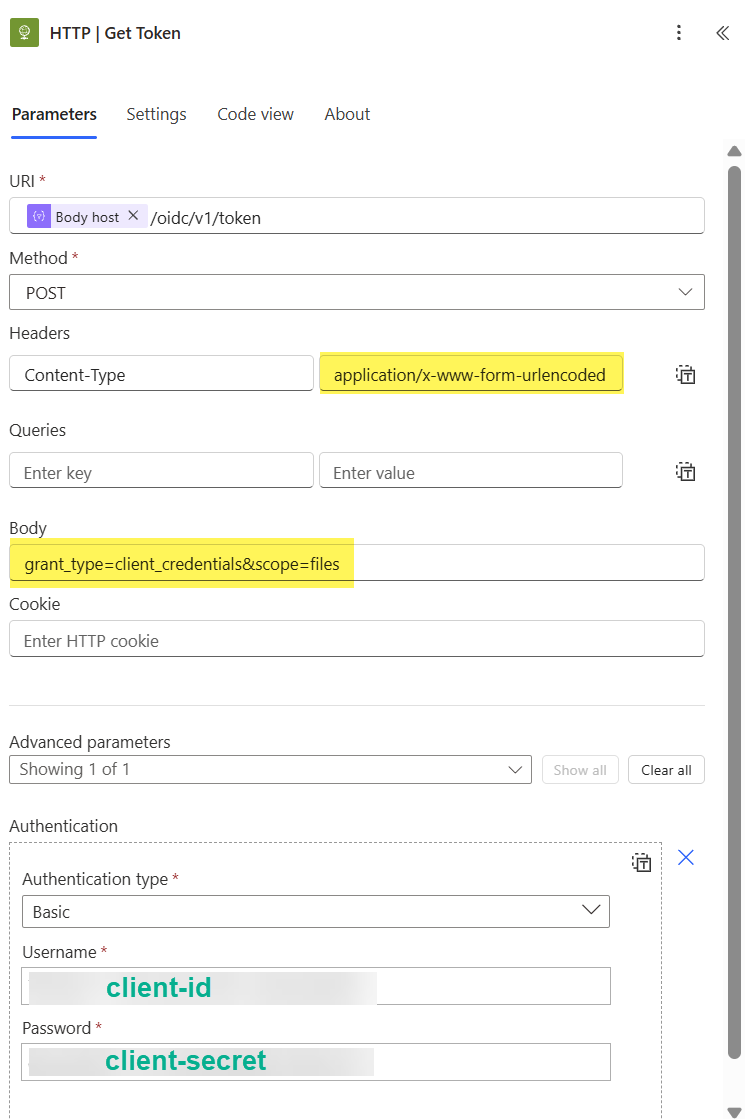
For simplicity, I typed both values straight into the action. That’s fine for a walkthrough. In production, store them in Azure Key Vault and reference them through an environment variable of type secret, because anyone who can edit the flow can read these values.
Parsing the Result
Databricks answers with a small JSON document. I add a Parse JSON action named Parse JSON | Bearer Token. I use the Body of the token call as content, and this schema:
{
  "type": "object",
  "properties": {
    "access_token": { "type": "string" },
    "token_type": { "type": "string" },
    "expires_in": { "type": "integer" }
  }
}
And here is the action:
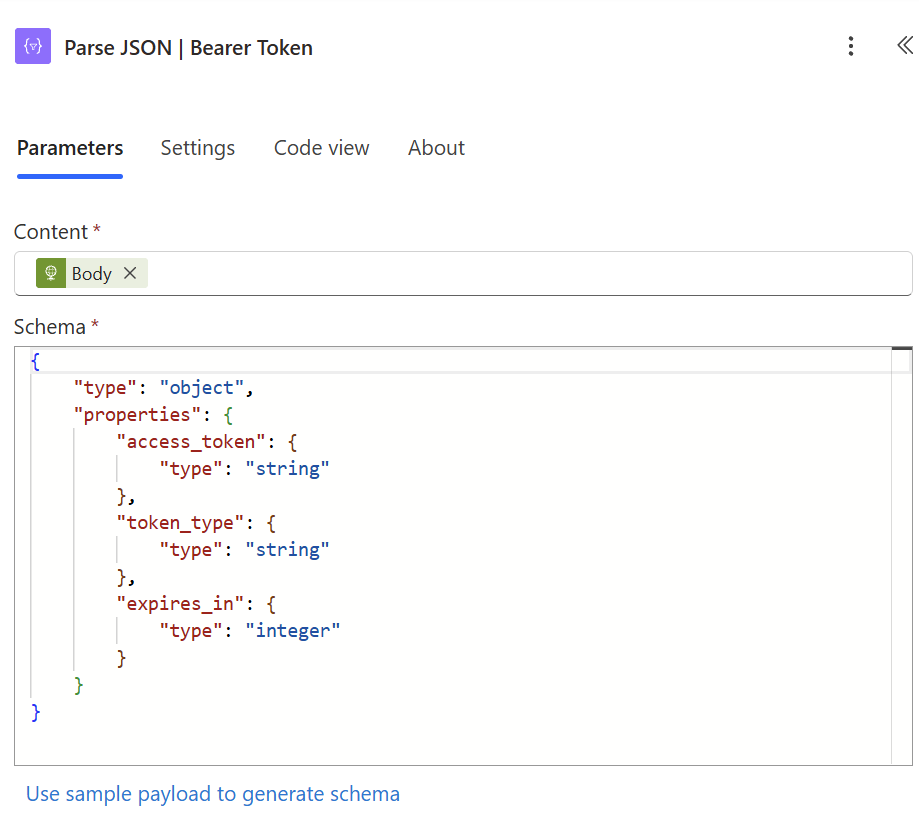
The token is valid for an hour. A flow run is much shorter, so you request a fresh token on every run and never worry about expiry.
Using the Bearer Token
Last, I open HTTP | Upload File. In the previous post, the Authorization header held my personal access token. I replace it with the word Bearer, a space, and the access_token from the Parse JSON step.
Apart from that, the rest stays as it was: the PUT method, the Files API URI with ?overwrite=true, the application/octet-stream content type, and the base64ToBinary body.
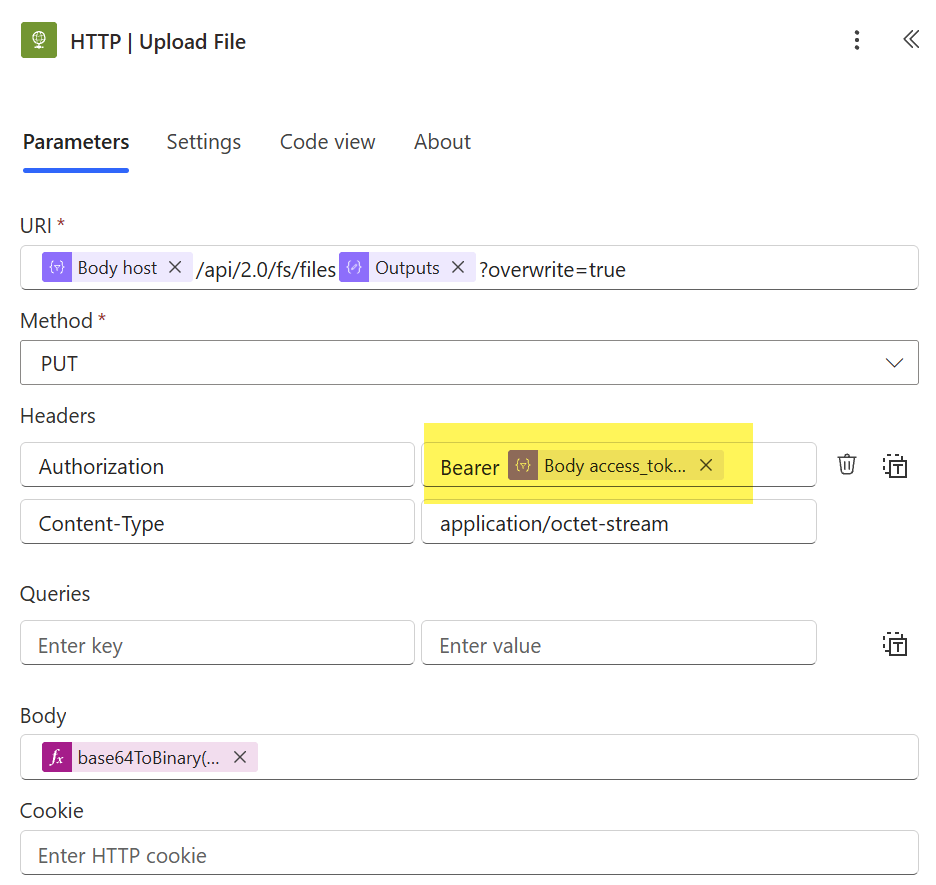
That’s the whole change.
The Moment of Truth
Same question as last time: does it run?
I triggered the flow and watched the run history. Parse JSON, file path, and then the first new action. HTTP | Get Token finished almost instantly and turned green. The Parse JSON step for the token followed right behind. Then HTTP | Upload File went green too.
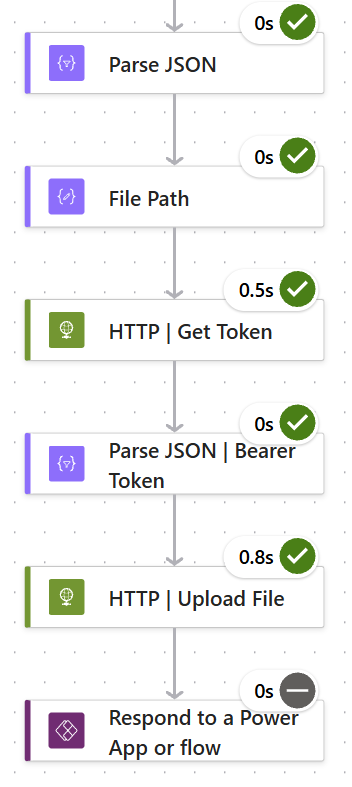
The green upload step is the real proof. Databricks accepted the access token and allowed the write, so the files scope and the Unity Catalog grant both said yes. The price for all this security? An extra call for the token.
There’s no personal access token anywhere. The flow stands on its own now.
Summary
This time I showed you that a borrowed identity doesn’t belong in an unattended flow. The flow now has its own: a service principal called Dataverse-Expenses, an OAuth secret limited to the files scope, and write access to exactly one volume. Before every upload, the flow asks Databricks for a fresh access token and sends it as a Bearer header. Everything else stayed exactly as it was.
For simplicity, I added the client ID and client secret directly in the flow. In production, I recommend you store them in Azure Key Vault and reference them through an environment variable of type secret. Also agree on a secret lifetime with your security team and plan the rotation, because the flow stops when the secret expires. And keep granting only what the flow needs, nothing more.
Now my file upload is solid. New files land in dropzone, authenticated the right way. That leaves the interesting part. In my spec-driven development series, I extract data from receipts and invoices and write the results back to Dataverse through the Agent Task automation. In one of my next posts, Databricks does that work: analyzing the file that just landed, and feeding the result back the same way. So stay tuned.