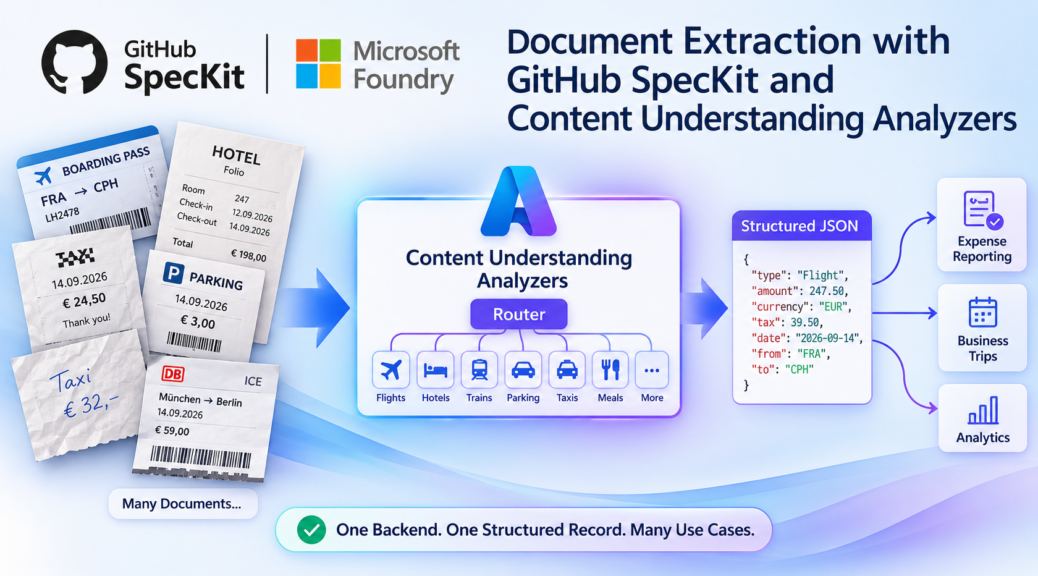
Document Extraction with GitHub SpecKit and Content Understanding Analyzers
My expense documents are usually airline receipts, hotel folios, parking tickets, a handwritten taxi slip. Some are PDFs, some are phone photos, and they come in German, English, Danish, Polish, or wherever I received them. Now imagine one backend that reads all of them and returns the same clean expense record every time. That is exactly what Content Understanding analyzers in Microsoft Foundry can do. And this time, I did not code them from scratch.
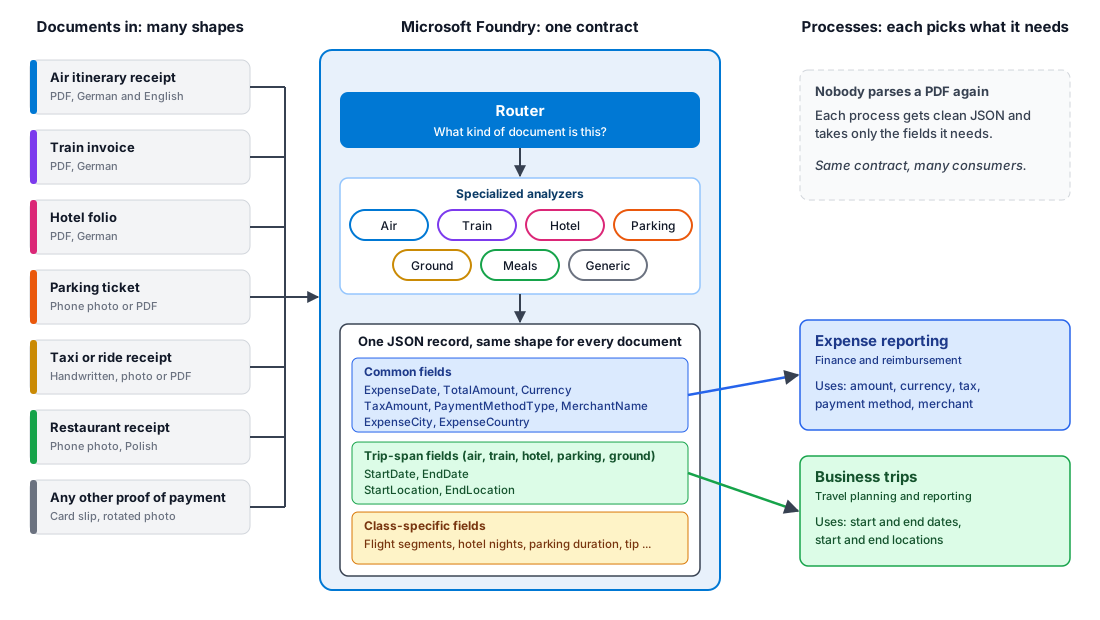
Look at the picture. Documents of many shapes go in, one consistent JSON record comes out. Then each process takes only what it needs. Expense reporting reads amount, currency and tax. Business trips read dates and locations.
Instead of code, I wrote a spec. GitHub SpecKit turned my idea into a plan and tasks. GitHub Copilot built the analyzers, deployed them and checked the results against my real example documents. My job was to describe the outcome, answer the clarifying questions and review what came back.
If you followed the series, you already know extraction as a task. In the Agent Task contract, Analyze Document is one clear job. The document goes into the input JSON. The extraction result comes back in the result JSON. Power Platform does not care what happens in between.
That is the beauty of it. A structured output is easy to consume. A Power App, a Dataverse table or a Power Automate flow simply picks the fields it needs. Now let’s build what hides behind that task.
No AI background needed. Ready? Let’s start with the spec.
Specify with Examples
Every spec starts with a prompt. Mine did not mention Azure resources or code. This is because I already deployed the Azure foundation with Copilot and SpecKit in my previous post. So the prompt could focus on what I want to get out of my documents.
Describe the Content Understanding analyzers with /speckit-specify
I started with /speckit-specify and briefed Copilot like a colleague. I described what I expect: analyzers per expense type, one common set of fields, and a router in front. But I did not stop there. I also gave Copilot hints to do its homework during the specification. One is the Microsoft Learn documentation URL, so it understands what Content Understanding can do today. The other is a folder with my documents, so it sees what the analyzers must deal with.
In other words, the spec should not only capture what I want. It should also reflect what is possible and what is needed.
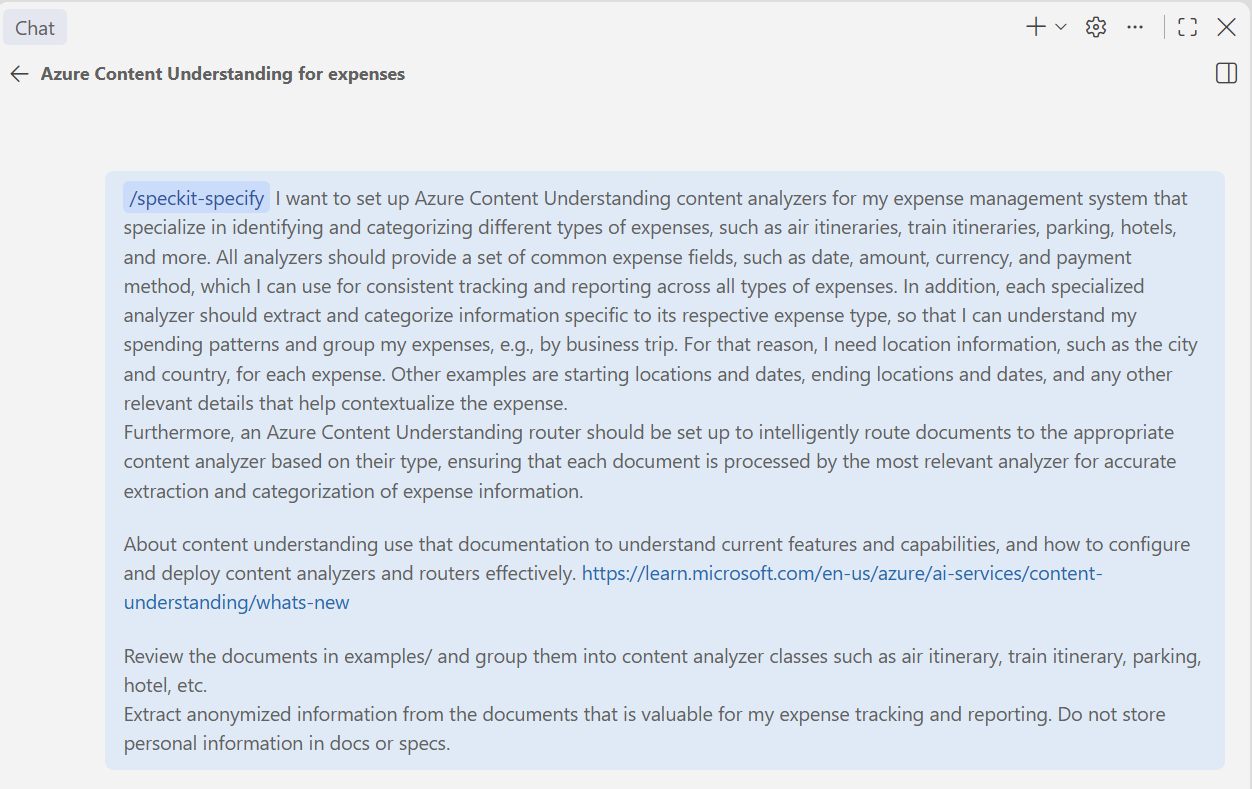
Notice what is missing. No resource names, no region, no deployment steps. This spec only talks about what to extract. The how and where were already defined in spec 001, the Azure foundation.
Give Copilot real documents
The folder hint made the biggest difference. My temporary examples/ folder held real documents. PDFs, phone photos, German, English, Polish, whatever I could find. Copilot reviewed all of them and grouped them into seven document classes.
Important: I did not pick one kind of document. I collected a broad spectrum, because that is what I expect in real life. Flights, trains, hotels, parking, taxis, meals. If the analyzers only know one clean receipt type, they fail on the first messy one.
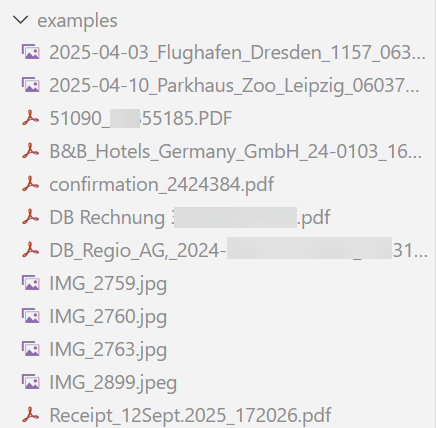
The spec came back with the classes, the router rules and the common and trip fields. Two of the taxi documents even turned out to be photos of the same receipt. Real life is messy, and that is exactly why I wanted real examples. The spec describes what my documents look like, not what I guessed they look like.
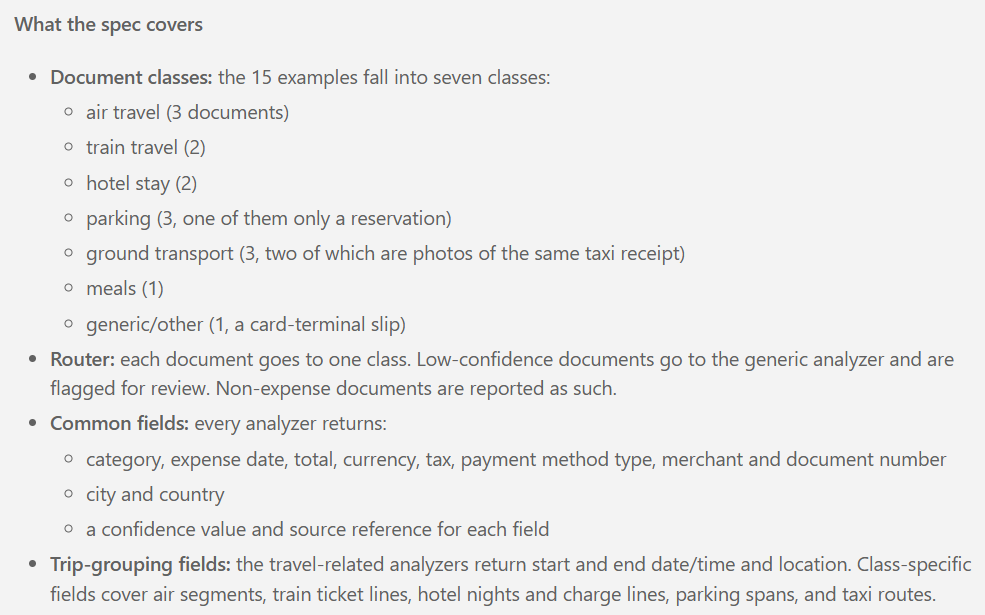
My examples are real, but the spec is not. It contains only anonymized observations, no names, no booking numbers.
Answer the clarifying questions with /speckit-clarify
Next, as usual in the workflow came /speckit-clarify. Copilot asked up to five questions and recommended an answer for each. Most were quick. Which date counts for a hotel stay? The invoice date. How many documents per month? Roughly 10 to 100, so no high-throughput design is needed.
The privacy question mattered most. Should the result include the traveller or cardholder name printed on a document? Copilot recommended never returning names. That follows data minimisation, and the system knows the submitter anyway. I agreed.
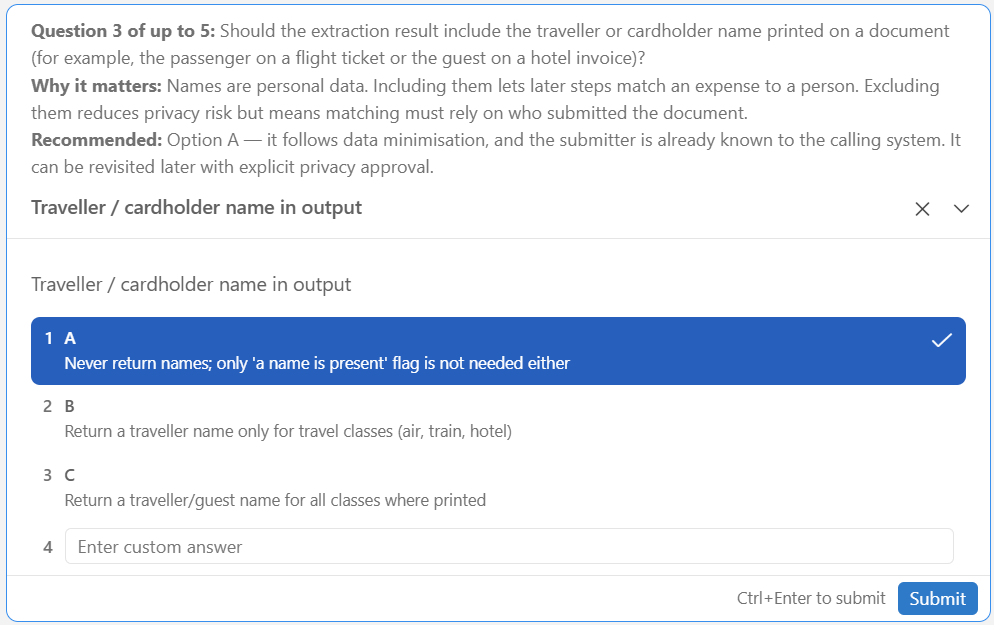
After answering the clarifying questions, the spec was sharp enough to plan against. But what does a plan for analyzers actually look like? Let’s find out.
Plan the Content Understanding Analyzers and Router
With a clear spec, /speckit-plan came next. I gave Copilot only one direction: use the latest preview API that supports routers, and generate the schemas first. Then deploy. Everything else came from the spec, the documentation and my examples.
One shared core, seven extensions
The plan for the Content Understanding analyzers is simple. Every analyzer includes the same common fields: date, amount, currency, tax, payment method, merchant, city and country. On top of that, each class adds its own extension. Air gets flight segments. Hotel gets nights and charges. Parking gets duration. Taxi gets tip and distance.
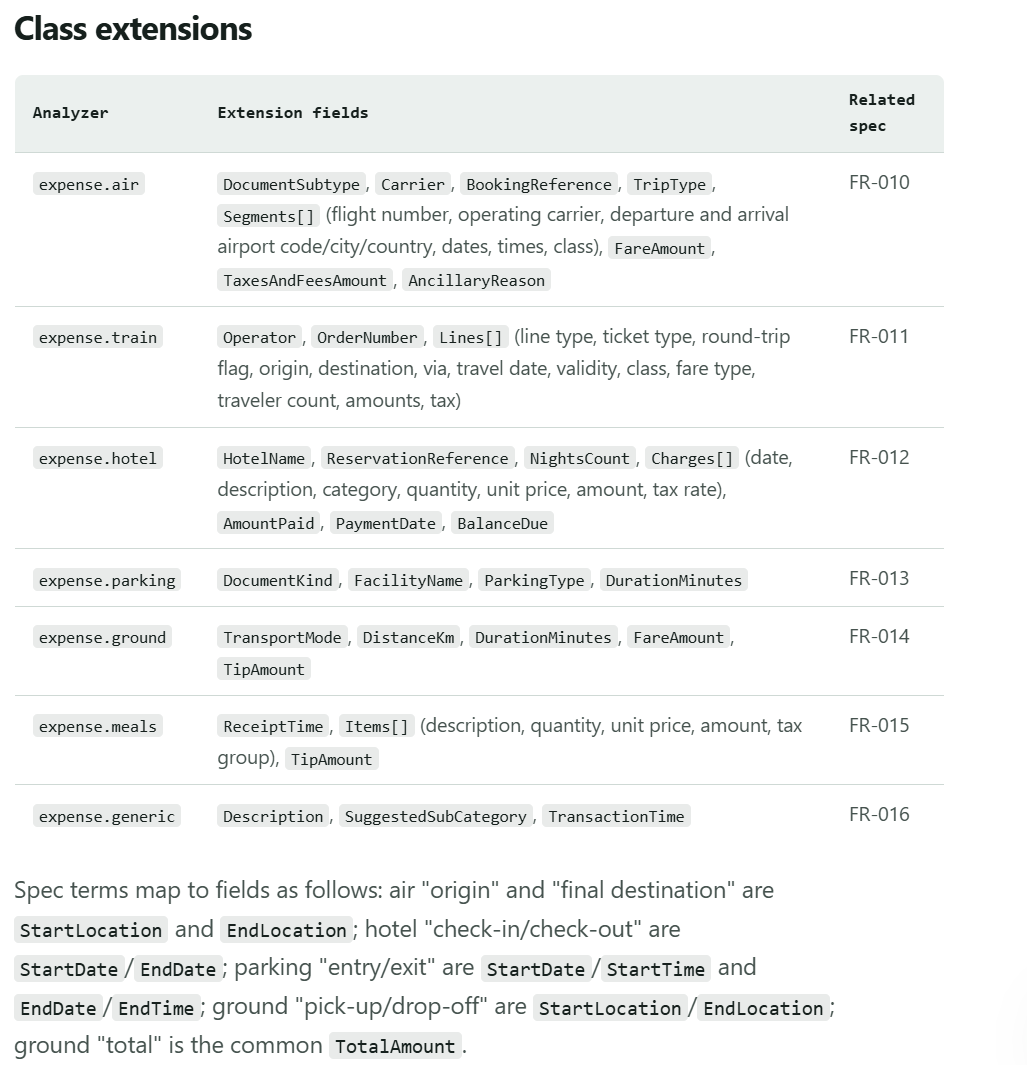
Why does this matter? Because anything that consumes the result can rely on the common part. It does not matter whether a record came from a hotel folio or a taxi slip. Date and amount are always in the same place.
Who reads which document? Meet the router
Now someone has to decide which analyzer reads which document. Think of a clerk in a mailroom. Every envelope lands on the desk, and the clerk sorts it into the right tray.
That clerk is the router. In Content Understanding, it is a classifier analyzer with a list of categories. Each category has a name, a description and a linked analyzer. The description is the classification prompt, so I treat those texts as part of the design. Documents that are not expenses go to the other category, and no record is produced. The classification documentation explains the details.
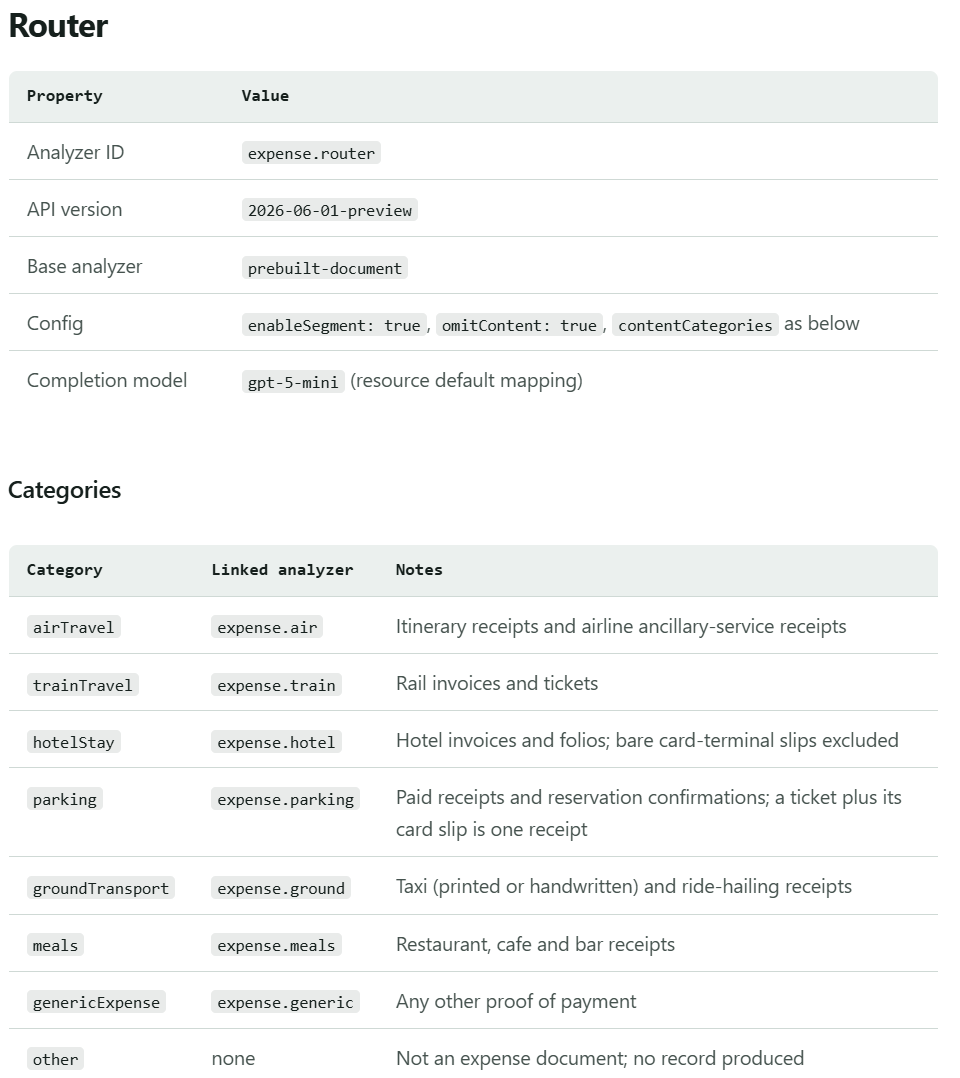
There is also a safety net. If the router is not confident enough, the document goes to the generic analyzer and is flagged for review. Nothing gets dropped, and nothing gets invented.
Contracts before code
Copilot did not start with code. Instead, the plan produced contracts: one for the fields, one for the router and one for the evaluation. They sit next to the spec as plain Markdown. Therefore, you can read, review and change them before a single line of code exists.
SpecKit also checked the plan against my project constitution. Consumption pricing only, no keys, deployment through the pipeline. Passed, with two small notes.
The plan ends with four steps: schemas, build, deploy, evaluate. But will it actually work with my 15 documents? Time to find out.
Implement and Evaluate
Time for the part I enjoy most. I ran /speckit-implement and watched.
Let Copilot build, deploy and test
Copilot did not just write files. It generated the schemas, deployed the analyzers and the router to my DEV environment, and then ran my 15 documents through them. Real documents, real calls, real results. At the time of the screenshot below, 51 files had changed.
Then it hit a wall. The evaluation was slow, and parallel runs failed. Copilot dug into it and found the cause: the model capacity. In my foundation post, I admitted that my model quota is tiny. Here is where it bit me. With a capacity of 10, back-to-back documents took 50 to 100 seconds.
Copilot raised the capacity to 100 on DEV. The model is pay-per-use, so there are no idle costs. It reran the evaluation, one document after the other.
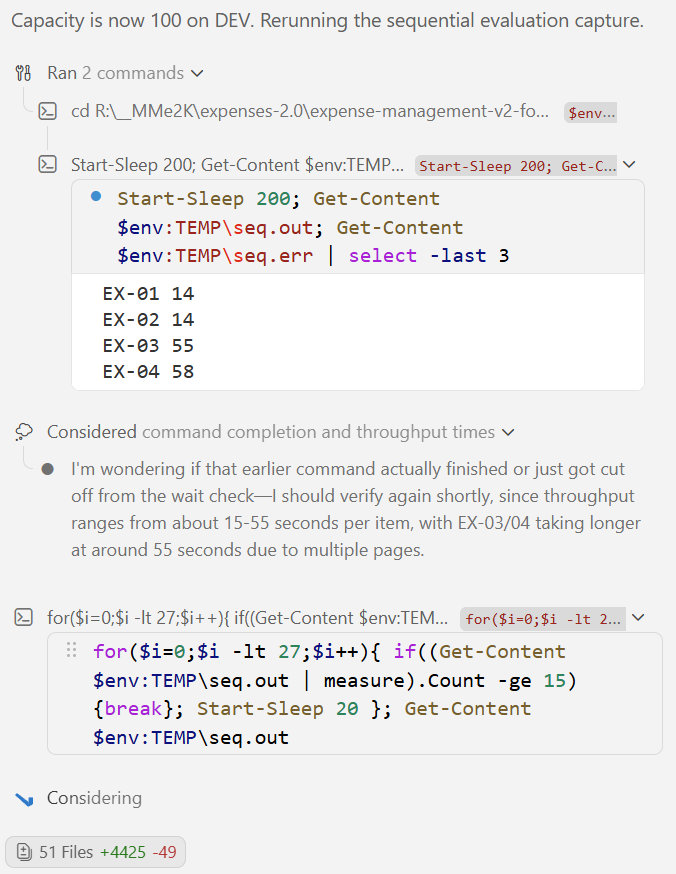
I like this part. Nothing to debug on my side: I watched the agent notice, explain, fix and verify.
Does it work? The completion report
Then came the report. Every metric met or beat its target.
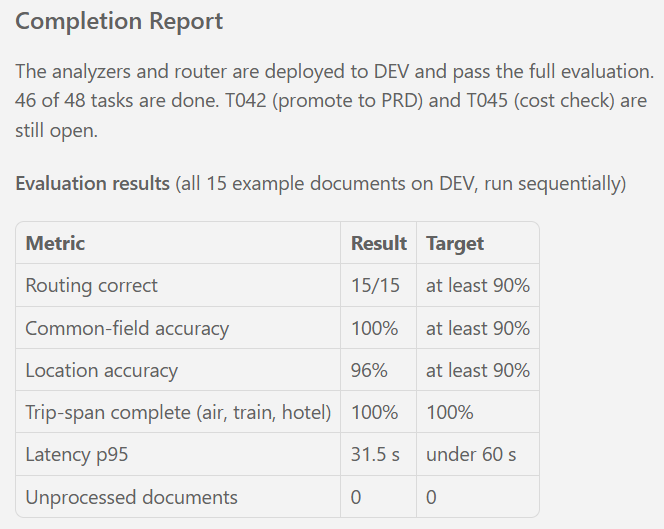
All 15 documents went to the right analyzer. The common fields were 100% correct. Locations reached 96%. And 95% of the documents finished within 31.5 seconds, well below the 60-second target. DEV is done. PRD follows through the pipeline.
Of course, 15 documents are a small test. However, they are my real documents, and the targets were part of the spec from the start. That is the difference between “looks good” and “measurably works”.
What got generated
Let’s peek into the repo. One schema file per document class, plus two shared building blocks: the common fields and the trip-span fields. The router definition sits next to them.
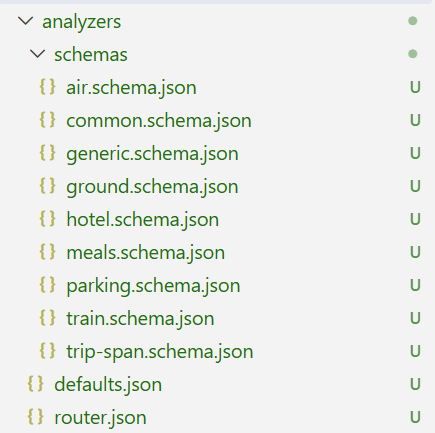
Each class schema simply says which building blocks it includes and which extra fields it adds.
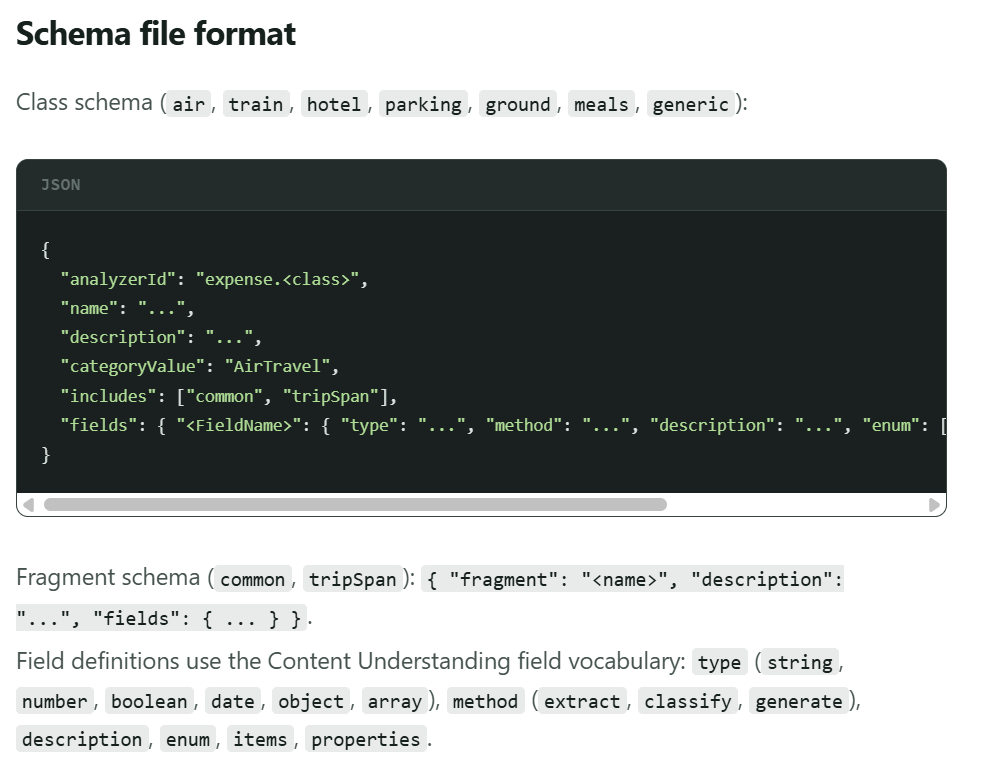
A small build step composes these files into the final analyzers. You can read, review and version every single one, like any other code. So what actually landed in Foundry?
Deployed Content Understanding Analyzers
What is in Foundry now
Time to leave the repo and look at the result in Foundry. I opened Content Understanding Studio, switched to the analyzer list and selected my DEV resource.
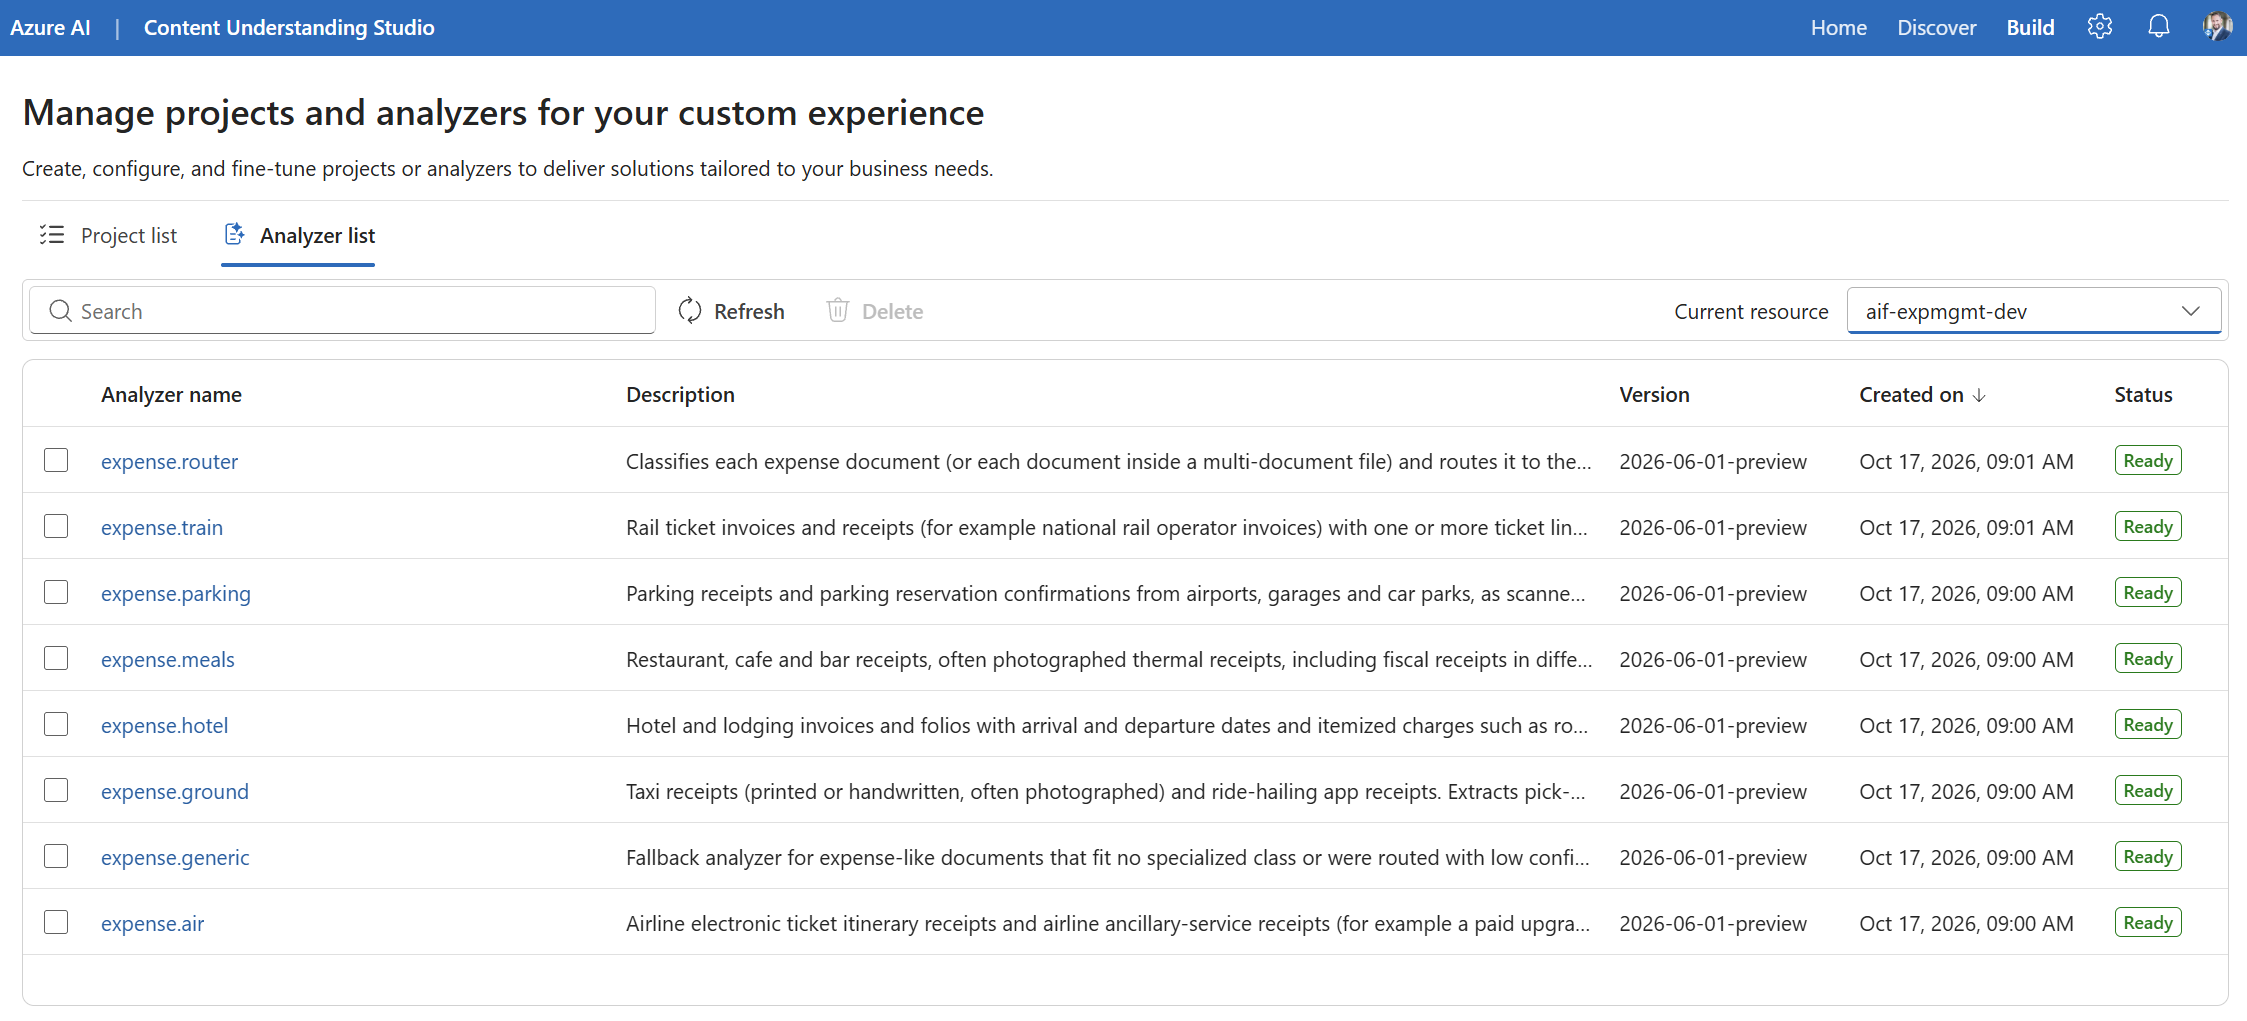
There they are, my Content Understanding analyzers: air, train, hotel, parking, ground, meals and generic, plus expense.router in front. All Ready, all on the same preview version, all created within a minute.
I did not click any of this together in the Studio. Copilot created every analyzer from the schema files in the repo, and the Studio is only my window to check the outcome. What I see here is what I reviewed in the spec and the plan. I opened two of them: the air analyzer and the router.
The air analyzer
Air travel is the most interesting document class, so I started there. The Analyzer details tab of expense.air shows the schema.
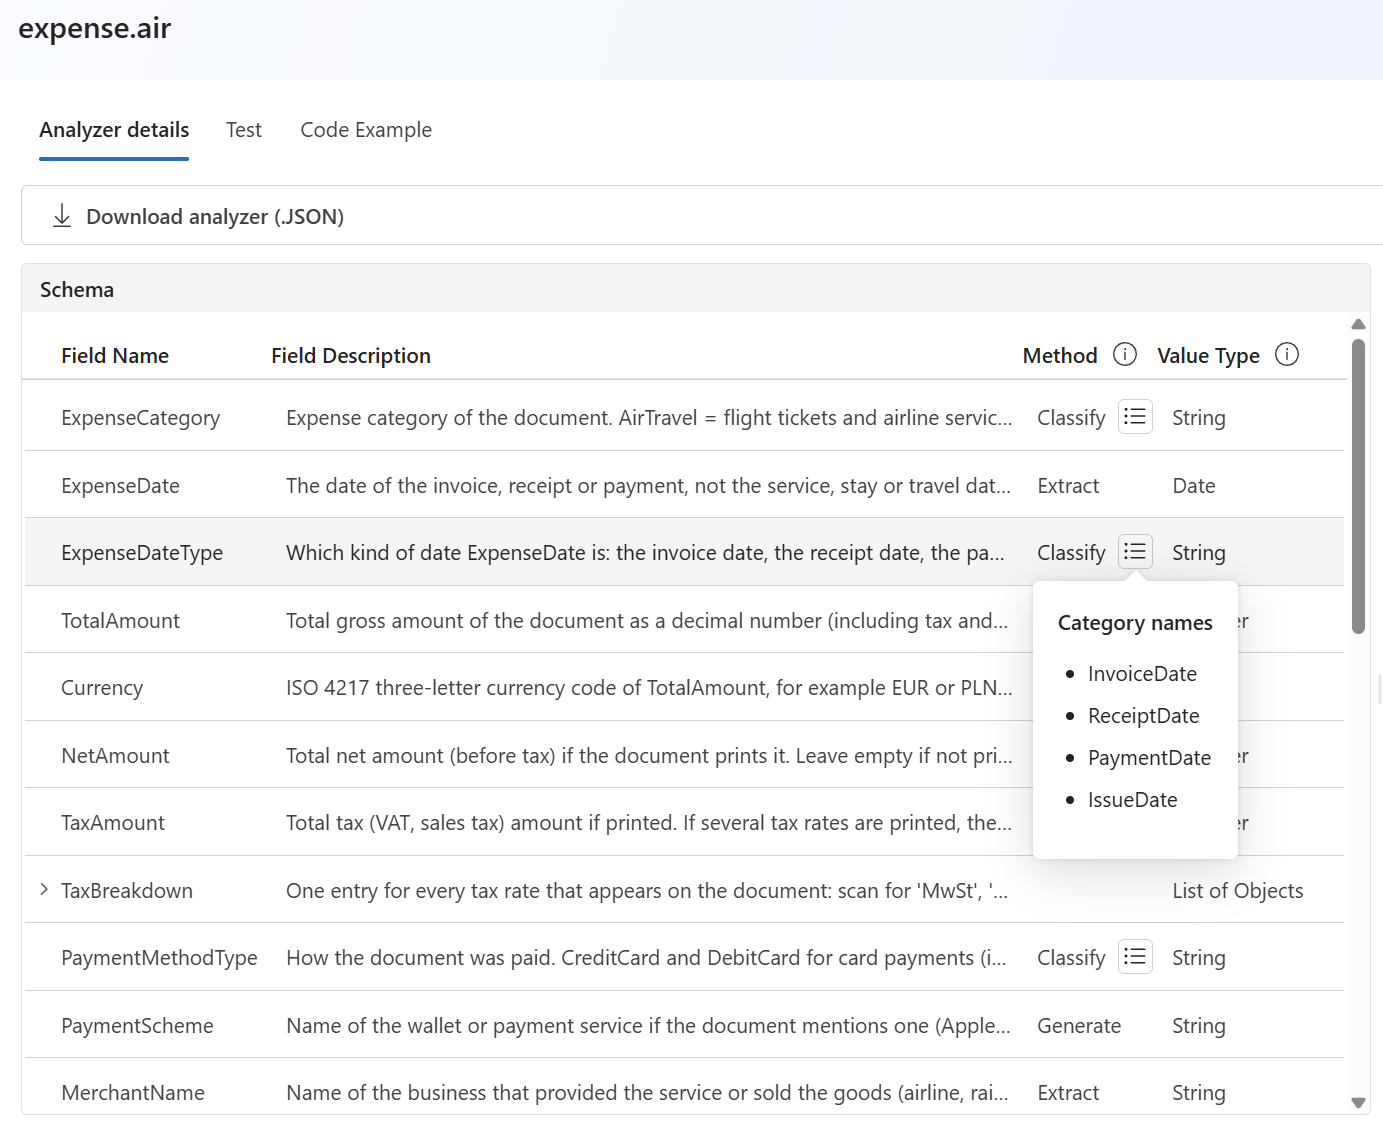
The first rows are the common fields from the plan: category, date, total amount, currency, net and tax amount, payment method, merchant. Look at the Method column. Content Understanding knows three ways to fill a field:
– Extract reads the value as it is printed, like the merchant name. – Generate lets the model derive the value, like the name of a payment service. – Classify picks from a fixed list. ExpenseDateType is a nice example. The date on a receipt can be the invoice date, the receipt date, the payment date or the issue date, and the analyzer tells me which one it found.
This matters because an expense date is not always the date of the trip. The field description says so: the date of the invoice, receipt or payment, not the service or travel date. These descriptions are prompts, so every sentence counts.
#### Where does the trip start and end?
Business trips need to know where something started and where it ended. That sounds easy until you look at an itinerary with three flights.
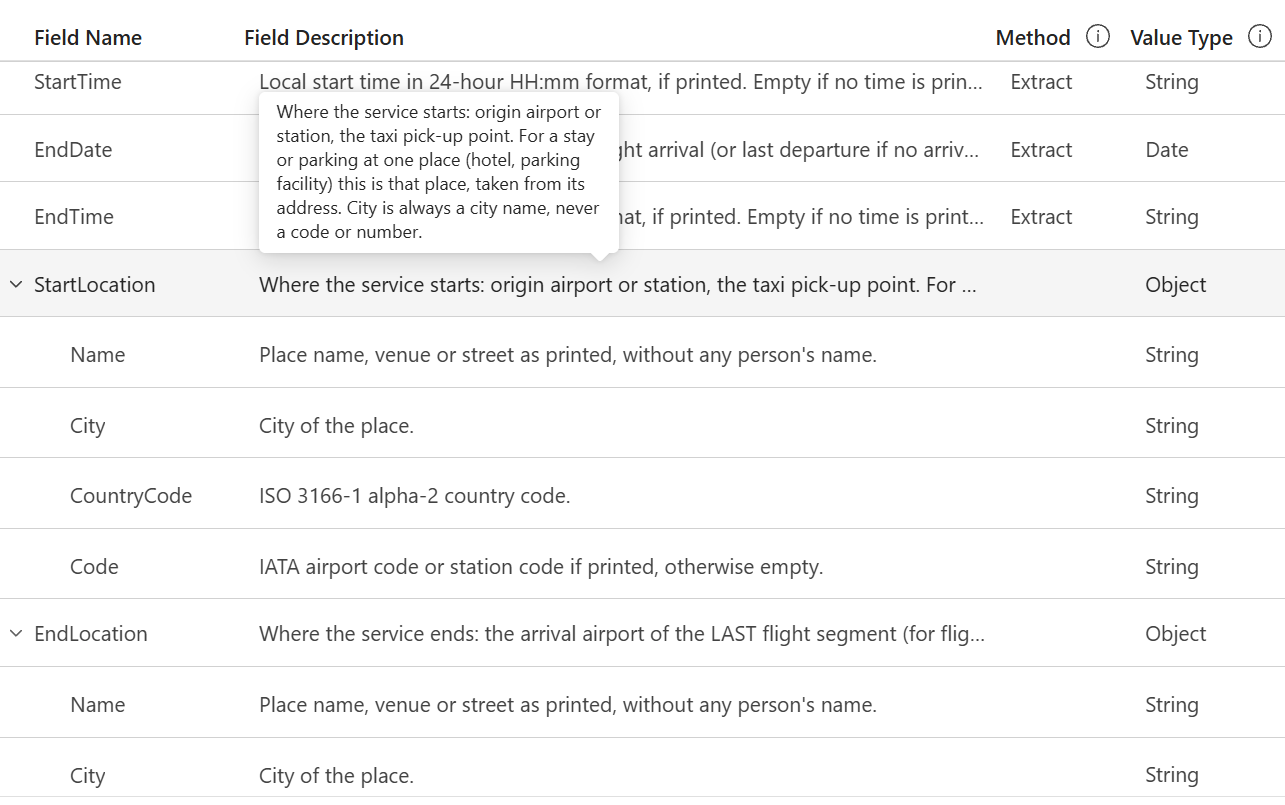
StartLocation and EndLocation are objects with name, city, country code and an airport or station code. And the descriptions hold the rules I would otherwise explain to a new colleague:
– The start is the origin airport. The end is the arrival airport of the last flight segment. – The same two fields work for a taxi (pick-up and drop-off) and for a hotel or a parking facility (the address of that one place). The business trip process does not need to know which class produced them. – City is always a city name, never a code or a number. The code has its own field. – The place name never contains a person’s name.
That last line is the privacy decision from the clarification step. I made it once in the spec, and now it sits in every location field. Nobody has to remember it later.
The router analyzer
Now the clerk from the mailroom. expense.router shows its Routing Rules in the Studio.
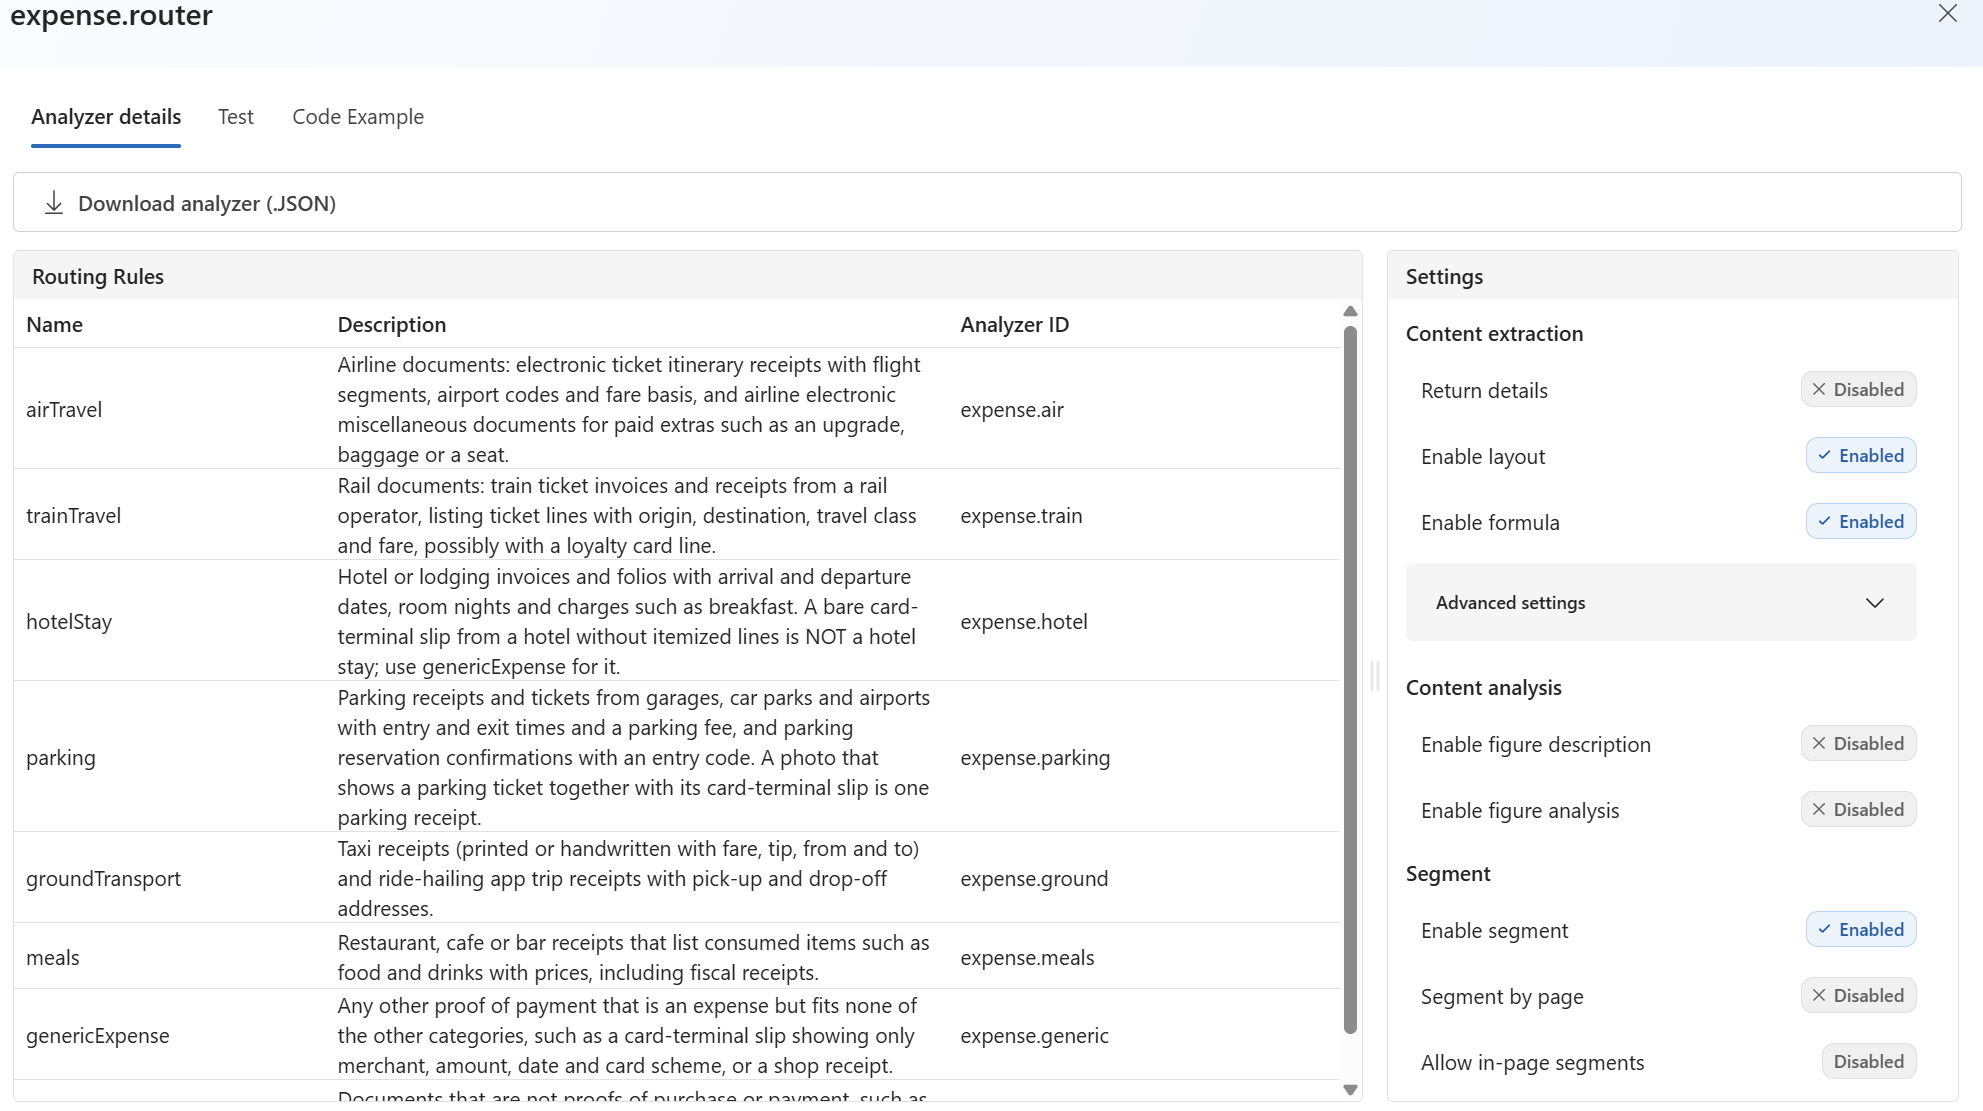
Each row is one category: a name, a description and the analyzer behind it. airTravel goes to expense.air, trainTravel to expense.train and so on. The last rows are the generic expense and the other category for everything that is not an expense.
Read the descriptions closely. This is where the router makes its decision. Two of them show what I learned from my real documents:
– A bare card-terminal slip from a hotel is not a hotel stay. Without itemized lines, it belongs to the generic expense. – A photo that shows a parking ticket together with its card slip is one parking receipt, not two documents.
I did not write those sentences. They grew out of my examples and the clarification, and Copilot put them into the categories. If a document lands in the wrong tray, I do not debug code. I edit a sentence, redeploy and run the evaluation again.
The settings on the right show that segmenting is enabled. That lets the router treat each document inside a multi-document file separately, so a scan with a flight receipt and a hotel folio can result in two records.
That is the whole picture. A document comes in, the router reads the descriptions and picks the matching analyzer, and the analyzer returns one JSON record with the common fields plus its own extension.
Summary
I did not write a single analyzer myself. I described the outcome, gave Copilot my real documents, answered the clarifying questions and reviewed what came back. The spec knew my messy PDFs and phone photos, the privacy decision was made once and now sits in every location field, and the plan produced contracts I could read before any code existed. And because the targets were part of the spec from the start, “it works” was a measurable result: all 15 documents routed correctly, common fields at 100% and locations at 96%.
For Power Platform pros, the best part is the output. Whatever the document is, date, amount and currency are always in the same place. A Power App, a Dataverse table or a Power Automate flow simply takes the fields it needs. If you want to try it yourself, start with the Microsoft Learn docs for classification and segmentation and custom analyzers, and grab GitHub SpecKit.
The backend is ready, but nobody can use it yet. In the next post, I connect it to the Agent Task from my Agent Task contract post, so a document goes in and the result lands in Dataverse for my Power App – the refurbished Expense Manager. Stay tuned.
Thank you for reading!